

A Small Drip Can Become a Costly Disaster: What You Need to Know About Roof Leak Repair
The repair of a leaking roof is one of the most urgent home fixes you can face — and the longer you wait, the worse it gets.
Here’s a quick overview of how to stop a roof leak:
- Protect the inside first — place buckets, move valuables, and cover belongings with plastic sheeting
- Find the source — check your attic with a flashlight, tracing moisture trails uphill from the drip point
- Apply a temporary fix — use a roof tarp, roofing tape, or roofing cement to stop active water entry
- Make the permanent repair — replace damaged shingles, pipe boots, or reseal flashing depending on the cause
- Call a pro — if there’s structural damage, steep pitch, mold, or multiple leak points
A damp spot on your ceiling after a rainstorm might seem minor. But water is patient. Left unaddressed for even one season, a small leak can cause structural rot, mold growth within 24-48 hours, and insulation damage worth thousands of dollars — often 5 to 10 times the cost of fixing the original leak.
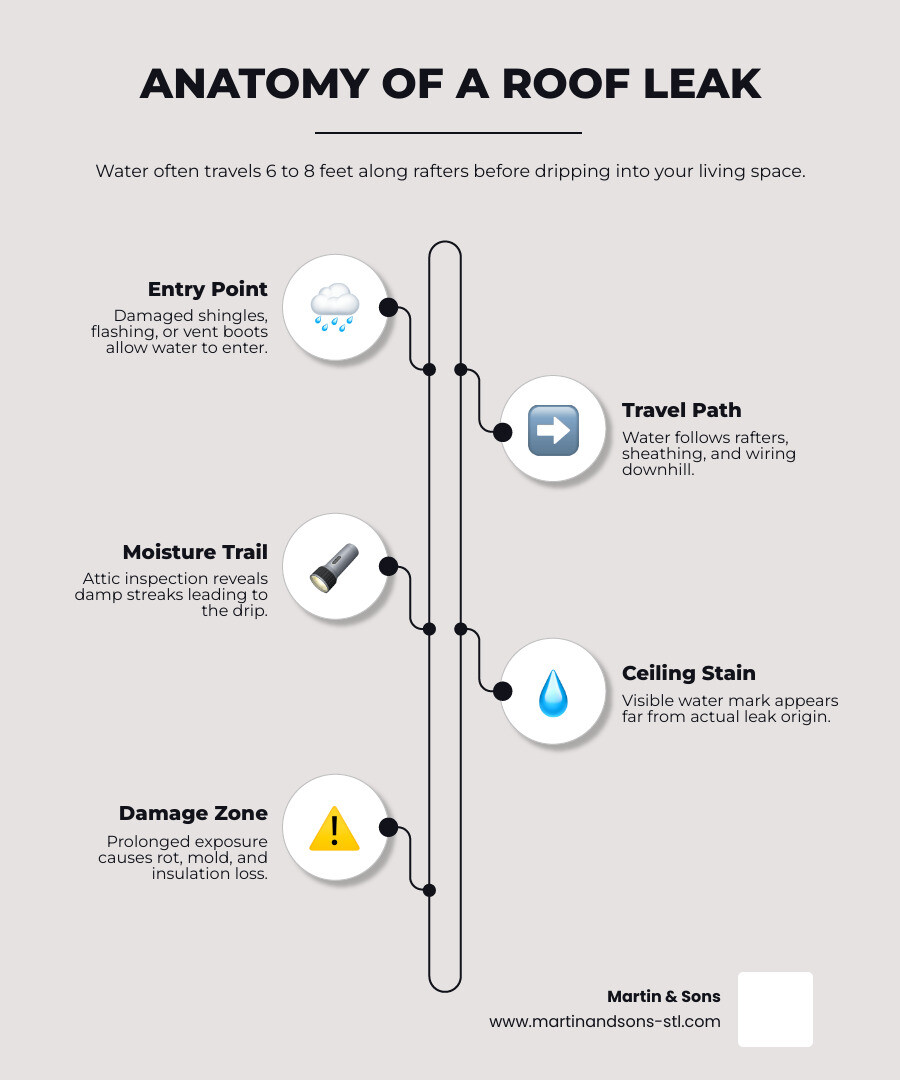
The tricky part? The visible stain on your ceiling is rarely where the water is actually entering. Water travels along rafters, sheathing, and wiring — sometimes 6 to 8 feet — before it drips down. That’s what makes finding the source harder than fixing it.
I’m John Martin of Martin & Sons, a family-owned roofing company serving St. Louis since 1953, and with over 35 years of personal experience in the repair of leaking roofs, I’ve seen a small drip turn into a $10,000 problem more times than I’d like to count. In this guide, I’ll walk you through exactly how to find, fix, and prevent roof leaks — step by step.
Common Causes of Roof Leaks in 2026
As we move through May 2026, we’ve seen quite a few spring storms roll through St. Louis and St. Peters. Understanding why your roof is failing is the first step toward a successful repair of leaking roof issues.

- Roof Age and Material Wear: Every roof has a limited lifespan. Asphalt shingles typically last 20–25 years. As they age, they lose granules, become brittle, and crack.
- Storm Damage (Wind and Hail): In Missouri, wind damage can begin at speeds as low as 50 mph. Wind lifts shingles and ruptures adhesive seals. Hail, on the other hand, acts like thousands of tiny hammers, denting shingles and exposing the delicate underlayment to UV rays.
- Flashing Failure: Flashing is the metal sheeting installed at joints and penetrations (like chimneys or dormers). Statistics show that flashing repairs fix 65% of roof leaks. About 30% of flashing failures are actually due to improper original installation.
- Vent Boots: These are the rubber seals around the pipes sticking out of your roof. They typically fail after 8–15 years due to UV exposure, long before the shingles themselves give up.
- Clogged Gutters: When gutters are full of leaves, water backs up under the roof edge, leading to rot in the fascia and roof deck.
- Ice Dams: Though more common in winter, the damage they cause—forcing water under shingles—often reveals itself as a persistent leak during spring rains.
- Attic Humidity: Sometimes, what looks like a leak is actually condensation from high attic humidity. Poor ventilation can cause moisture to collect on rafters and drip onto your ceiling.
Recognizing these issues early is vital. Be sure to check out these Signs of Roof Damage You Should Never Ignore to stay ahead of the curve.
How to Safely Locate the Source of a Leak
Finding the entry point is like being a detective. Because of gravity, the leak source is almost always higher than the visible drip.
The Attic Inspection
Wait for a rainy day (or right after) and head into the attic with a bright flashlight. Look for:
- Water Trails: Look for dark “tracking” marks or dampness on the rafters.
- Mould or Mildew: Even if it’s dry now, mold indicates a recurring leak.
- Shiners: These are nails that missed the rafter. In cold weather, they frost over and then “leak” as they melt, which can be mistaken for a roof hole.
The Garden Hose Test
If you can’t find the leak during a rainstorm, you’ll need a helper and a garden hose. Start at the lowest point of the roof and soak one area at a time for at least five minutes while your helper stays in the attic. Work your way up slowly. Important: Never use a pressure washer; it can force water under shingles and create “fake” leaks.
For more technical details on tracking water movement, you can refer to this Roof Leaks: diagnosis & repair guide.
Step-by-Step Guide for the Repair of Leaking Roof Issues
Before you grab your ladder, let’s look at the numbers. DIY repairs can save you $150 to $500 on service calls for minor fixes.
| Repair Type | DIY Material Cost | Professional Labor (Avg) |
|---|---|---|
| Pipe Boot Replacement | $15 – $25 | $150 – $350 |
| Shingle Replacement (Single) | $20 – $50 (Bundle) | $150 – $400 |
| Flashing Resealing | $10 – $30 | $200 – $500 |
| Complex Valley Repair | $100+ | $600 – $2,500 |
Permanent Repair of Leaking Roof Vent Boots
The pipe boot is the single most overlooked DIY fix. If the rubber gasket is cracked or “rotted,” follow these steps:
- Remove Shingles: Use a pry bar to gently lift the shingles covering the base (flange) of the boot.
- Pull the Old Boot: Remove the nails holding the old boot down and slide it off the pipe.
- Install New Boot: Slide the new neoprene or rubber boot over the pipe.
- Seal and Nail: Apply roofing cement to the underside of the flange, nail it down, and cover the nail heads with more cement.
- Reinstall Shingles: Slide the shingles back over the flange and secure them.
Check out the Roofs Wiki DIY Leak Repair Guide for more on vent penetrations.
Repair of Leaking Roof Shingles and Flashing
If you find a damaged shingle or loose flashing:
- Shingles: Lift the tab above the damaged shingle, pull the nails, and slide in a new one. Apply a dab of roofing cement to the underside of the new shingle to ensure it seals.
- Flashing: For minor gaps around chimneys, use a polyurethane sealant. It’s more durable than silicone for masonry-to-metal joints. If the flashing is rusted through, it likely needs a professional replacement.
For a deeper dive, read The Homeowner’s Guide to Shingle Roof Repair.
Emergency Temporary Fixes to Stop Active Leaks
If it’s 2 AM and raining in Florissant, you can’t do a permanent repair. You need to mitigate damage immediately.
- Puncture the Bulge: If your ceiling is sagging with water, poke a small hole in the center with a screwdriver. This allows the water to drain into a bucket in a controlled way, preventing the entire ceiling from collapsing.
- Tarping: If it’s safe to go up (never on a wet or steep roof!), use a tarp that extends at least 6 feet beyond the damaged area. Secure it with 2×4 furring strips. Never just nail a tarp down—the nails will create more leaks!
- Roofing Tape: For small holes (like from an old satellite dish), waterproof roofing tape can provide a temporary seal for 14–30 days.
If you are in the middle of a crisis, our Emergency Roof Repair team can help you secure your home.
When to Call a Professional vs. DIY
We love a good DIY project, but some things are best left to the pros at Martin & Sons.
- Safety First: Falls are a leading cause of injury. If your roof is steep, high, or you aren’t comfortable with heights, stay off it.
- Structural Damage: If the roof deck feels “spongy” or “bouncy” when you walk on it, the wood is rotted. This requires cutting out the deck and replacing it, which is a complex job.
- Multiple Leaks: If water is coming in from three or more spots, your roof has likely reached its end-of-life. Patching won’t help.
- Mold: If you find significant mold in the attic, don’t touch it. It can be hazardous. Call a professional for remediation.
- Warranty: DIY repairs can sometimes void your manufacturer’s warranty.
Not sure which way to go? Read our guide on Repair vs Replace: How Do I Know Which Route to Take for My Roof.
Frequently Asked Questions about Roof Maintenance
How long does a temporary roof patch last?
A high-quality tarp installed with furring strips can last 60 to 90 days. Roofing cement (often called “wet patch”) used on a small hole can last 1 to 3 years, but it is not a permanent fix. It will eventually dry out and crack.
Can I fix a roof leak from the inside?
You can apply a “patch” from the inside using roofing cement or a bituminous patch to stop the immediate drip, but this is never a permanent solution. The water is still getting through the shingles and rotting your wood deck. You must fix the exterior source to prevent structural failure.
Does homeowners insurance cover roof leak repairs?
Usually, yes—if the cause is a “sudden and accidental” event like wind or hail. Insurance typically does not cover leaks caused by “wear and tear” or lack of maintenance. Always document damage with photos immediately after a storm. For more tips, see Signs Your Home Needs Immediate Roof Storm Damage Repair.
Conclusion
The repair of leaking roof disasters doesn’t have to be a nightmare if you act quickly. Whether you’re in Chesterfield, Creve Coeur, or Maryland Heights, the key is early detection and the right materials.
At Martin & Sons, we believe in making things easy for our neighbors in the St. Louis area. That’s why we offer no upfront deposits—you only pay when you are 100% satisfied with the work. Plus, we back our repairs with lifetime labor warranties.
If that drip is keeping you up at night, don’t wait for the ceiling to come down. Stop the Drip with These Maryland Heights Roof Leak Solutions or schedule your professional roof inspection today. We’ll get your home back to being the dry, safe sanctuary it’s supposed to be!