
What to Do After Ice Dam Roof Damage: A St. Louis Homeowner’s Guide
Ice dam roof repair is something no homeowner wants to deal with — but if you had a rough winter, you may already be seeing the signs: ceiling stains, peeling paint, or water dripping where it shouldn’t be.
Here’s what ice dam roof repair typically involves, step by step:
- Stop active leaks — protect interior surfaces and dry out wet materials immediately
- Remove remaining ice safely — use a roof rake or calcium chloride, not chisels or rock salt
- Inspect the damage — check shingles, underlayment, roof decking, and attic insulation
- Replace damaged materials — saturated underlayment, delaminated decking, and lifted shingles all need to go
- Seal and protect — install ice and water shield, air-seal the attic, and upgrade insulation to prevent it from happening again
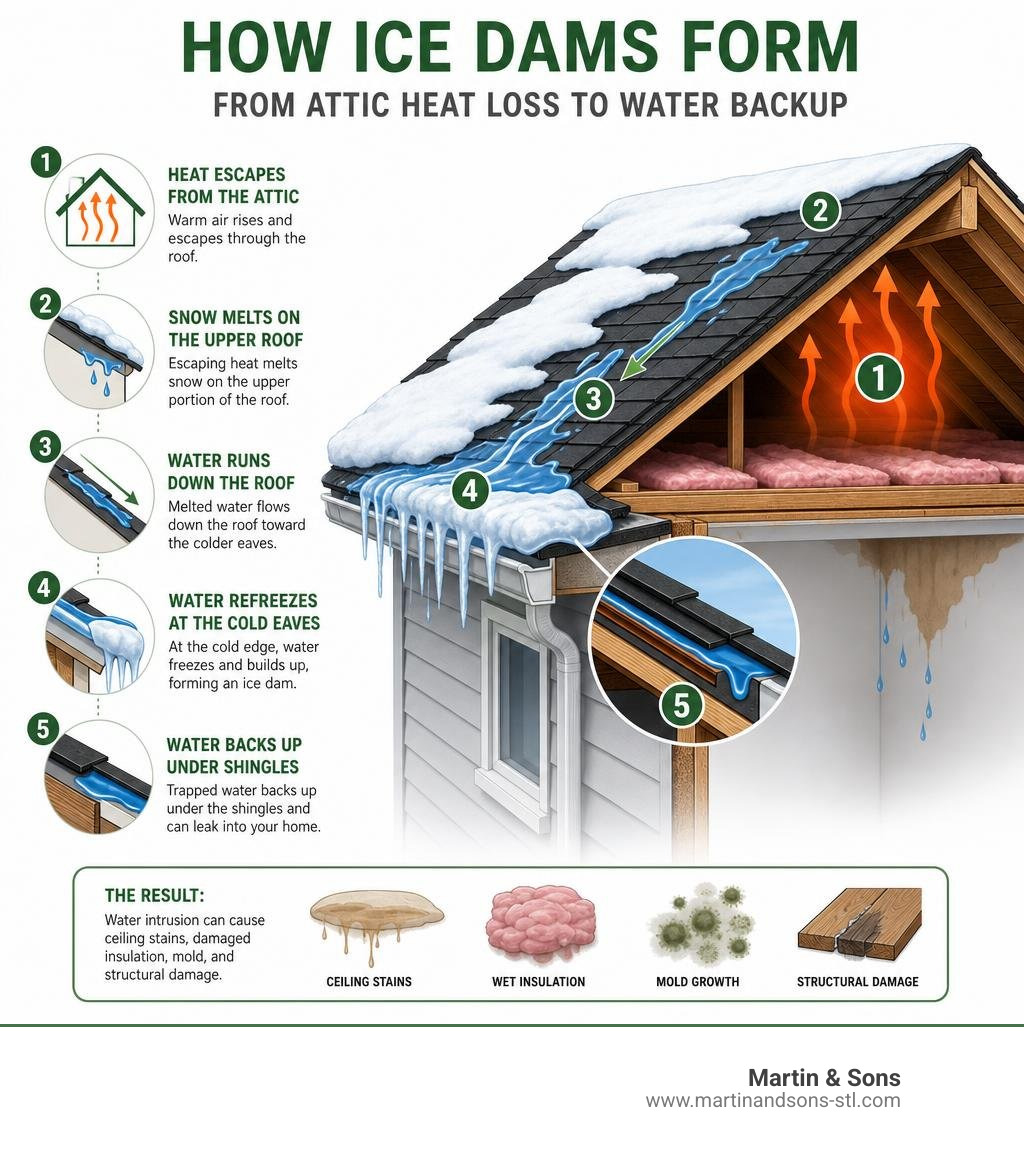
Ice dams form when heat escaping from your home melts snow on the upper roof. That water runs down and refreezes at the cold eaves, building a wall of ice. Water then backs up under your shingles — sometimes 3 to 6 feet up the slope — and leaks into your home.
The damage isn’t always obvious right away. By the time you see a ceiling stain, water may have already been sitting in your walls, insulation, and decking for days.
I’m John Martin, and with over 35 years of hands-on roofing experience at Martin & Sons, I’ve seen how quickly ice dam roof repair needs can spiral from a minor shingle fix into full deck replacement and mold remediation — and I’ll walk you through exactly how to handle it the right way. Let’s start with understanding what you’re actually dealing with before picking up a single tool.
Ice dam roof repair terms made easy:
Understanding Ice Dams: How and Why They Form
To effectively tackle ice dam roof repair, we first have to understand the physics of how these icy ridges develop. Ice dams are not just “frozen gutters.” They are the physical manifestation of a thermal battle taking place right above your head.
For an ice dam to form, three ingredients must come together:
- Significant snow cover on the roof.
- Sustained outdoor temperatures below freezing.
- Uneven roof surface temperatures (where the upper parts of the roof are above 32°F and the lower eaves are below 32°F).
When heat transfers from your heated living space into your attic, it warms the upper roof deck. This causes the bottom layer of snow to melt. The meltwater flows down the slope of the roof under the blanket of snow. However, once that water reaches the roof eaves—which overhang the exterior walls and remain at outdoor freezing temperatures—it refreezes.
Over a few days of this freeze-thaw cycle, a thick ridge of ice builds up along the eaves. This ice ridge traps subsequent meltwater behind it, forming a reservoir of standing water. Because asphalt shingles are designed to shed water running downhill—not to hold back standing pools under hydrostatic pressure—this trapped water backs up under the shingles, leading to severe interior leaks. If you are noticing uneven snow melt or heavy icicle formations, it is highly recommended to learn Why Every St Louis Homeowner Needs a Roof Inspection to catch these issues before the next winter storm hits.
The Physics of Attic Heat Loss
The primary driver of the uneven roof temperatures that cause ice dams is attic heat loss. This heat transfer occurs in three ways:
- Conduction: Heat traveling directly through solid building materials, such as your ceiling drywall, wooden joists, and inadequate insulation.
- Convection: Warm air rising and physically escaping into the attic space. This is often driven by “attic bypasses”—unsealed gaps around plumbing stacks, chimneys, recessed light fixtures, electrical wiring, and the attic hatch.
- Radiation: Electromagnetic heat waves radiating from hot attic surfaces (like uninsulated heating ducts) to the colder roof deck.
When warm air leaks into your attic, it creates a pocket of warmth directly beneath the upper roof deck. The snow melts, runs down to the cold eave overhang, and the refreezing process begins. Keeping your roof deck cold is the ultimate goal of any permanent ice dam prevention strategy.
Warning Signs of Interior Water Damage
Water backed up by an ice dam can travel 3 to 6 feet up the roof slope from the eave, meaning leaks often manifest several feet inward from your exterior walls. Keep a close eye out for these warning signs:
- Ceiling and Wall Stains: Water spots or rings on drywall, often located near exterior walls or windows.
- Peeling or Blistering Paint: Moisture trapped behind latex paint causes it to bubble and peel away from the drywall.
- Sagging Gutters: The sheer weight of the ice dam can bend gutter hangers and pull the entire system away from the fascia board.
- Damp Attic Insulation: Saturated fiberglass or cellulose insulation loses its R-value permanently and must be replaced.
- Mold and Mildew Growth: Mold can begin initiating on wet drywall, wood, or insulation within 72 hours of moisture exposure, posing a respiratory risk to your family.
The Step-by-Step Process of Ice Dam Roof Repair

Once the ice has melted and the weather permits, the physical ice dam roof repair must begin. Because water backed up under hydrostatic pressure, it likely bypassed your shingles entirely, saturating the underlayment and soaking the wooden roof deck beneath.
Ignoring this trapped moisture leads to wood rot, structural sagging, and mold. A proper repair requires systematically removing the damaged materials and rebuilding the roof assembly using modern, water-resistant techniques. For a deeper understanding of standard shingle fixes, consult The Homeowners Guide to Shingle Roof Repair.
Emergency Steps Before Your Ice Dam Roof Repair
If you have an active leak in your St. Louis home during a winter thaw, you cannot wait for spring to take action. You must protect your home’s interior immediately:
- Contain the Leak: Place buckets under active drips. If water is pooling behind ceiling paint, carefully poke a small hole in the center of the blister with a screwdriver to channel the water into a bucket, preventing a sudden ceiling collapse.
- Protect Valuables: Move furniture, electronics, and rugs away from the wet area, or cover them with heavy plastic sheeting.
- Dry Out Wet Materials: Set up heavy-duty fans and dehumidifiers in the affected rooms. Mold can start growing within 72 hours, so fast drying is critical.
- Document Everything: Take date-stamped photos of the ice dam, the exterior roof, the interior water stains, and any damaged personal property for insurance purposes.
For more emergency tips, read Dont Panic Your Emergency Guide for a Fast Roof Leak Fix.
Repairing Shingles, Underlayment, and Decking
When it is time for the permanent repair, we follow a strict process to restore your roof’s structural integrity:
- Remove Damaged Shingles: We carefully remove the shingles in the affected area, extending at least 3 to 6 feet up from the eave to expose the underlying damage.
- Inspect and Replace Decking: We check the plywood or OSB roof deck. If the decking has a moisture content above 19%, or if it shows signs of delamination (plywood layers splitting apart) after 48–72 hours of exposure, we cut out the damaged sections and install fresh plywood.
- Replace Saturated Underlayment: Standard felt paper underlayment tear easily when wet and offers no protection against standing water. We replace it with high-performance synthetic underlayment and self-adhering membrane.
To get professional assistance with this reconstruction, visit our Martin & Sons Roof Repair Services page.
Safe and Immediate Ice Dam Removal Techniques
When an ice dam is actively causing a leak, you need immediate relief. However, improper removal techniques can ruin your shingles instantly.
Never use hammers, chisels, axes, or shovels to chip away at the ice. One misplaced blow will easily crack frozen asphalt shingles, puncture your underlayment, or dent your gutters. The goal of immediate removal is simply to restore drainage, allowing trapped water to flow off the roof safely.
The Calcium Chloride Sock Method
If you want to safely melt a channel through an ice dam yourself, the “calcium chloride sock” method is highly effective:
- Use Calcium Chloride: Only use calcium chloride. Never use rock salt (sodium chloride), which will chemically degrade your shingles, corrode your aluminum gutters, and kill your landscaping when it melts.
- Fill a Nylon Stocking: Fill a pair of pantyhose or a long nylon stocking with calcium chloride pellets and tie off the end.
- Lay Vertically Across the Dam: Place the filled stocking vertically across the ice dam so that it crosses the ridge of ice.
- Monitor the Melt: The calcium chloride will slowly melt through the ice, creating a vertical drainage channel. This allows the trapped water behind the dam to escape safely into your gutters.
- Protect Landscaping: Lay plastic tarps over shrubs directly below the eave to catch any chemical runoff.
Professional Steam Ice Dam Removal
The absolute safest and most efficient way to remove an ice dam is with professional low-pressure steam. This process uses superheated water (around 200°F) delivered through a specialized nozzle at low pressure.
Unlike pressure washers, which will strip the protective granules off your shingles, low-pressure steam gently cuts through the ice like a hot knife through butter. It melts the dam away without prying, hammering, or scraping. If you are dealing with a severe winter emergency in O’Fallon, St. Charles, or St. Louis, contact Martin & Sons Emergency Roofing Services. You can also learn more about regional steam services through Steam Ice Dam Removal Near Kansas City & St. Louis.
Long-Term Prevention: Keeping Your Roof Deck Cold
To stop ice dams from returning year after year, you must address the root cause: attic heat loss. The table below outlines the financial and practical differences between temporary “band-aid” fixes and permanent, long-term prevention.
| Method | Type | Estimated Cost | Lifespan | Pros | Cons |
|---|---|---|---|---|---|
| Calcium Chloride Socks | DIY Short-Term | $10 – $30 | One Storm | Cheap, fast emergency relief | Messy, temporary, chemical runoff |
| Professional Steam Removal | Professional Emergency | $400 – $2,000 | One Storm | Instantly stops active leaks, safe | Expensive, must be repeated if roof isn’t fixed |
| Air Sealing & Attic Insulation | Permanent Prevention | $1,500 – $4,000 | Lifetime | Lowers energy bills, stops ice dams permanently | Higher upfront cost |
| Attic Ventilation Upgrade | Permanent Prevention | $500 – $1,500 | Lifetime | Keeps roof deck cold, prevents attic mold | Requires professional installation |
To understand how investing in long-term maintenance saves you thousands in emergency repairs, read Roofing Maintenance Service Why Prevention Beats Cure.
Air Sealing and Attic Insulation
The most effective way to keep your roof deck cold is to create a continuous, airtight barrier between your heated living space and your attic.
- Air Sealing: Before adding insulation, we must seal all attic bypasses. This involves using expanding foam and caulk around chimneys, plumbing vents, light fixtures, and top plates. A professional weatherization contractor can perform blower door testing and infrared imaging to pinpoint exactly where warm air is escaping.
- Upgrading Insulation: Once the attic is airtight, we install high-quality insulation (such as blown-in fiberglass or cellulose) to reach a target of R-49 (the standard recommended for our St. Louis climate zone). This drastically reduces conductive heat loss.
Improving Attic Ventilation
Even with great insulation, some heat will always escape into the attic. A balanced attic ventilation system uses natural airflow to sweep this residual heat away, ensuring your roof deck stays at the same temperature as the outdoor air.
- Soffit Vents: Located under the eaves, these vents draw cool, dry outdoor air into the attic. We install plastic baffles (or rafter vents) at the eaves to ensure your insulation doesn’t block this incoming airflow.
- Ridge Vents: Installed along the peak of your roof, ridge vents allow warm attic air to escape naturally.
- The Target: Building codes generally recommend maintaining at least 1 square foot of net free vent area for every 150 square feet of attic floor space.
How Ice and Water Shield Prevents Ice Dam Roof Repair Needs
While air sealing, insulation, and ventilation are designed to prevent ice dams from forming, an ice and water shield is your last line of defense when they do. This self-adhering, rubberized asphalt membrane is installed directly onto the roof deck before shingles are laid.
Many local building codes require this protective membrane to extend from the eave edge to at least 24 inches inside the heated wall space of the home. When an ice dam forms and water backs up, the membrane seals tightly around the shingle nails, creating a completely waterproof barrier that prevents water from reaching the wooden decking. To learn more about how protective underlayments safeguard your home from extreme weather, check out The Ultimate Guide to Identifying and Repairing Wind Damage.
Frequently Asked Questions About Ice Dams
How much does professional ice dam removal cost?
Professional steam ice dam removal typically costs between $400 and $2,000. Most specialized crews charge hourly rates (often ranging from $300 to $600 per hour) with a two-hour minimum. The total cost depends on the thickness of the ice, the height and pitch of your roof, and whether emergency same-day service is required.
Does homeowners insurance cover ice dam roof repair?
Most homeowners insurance policies will cover sudden and accidental interior water damage caused by an ice dam (such as ruined drywall, peeling paint, and warped flooring). However, they rarely cover the cost of the actual roof repair or ice removal itself, as insurance companies view ice dam prevention as a routine maintenance responsibility. Be sure to document the damage with clear photos to support your claim.
Can I use rock salt to melt ice on my roof?
No, you should never use rock salt (sodium chloride) on your roof. Rock salt is highly corrosive; it will rust your gutter hangers, degrade your shingles, and leave unsightly white streaks on your siding. Furthermore, when the salty water drains off the roof, it will kill the grass, shrubs, and flowers surrounding your home. Always use calcium chloride instead.
Conclusion
Dealing with the aftermath of a brutal winter doesn’t have to be a stressful ordeal. By taking immediate emergency steps, safely removing remaining ice, and performing proper ice dam roof repair on your shingles and decking, you can protect your home’s structural integrity.
At Martin & Sons, we have been helping our neighbors in St. Louis, St. Charles, Florissant, and surrounding areas keep their homes safe and dry for decades. We believe in doing business the right way: we require no upfront deposits, meaning you only pay when you are 100% satisfied with our completed work. Plus, we back our craftsmanship with industry-leading lifetime labor warranties.
Don’t wait for the next winter storm to put your roof to the test. Schedule a professional roofing maintenance service today and let our family take care of yours!