
Why Getting Your Roof Vent Installation Furnace Vent Right the First Time Matters
A proper roof vent installation for your furnace vent can mean the difference between a safe, efficient home and a costly — or dangerous — mistake.
Here’s a quick overview of how to install a furnace roof vent:
- Determine your furnace type — Category I (B-vent) or Category IV condensing (PVC/concentric vent)
- Choose your termination location — vertical roof or horizontal sidewall
- Cut the correct hole size — typically 5 inches for a concentric vent kit
- Install flashing and a roof boot around the pipe penetration
- Assemble and cement the vent pipes, following manufacturer specs
- Secure the assembly with metal strapping and check all joints
- Run the furnace through one full cycle to confirm proper operation and no leaks
Most homeowners don’t think about their furnace venting until something goes wrong. A blocked vent, a frozen pipe in January, or a failed flashing can send combustion gases back into your living space — or let water pour into your attic. Neither is a good situation.
The job gets more complicated depending on whether you have an older naturally-drafted furnace or a modern high-efficiency condensing unit. Each one has different venting requirements, different pipe materials, and different rules for where and how high the vent must terminate above your roofline.
I’m John Martin of Martin & Sons LLC, and with over 35 years of hands-on experience handling roof vent installation for furnace vent systems in the St. Louis area, I’ve seen every mistake in the book — and I’m here to help you avoid them. Whether you’re tackling this yourself or just want to know what a contractor should be doing, this guide will walk you through everything clearly.
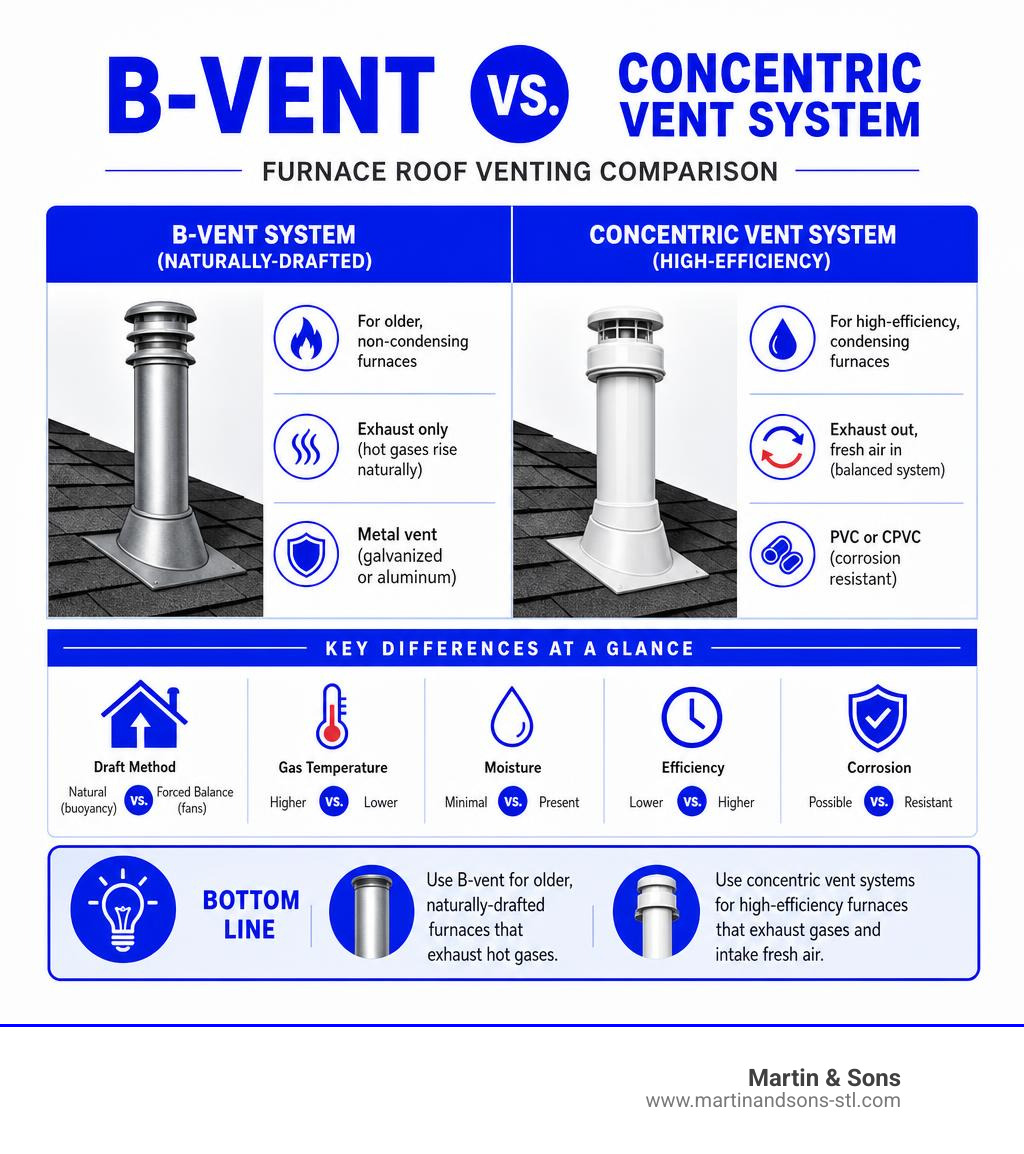
Understanding Furnace Venting: B-Vent vs. Concentric Vent Systems
Before you run to the hardware store or climb onto your roof, you must know what kind of furnace you are venting. Furnaces are classified into categories based on their operating temperatures and vent pressures.
For residential homes, you will almost always deal with Category I or Category IV furnaces:
- Category I (Standard Efficiency): These are older or standard-efficiency furnaces (usually 80% AFUE). They produce very hot exhaust gases that rise naturally through convection. Because the exhaust is hot and dry, it requires a double-wall metal pipe, commonly known as a Type B gas vent.
- Category IV (High-Efficiency Condensing): These modern units (90%+ AFUE) squeeze so much heat out of the combustion process that the flue gases cool down and condense into an acidic liquid. Because the gases are cool, they don’t rise naturally and must be pushed out by an internal blower motor. Metal pipes would quickly corrode, so Category IV systems require corrosion-resistant plastic pipes, typically PVC or ABS.
Understanding these differences is crucial. If you are working with a Category I system, you must follow the manufacturer’s Model BV Instructions to ensure the double-wall pipe has the required clearance to combustible materials. If you are looking to understand how this fits into your overall attic ventilation strategy, check out A Comprehensive Guide to Choosing the Best Type of Roof Vent.

What is a Concentric Vent Kit?
If you have a high-efficiency Category IV condensing furnace, you traditionally have to run two separate PVC pipes all the way out of your home: one to bring fresh combustion air in, and another to blow the acidic exhaust out.
A concentric vent kit simplifies this process beautifully. It combines both pipes into a single, sleek “pipe-within-a-pipe” design. The inner pipe carries the hot exhaust gases safely out, while the outer pipe draws fresh combustion air in.
By utilizing a concentric vent kit, you only have to make a single penetration through your roof or wall. This significantly reduces the risk of water leaks in your roof structure and cuts down on the physical labor involved. For a broader look at how different roof penetrations interact with your home’s air circulation, see our guide on The Most Common Types of Roof Vents.
Roof Venting vs. Sidewall Venting
When installing a furnace vent, you generally have two choices: running the vent vertically through the roof, or routing it horizontally through a sidewall. Both options have distinct pros and cons.
| Feature | Vertical Roof Venting | Horizontal Sidewall Venting |
|---|---|---|
| Aesthetic Impact | Hidden from ground view; keeps the sides of your home clean. | Pipes are visible on the side of your home; can look industrial. |
| Snow Blockage Risk | Low, provided the pipe extends well above the anticipated snow line. | High; drifting snow can easily block low-lying wall vents. |
| Pipe Freezing Risk | Higher in extremely cold climates due to long vertical runs in cold attics. | Lower, as the run is typically shorter and drains quickly. |
| Wind Interference | Minimal; terminates high above wind turbulence zones. | High; strong winds blowing directly against the wall can disrupt drafts. |
While sidewall venting is often favored by installers because it avoids a roof penetration, vertical roof venting remains the gold standard for homes in dense neighborhoods (like Creve Coeur or Maryland Heights) where close neighboring properties make sidewall exhaust unpleasant or restricted by local codes.
Planning Your Roof Vent Installation Furnace Vent Project
Proper planning is the secret to a leak-free, long-lasting roof vent installation furnace vent project. You must map out your venting layout, evaluate your attic space, and ensure that your active furnace exhaust does not interfere with your home’s passive ventilation systems.
Active furnace vents must never exhaust into a passive ventilation system (like a ridge vent or attic eave). Doing so can pull deadly carbon monoxide back into your attic and living spaces. Keeping these systems isolated helps preserve your roof’s integrity. To understand how attic conditions affect your home over time, read about Understanding the Lifespan of Your Homes Roofing.
Choosing the Right Materials for Roof Vent Installation Furnace Vent Systems
Using the wrong materials is a recipe for code violations or, worse, system failure.
- For Category I Furnaces: You must use certified Type B gas vent pipes. These feature an aluminum inner wall and a galvanized steel outer wall, creating an insulating air space that keeps the outer pipe cool.
- For Category IV Furnaces: You will use plastic piping. Most manufacturers specify Schedule 40 PVC or SDR-26 PVC. SDR-26 PVC (which has a thinner wall) is frequently used for concentric vent kits, but you must consult your furnace manual and local codes to ensure compliance. Never use standard cellular-core PVC or DWV (drain, waste, vent) pipes for venting unless they are explicitly rated for Category IV exhaust.
For detailed material specifications and joint connection guidelines, refer to the manufacturer’s Installation Instructions. If you are unsure about material compatibility or need professional guidance in St. Louis, consulting with a licensed local HVAC professional can help you select the exact parts for your heating system.
Clearance, Snow Levels, and Local Building Codes
Your roof vent must terminate high enough to prevent blockages from snow and debris.
- Termination Height (U.S.): In the United States, the termination cap must be a minimum of 12 inches above the roof surface or the highest anticipated snow level.
- Termination Height (Canada): In Canada, the minimum height is 18 inches above the roof or anticipated snow level.
- Clearance to Combustibles: Type B vents require a minimum of 1-inch clearance to combustible materials (such as wood framing, drywall, or roof decking) in both the U.S. and Canada.
- Multiple Vent Spacing: If you are installing multiple concentric vent kits (for example, if you have dual furnaces), you must maintain a minimum of 1 inch of clearance between the vent terminal caps to prevent exhaust recirculation.
Additionally, keep in mind the 1-to-300 rule for passive attic ventilation (1 square foot of ventilation for every 300 square feet of attic space). While your furnace vent is an active exhaust system, maintaining a properly ventilated attic prevents moisture buildup around your furnace pipes. For professional roof ventilation assessments, you can always reach out to a trusted local roofing contractor to evaluate your attic’s airflow.
Step-by-Step B-Vent and Concentric Roof Installation Guide
Now, let’s get into the step-by-step process of installing your furnace vent. Whether you are running a metal B-vent or a PVC concentric kit, the preparation phase is identical.
Before you cut any holes, make sure you have the proper safety gear: safety glasses, gloves, a sturdy ladder, and a safety harness if you are working on a steep pitch. If you are modifying an existing roof, it is also a great time to inspect your roof decking and underlayment to ensure the structure is solid. Learn more about this in our guide on Roofing Underlayment Replacement and Decking Essentials.
Step-by-Step Guide to Roof Vent Installation Furnace Vent Assembly
To complete this installation, assemble the following tools:
- Reciprocating saw or hole saw (5-inch diameter for a 3-inch concentric kit)
- Power drill and bits
- Level and plumb bob
- PVC primer and solvent cement (conforming to ASTM D2564)
- Roofing nails and hammer
- High-grade RTV silicone sealant
- Metal support strapping
Step 1: Mark and Cut the Roof Penetration
From inside your attic, locate the path of your vent pipe. Use a plumb bob or level to find the center point where the pipe will pass through the roof. Drive a long nail up through the roof deck at this center mark so you can locate it easily from the outside.
Go up onto the roof, locate the nail, and draw your cut line. For a standard 3-inch concentric vent kit (which has a 4.5-inch outer diameter), cut a 5-inch diameter hole through the shingles and roof decking using your reciprocating saw or hole saw.
Step 2: Dry Fit the Vent Assembly
Before applying any cement, pass the main body of the vent pipe through the roof hole to verify that it fits cleanly without binding. Ensure you have the required clearances to all nearby roof rafters and combustibles.
Step 3: Solvent Welding the Joints
For PVC concentric systems, apply a generous layer of PVC primer followed by solvent cement (meeting ASTM D2564 standards) to both the pipe and the concentric Y-fitting. Push the pieces together firmly, giving a slight quarter-turn to distribute the cement, and hold for 30 seconds until set.
Installing a Concentric Vent Kit Vertically Through the Roof
When installing a concentric vent kit vertically, you must assemble the components in a specific order to ensure proper combustion air intake and exhaust flow.
- Assemble the Y-Fitting: Cement the larger outer air inlet pipe to the Y-fitting. Ensure the smaller inner exhaust pipe is bottomed out and completely sealed inside the Y-fitting.
- Install the Rain Cap: Secure the rain cap to the top of the exhaust pipe. You can cement this cap in place, or use a stainless steel screw if you want the option to disassemble it for cleaning in the future.
- Observe Extension Limits: Do not extend the air inlet pipe more than 60 inches from the Y-fitting. Exceeding this limit will restrict combustion air and cause the furnace to shut down or fail to ignite.
- Account for Length Reductions: That using a concentric vent kit reduces the allowable intake/vent piping length by 5 equivalent feet compared to running two separate pipes. Factor this into your total pipe run calculations.
- Secure the Assembly: Once the pipe is passed through the roof, secure it to the attic framing using metal support strapping to prevent the pipe from sagging or shifting.
- Test the System: Turn on your furnace and let it run through one complete heating cycle. Check all joints for air leaks and ensure the exhaust is venting cleanly outside.
How to Flash Your Furnace Chimney and Prevent Leaks
A vent pipe is only as good as its flashing. Without proper flashing, water will run straight down the pipe and ruin your attic insulation and ceiling drywall.
- Slide the Roof Jack/Flashing Over the Pipe: Position the flashing boot over the pipe and slide it down flat against the roof.
- Weave the Flashing Into the Shingles: Carefully tuck the top and side edges of the metal flashing plate underneath the shingles above it. The bottom edge of the flashing plate should lay on top of the shingles below it. This ensures that water flowing down the roof runs over the flashing and onto the shingles, rather than slipping underneath them.
- Nail the Flashing Down: Secure the flashing plate with roofing nails, and apply a dab of roofing cement over every nail head.
- Install the Storm Collar: Slide the metal storm collar down the pipe until it sits snug against the top of the flashing boot.
- Seal with Silicone: Apply a thick bead of high-grade, weatherproof RTV silicone sealant around the seam where the storm collar meets the vent pipe. This creates a watertight barrier that prevents rain from running down the pipe.
On steep roofs or complex valleys, water runoff can be heavy. If your furnace vent is located near a valley or obstruction, you may need to install a roof cricket to divert water around the pipe. For details on how to handle these situations, see our guide on Best Practices for Installing a Roof Cricket Essential Guide.
Frequently Asked Questions about Furnace Roof Venting
We get a lot of questions from homeowners in O’Fallon, St. Peters, and across St. Louis regarding furnace roof vents. Here are some of the most common issues we encounter:
Can I vent two furnaces through a single roof vent?
No. You cannot vent two furnaces through a single standard concentric vent or B-vent unless the system is specifically designed, engineered, and sized as a common vent system under local building codes.
Venting two modern furnaces through a single vent creates a major risk of backdrafting, where exhaust gases from one running furnace are pushed backward into the idle furnace and into your home. Each furnace should have its own dedicated vertical vent.
What is the maximum length I can extend a concentric vent pipe?
For a standard concentric vent kit, the air inlet pipe must not be extended more than 60 inches (5 feet) beyond the main assembly body. If you extend the pipe beyond this limit, you will restrict the combustion air supply, leading to pressure switch errors and furnace operational failure. Always use SDR-26 PVC for extensions if specified by the manufacturer, and keep the total equivalent length of your entire vent run within the furnace manufacturer’s limits.
How do I prevent my furnace roof vent from freezing in winter?
In cold Missouri winters, moisture in the furnace exhaust can freeze at the roof termination, creating ice dams that block the vent. To prevent this:
- Ensure the entire horizontal run of the vent pipe has a minimum slope of 1/4-inch rise per foot back toward the furnace so that condensate drains back to the furnace drain system instead of pooling and freezing in the pipe.
- Insulate any portions of the vent pipe that run through unheated spaces, such as cold attics, using foil-faced pipe insulation.
Conclusion
Getting your roof vent installation furnace vent right is essential for keeping your home safe and warm. Whether you are dealing with a standard B-vent or a modern concentric system, paying attention to clearances, slope, and water-tight flashing will save you from major headaches down the road.
If you are planning a roof replacement or need to update your home’s ventilation system, we can help. At Martin & Sons, we have served the St. Louis area — including Florissant, Chesterfield, and O’Fallon — for decades.
We believe in doing business the right way:
- No upfront deposits — you pay only when the job is 100% complete and you are fully satisfied.
- Lifetime labor warranties on our work.
- Best prices upfront without high-pressure sales tactics.
If you want to learn more about choosing the best ventilation setup for your home, take a look at our Roof Vent Installation Guide Static vs Turbine vs Ridge, or contact us today to schedule an inspection!