
Signs Your Aluminium Window Seals Need Replacing and How to Choose the Right Material
Aluminium window frames are built to last for decades, but the rubber gaskets tucked inside them are consumable hardware. Over years of exposure to sunlight, humidity, and drastic seasonal shifts across St. Louis and surrounding areas, rubber loses its essential oils and flexibility. When these gaskets fail, your window loses its thermal barrier, making your heating and cooling systems work overtime.
Understanding when and why your window gaskets deteriorate allows you to catch problems before water leaks ruin your interior walls or trim.
Warning Signs of Seal Deterioration
How do you know it is time for an aluminium window rubber seal replacement? Rubber gaskets generally have an operational lifespan of 7 to 10 years. Under typical weather conditions, high-quality EPDM can stretch to 8–15 years, but routine exposure to extreme temperature swings and atmospheric pollution will accelerate breakdown.
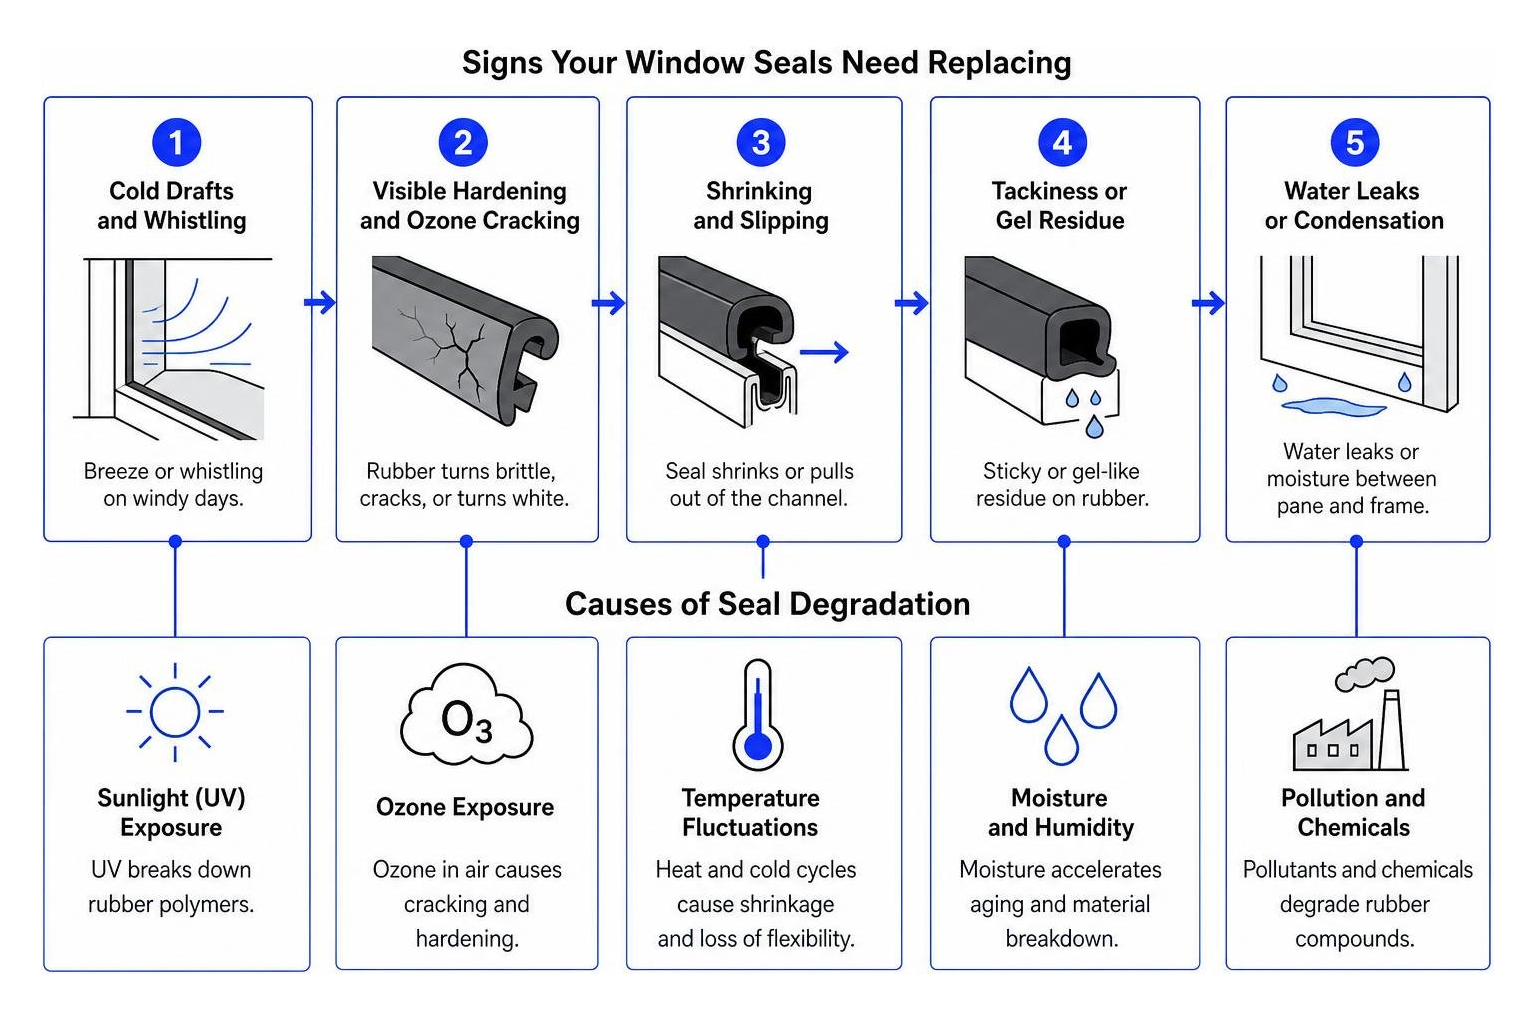
Keep an eye out for these five common warning signs:
- Cold Drafts and Whistling: If you feel a breeze or hear high-pitched whistling on windy days while the window is closed tightly, air is slipping past a flattened gasket.
- Visible Hardening and Ozone Cracking: Fresh rubber is flexible and soft. As atmospheric ozone attacks the polymer chains—a process known as ozone cracking—the rubber turns brittle, cracks, or turns white.
- Shrinking and Slipping: Aging seals lose their tension, shrinking out of the frame corners or pulling completely out of their retaining channels.
- Tackiness or Gel Residue: In advanced stages of chemical breakdown, rubber exude a sticky, gel-like residue that feels tacky to the touch.
- Water Ingress and Mold: Water pooling on your interior window sills or dark mold spots near the glass edges indicate the compression seal is no longer watertight. If you suspect deeper moisture issues, reviewing our guide on dealing with a broken window seal can help you diagnose the damage.
Comparing EPDM, PVC, and Brush Pile Seals
Selecting the proper replacement material ensures your new weatherstripping withstands local environmental demands without premature failure. Not all replacement seals are created equal, and choosing the wrong compound can lead to immediate drafts or stiff window operation.
Here is how the primary seal materials compare:
- EPDM (Ethylene Propylene Diene Monomer): The gold standard for outdoor window applications. EPDM is a synthetic rubber engineered specifically for extreme outdoor exposure. It maintains high elasticity, resists UV radiation and ozone, and tolerates wide temperature fluctuations.
- PVC (Polyvinyl Chloride): PVC profiles are stiffer plasticized seals often used for quick interior replacements or light-duty applications. While cheaper, PVC tends to harden faster in cold weather and suffers from higher permanent compression set (it loses bounce-back shape) compared to EPDM.
- Brush Pile (Mohair Seals): Constructed with high-density woven fibers attached to a rigid plastic backing, brush pile seals are installed in sliding window tracks where rubber would create too much drag. They stop dust, insects, and wind, but are not intended for watertight glass sealing.
When purchasing rubber profiles, consider the Shore A hardness rating. A Shore A rating between 50 and 70 offers the ideal balance—soft enough to yield under sash pressure for an airtight fit, yet firm enough not to collapse permanently.
| Material Type | Primary Usage | UV & Weather Resistance | Expected Lifespan | Best Suited For |
|---|---|---|---|---|
| EPDM Rubber | Exterior glass gaskets & sashes | Exceptional | 8–15 Years | Outdoor perimeter sealing & heavy weather |
| PVC Profile | Interior stops & dry glazing | Moderate | 3–5 Years | Mild indoor environments & budget fixes |
| Brush Pile (Mohair) | Sliding window tracks & sashes | Fair | 5–7 Years | Reducing friction in sliding window tracks |
How to Measure Your Frame and Glass Before Buying
Buying the wrong profile height or channel width is the most common reason DIY gasket projects stall out. Rubber gaskets are extruded into dozens of specific geometries—including wedge gaskets, U-channels, bubble bulbs, and push-in splines. A profile that is just 1mm too thick can prevent your window sash from latching shut, while one that is too thin will leave drafty gaps.
Measuring Glass Thickness, Channel Width, and Gaps
Before placing an order for replacement weatherstripping, take accurate, physical measurements using precision tools rather than guessing.
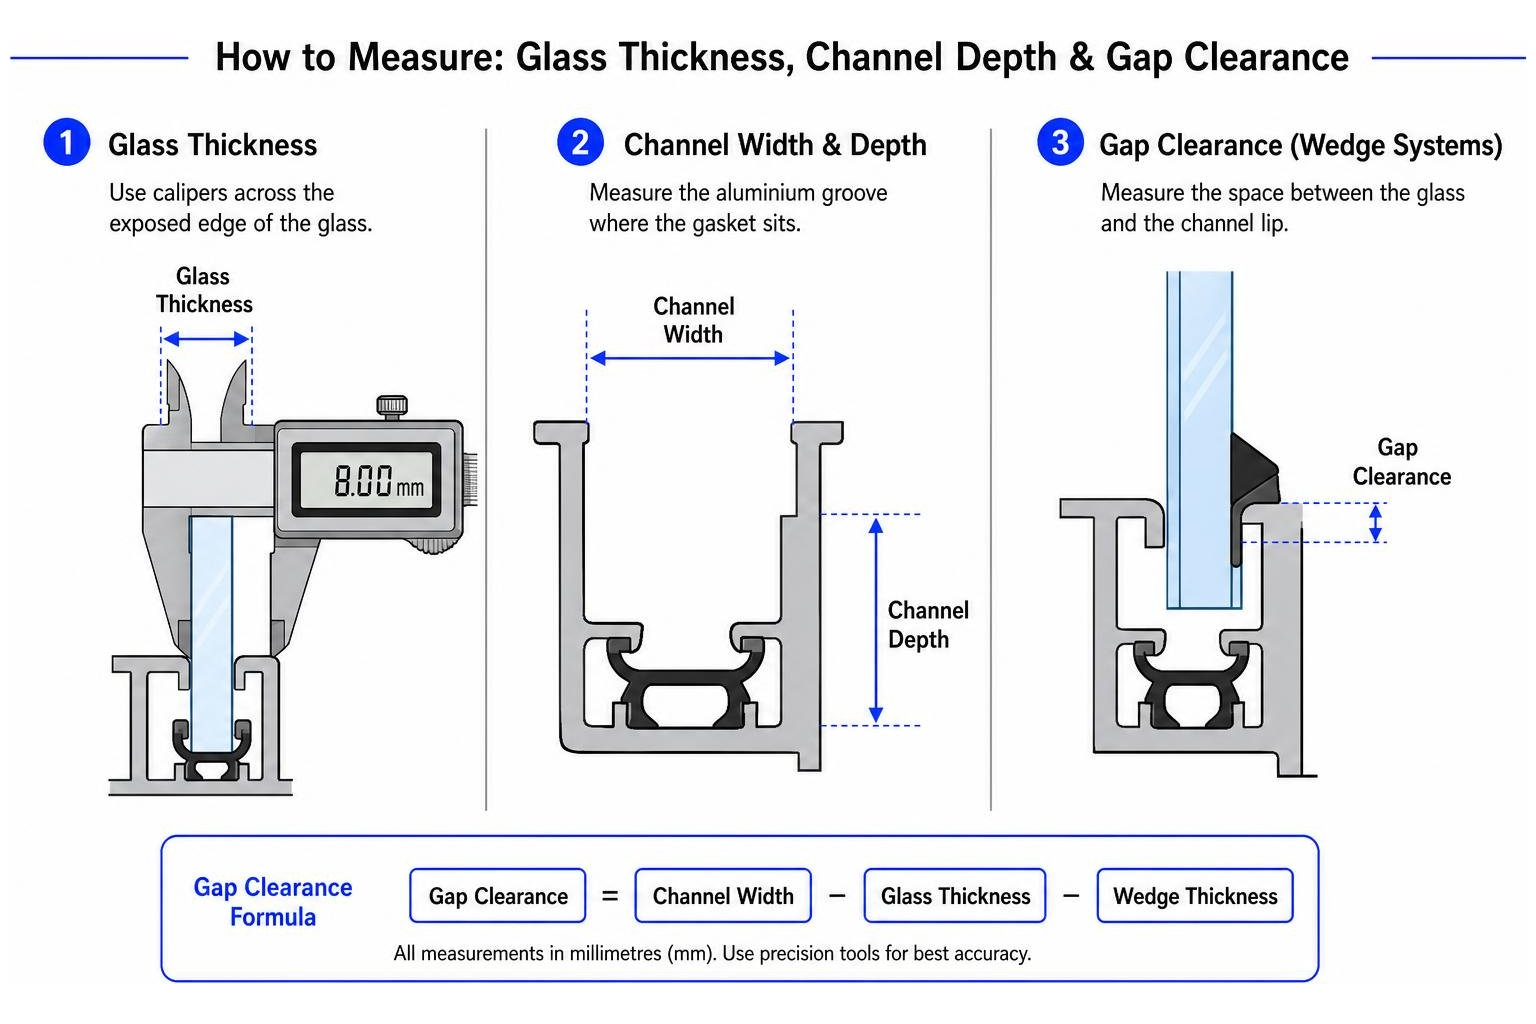
Follow this step-by-step sizing approach, referencing standard guidelines on seals for aluminium windows:
- Measure Glass Thickness: Standard architectural glass panes in residential aluminium frames generally measure 6 mm, 8 mm, or 10 mm thick (or up to 1 inch for insulated glass units). Use digital or vernier calipers across an exposed edge to get an exact measurement.
- Measure Internal Channel Width and Depth: Open the window and measure the aluminium groove where the gasket sits. Record the interior width of the channel slot and the depth from the top lip down to the bottom channel floor.
- Calculate Gap Clearance for Wedge Systems: If your window uses a separate wedge gasket pushed between the glass and the aluminium channel lip, calculate the clearance gap using this simple formula: $$\text{Clearance Gap Per Side} = \frac{\text{Internal Channel Width} – \text{Glass Thickness}}{2}$$
- Snip a Physical Sample: The foolproof way to match your profile is to cut a 25mm (1 inch) sample of the old, non-degraded seal from the top of the frame. Take this sample to a local supplier or hold it up against manufacturer cross-section templates to guarantee an exact match.
Step-by-Step DIY Aluminium Window Rubber Seal Replacement
Replacing the press-fit weatherstripping around your windows does not require specialized mechanical licenses, but it does demand patience and attention to detail.
Preparing Tools for Aluminium Window Rubber Seal Replacement
Having the proper tools laid out before you begin prevents accidental frame damage and speeds up installation.
Gather these essentials:
- Cutting Tools: Sharp utility knife, heavy-duty scissors, or anvil miter shears.
- Prying & Removal Tools: Mini pick and hook tool set, plastic putty knife, or wooden spatula (avoid sharp steel screwdrivers that scratch aluminium).
- Glazing Wedge Tool or Seal Roller: Specialized hand tool designed to press rubber bulbs and wedge profiles smoothly into narrow channels.
- Cleaning Agents: Isopropyl alcohol (90%+ concentrated) or mild soapy water, along with lint-free microfiber cloths.
- Adhesives & Safety: Cyanoacrylate glue (super glue) for rubber end-butt joints, and safety glasses.
Removing Old Seals and Cleaning the Channel
Take your time during removal to protect the powder-coated or anodized finish on your frames, as detailed in practical guides on replacing rubber seals on aluminum windows.
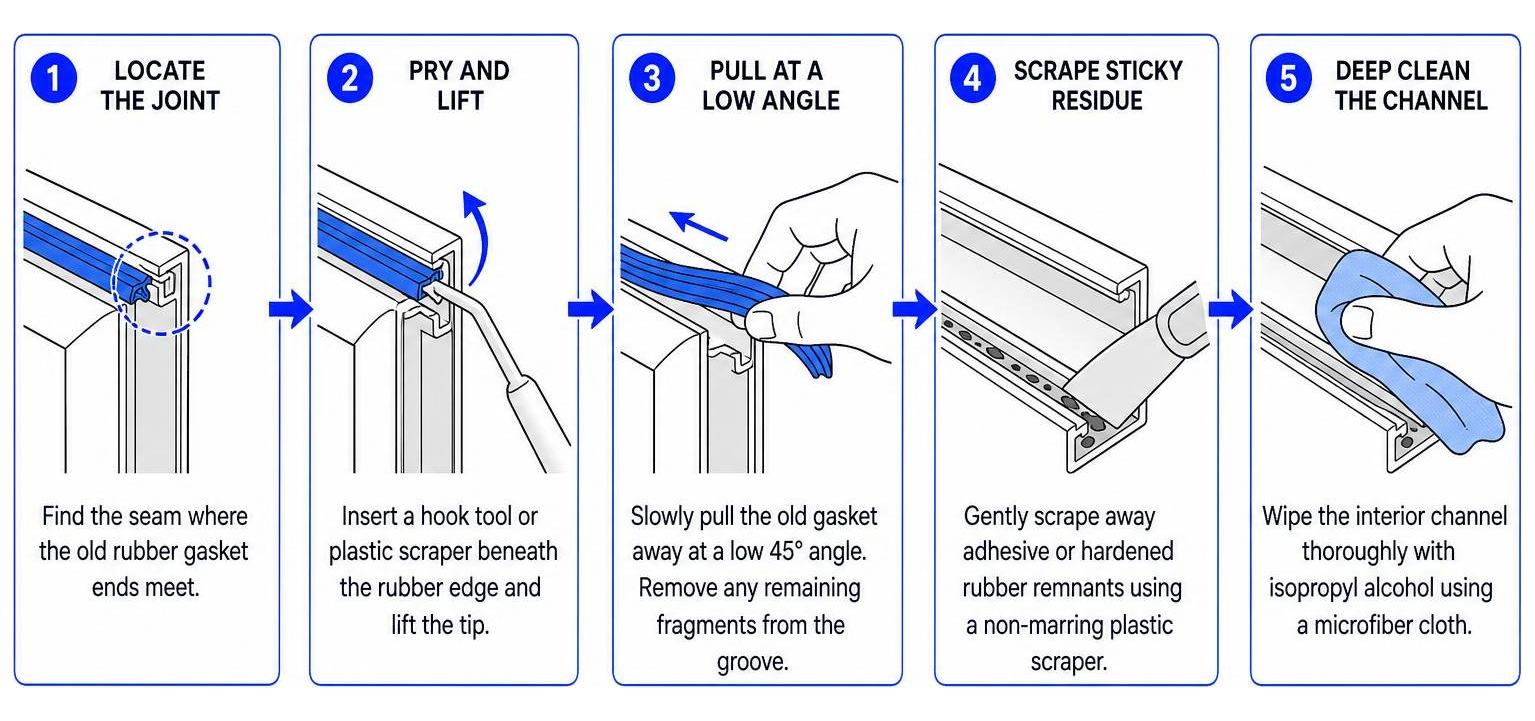
- Locate the Joint: Find the seam where the old rubber gasket ends meet—usually at a top corner or the middle of the upper rail.
- Pry and Lift: Insert a mini hook tool or plastic scraper beneath the rubber edge. Carefully lift the tip until you can grip it firmly with your fingers.
- Pull at a Low Angle: Slowly pull the old gasket away from the window channel at a low 45-degree angle. If the old rubber crumbles or breaks, use your pick set to clear away remaining fragments stuck inside the groove.
- Scrape Sticky Residue: If old contact adhesive or hardened rubber remnants cling to the channel floor, gently scrape them clear using a non-marring plastic scraper.
- Deep Clean the Channel: Saturate a microfiber cloth with isopropyl alcohol and wipe down the interior channel surface thoroughly. Solvent-free alcohol breaks down grease, dirt, and mold without damaging the metal finish or paint.
- Dry Fully: Allow the groove to air-dry completely. Installing a new rubber gasket over wet or dirty metal leads to poor grip and premature mold growth.
Fitting the New Seal and Handling Corners
The secret to a long-lasting, watertight installation is installing the rubber tension-free.
Follow this technique to fit your new continuous gasket:
- Add Measuring Slack: Measure the entire perimeter of your window frame and add at least 25mm (1 inch) of total extra length to account for minor fitting adjustments.
- Start in the Middle: Begin installing the seal at the center of the top horizontal rail or middle of the longest side—never start at a corner. Starting at a straight edge eliminates corner seams where rain naturally collects.
- Press, Never Stretch: Push the rubber profile firmly into the metal channel using your thumb or a glazing roller tool. Crucial Rule: Never stretch the rubber gasket as you press it in. Stretched rubber inevitably shrinks back to its natural length over time, creating gaps at the frame corners. Instead, slightly push the rubber back into itself as you press down.
- Turn the Corners Safely: When you reach a 90-degree frame corner, you have two reliable options:
- The V-Notch Method (Continuous): Use your utility knife to cut a precise 90-degree “V” notch into the bottom back lip of the seal, leaving the outer facing bulb intact. This allows the gasket to bend cleanly around the corner without kinking or buckling.
- The Miter Cut Method: Cut the rubber profile completely at a 45-degree angle using miter shears. Butt the two clean 45-degree cut edges tightly against each other in the corner.
- Join the Ends: Bring the two ending edges together at your starting point. Trim them so they meet tightly with slight compression pressure. Apply a single drop of cyanoacrylate (super glue) to the rubber faces, press them together for 10 seconds, and create a continuous, airtight loop.
Testing Your New Installation and Avoiding Common Pitfalls
Once your new rubber seals are snapped tightly into place, take a few minutes to verify your installation. Catching a small gap now prevents water damage during the next severe storm.
Testing for Air Drafts and Water Leaks
Use these simple home tests to verify that your windows are fully sealed:
- The Incense Smoke Test: On a breezy day, close and latch the window completely. Hold a lit incense stick or candle near the perimeter of the frame and move it slowly along the rubber joint. If the trail of smoke flickers or blows inward, air is pushing past the seal, indicating a spot that needs adjustment or thicker profiling.
- The Backlight Inspection: Turn off the indoor lights in the room during bright daytime hours. Walk along the window frame and look for light bleeding through the edges. A continuous dark seal line confirms proper compression.
- Controlled Water Spray Test: Have a partner stand outside with a garden hose set to a light spray nozzle, aiming water downward across the window pane to simulate heavy rain. Stand inside with a dry cloth and check the sill and bottom corners for moisture ingress. For a broader look at routine maintenance, consult our overview on conducting a window inspection to protect your home.
Avoiding Common Mistakes in Aluminium Window Rubber Seal Replacement
Avoid these common mistakes that lead to early seal failure, as highlighted in comprehensive repair guides on weatherstrip replacement timing and tips:
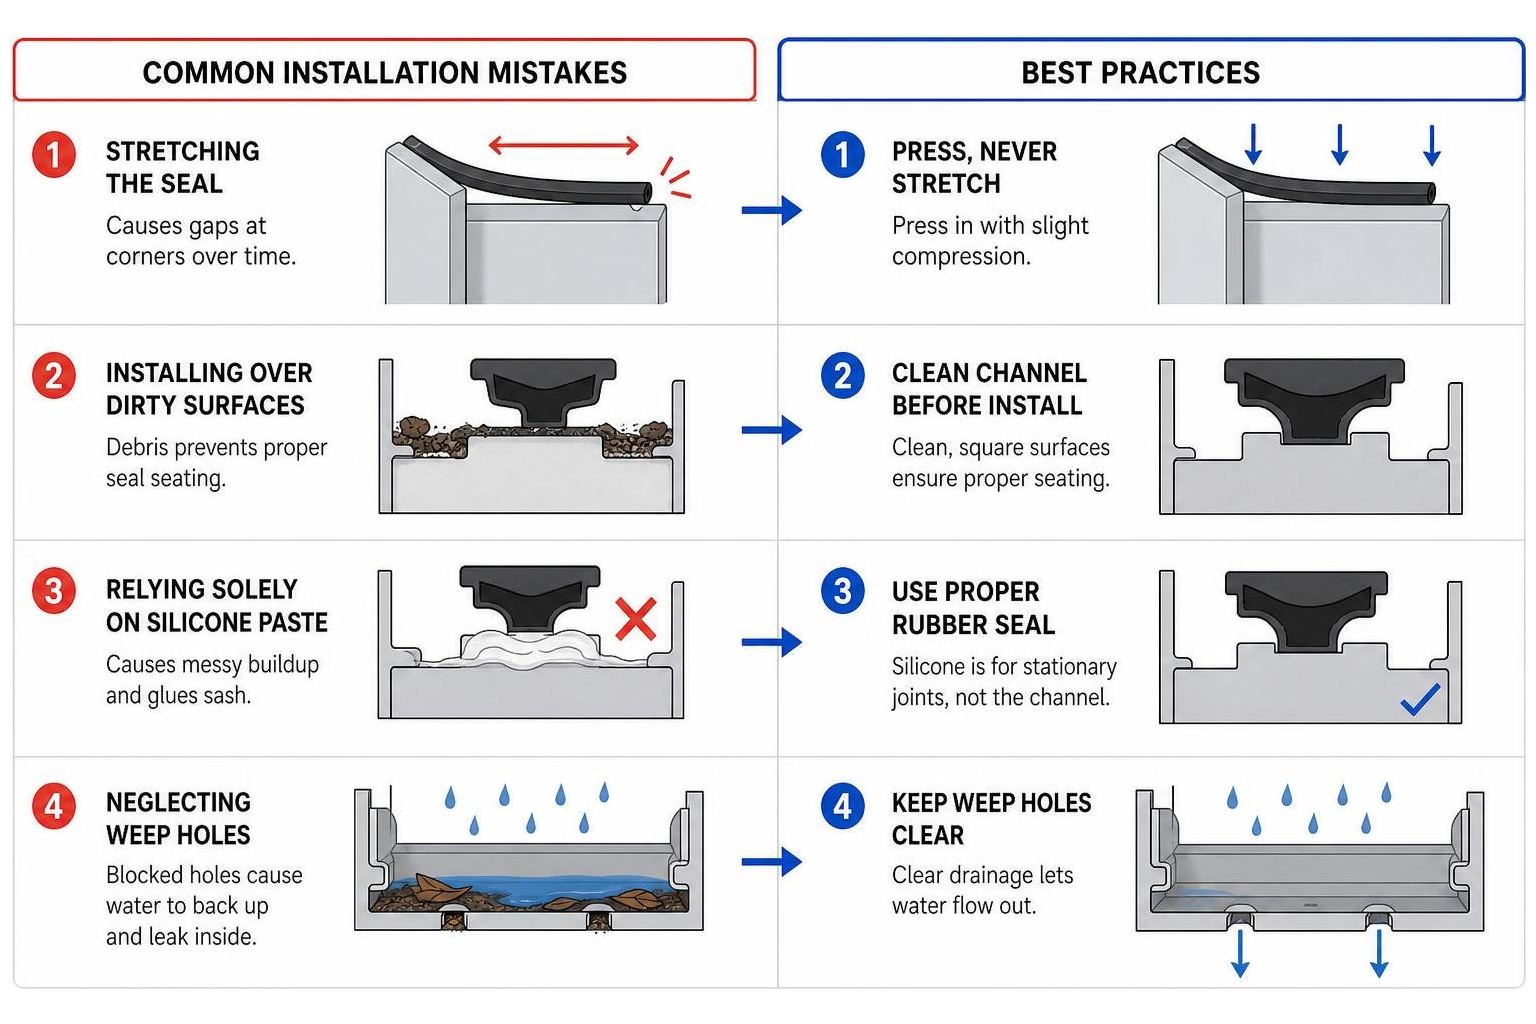
- Stretching the Seal Material: As noted, stretching rubber makes installation easy in the moment, but causes the gasket to shrink back, leaving wide gaps at the corners within weeks.
- Installing Over Dirty Surfaces: Rubber gaskets rely on clean, square channel walls to hold their position. Dust, sand, or old glue left inside the groove will push the seal out of alignment.
- Relying Solely on Silicone Paste: Liquid silicone caulking is intended for stationary perimeter joints between the window frame and wall—it is not a replacement for removable sash weatherstripping. Pumping silicone paste into a rubber channel glues the window shut and creates an unsightly mess.
- Neglecting Frame Weep Holes: If your window leaks water even after fitting a new rubber gasket, inspect the exterior frame weep holes along the bottom track. If these drainage slots are blocked with dirt or debris, backed-up rain will spill over the interior track regardless of how fresh your seals are.
DIY vs. Professional Window Repair: When to Call an Expert
While pressing a push-fit gasket into an accessible residential frame is a manageable weekend project, certain window conditions require professional tools and advanced technical skills.
When DIY Isn’t Enough
Knowing your limits protects your home from accidental structural damage or glass breakage.
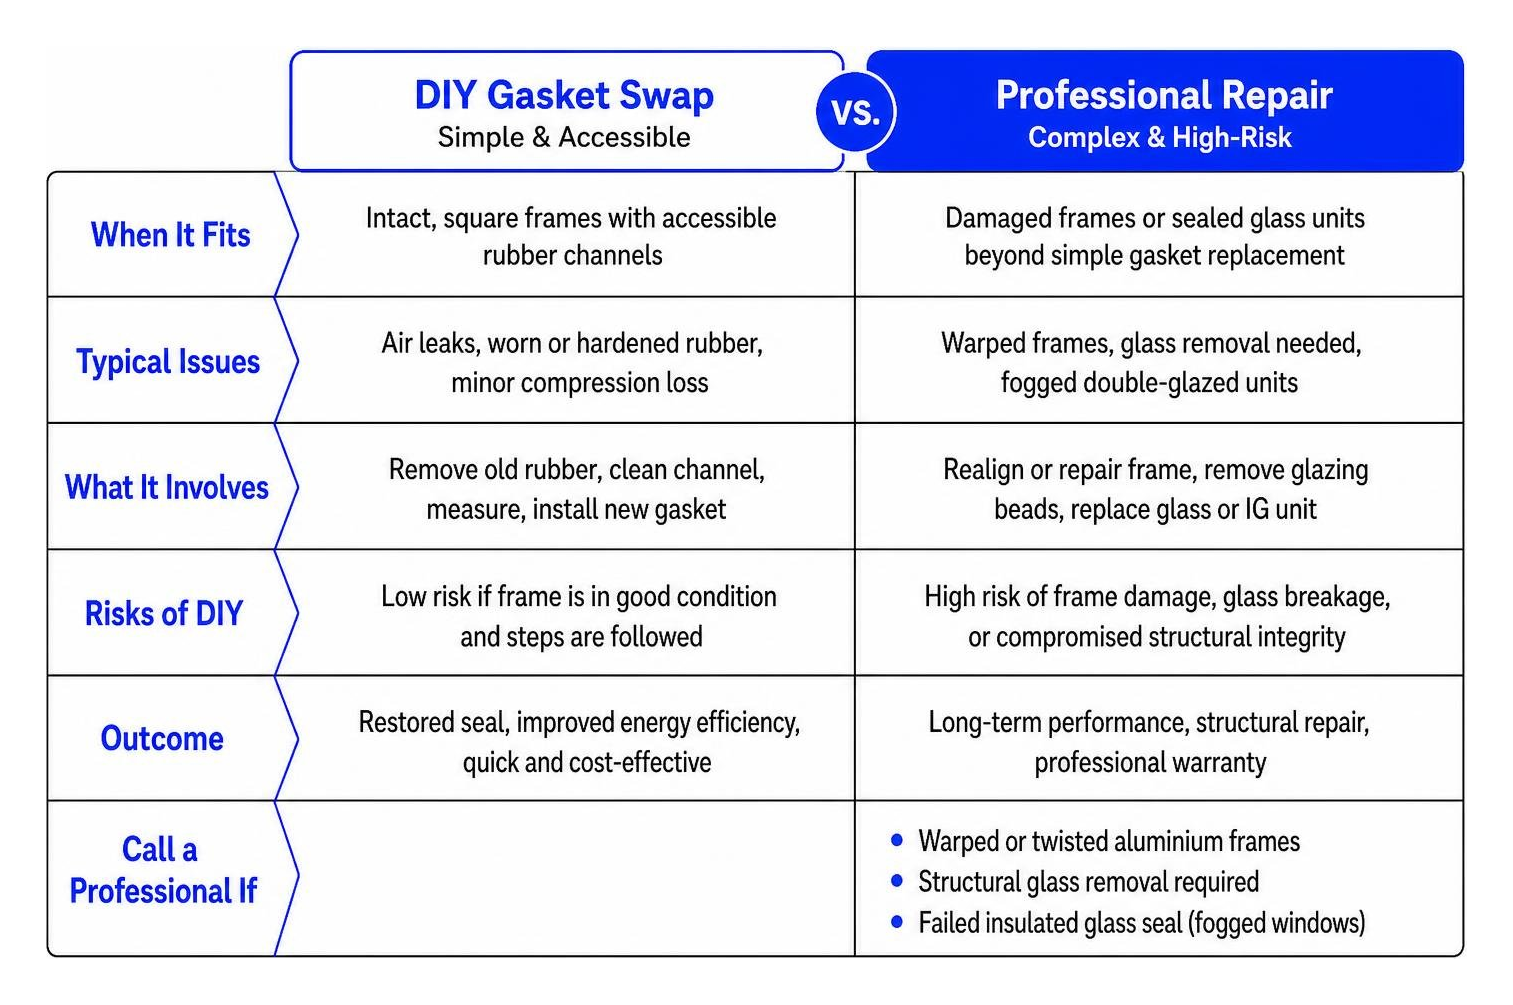
Consider calling a professional contractor if you encounter any of the following:
- Warped or Twisted Frames: If the aluminium sash itself has sagged, bent, or twisted out of square due to building foundation movement, new rubber seals will not bridge the uneven gap. The frame or hinges must be mechanically realigned.
- Structural Glass Removal Required: High-performance commercial frames or custom residential windows often sandwich heavy double-pane units tightly between structural gaskets. Replacing these requires removing the glazing beads and lifting out the glass unit—a high-risk task that can easily crack the insulated glass unit.
- Failed Insulated Glass Seal (Fogged Windows): If you see moisture, fogging, or mineral stains between the glass panes inside a double-glazed window, the primary seal of the glass unit itself has failed. Rubber weatherstripping cannot fix internal glass condensation—the double-pane unit must be replaced.
- Discontinued Window Profiles: Sourcing matching replacement gaskets for older, obsolete aluminium windows can be nearly impossible at retail hardware stores. Professional glass contractors have access to custom extrusion libraries to source or custom-manufacture matching profiles.
If you suspect your windows need structural frame adjustments, custom glazing work, or full unit upgrades, explore our guide to finding reliable local window contractors or read our complete breakdown on calculating overall window replacement costs.
Frequently Asked Questions About Window Seals
How often should aluminium window rubber seals be replaced?
In standard residential settings across the Midwest, rubber window seals should be inspected annually and typically replaced every 7 to 10 years. High-quality EPDM seals exposed to mild conditions can last up to 15 years. You can extend their service life by cleaning the gaskets twice a year with mild soapy water and applying a light coat of silicone protectant spray to keep the rubber soft and prevent dry rotting.
Can I replace window seals during cold winter weather?
You can replace press-fit rubber gaskets in cold weather, but it is easier in mild temperatures (above 50°F / 10°C). Cold temperatures make synthetic rubber stiff and harder to push into narrow channel grooves. Furthermore, if your installation requires liquid adhesives or cyanoacrylate glue for corner joints, cold conditions slow down curing times significantly. If working in winter, keep your new rubber spool indoors until right before installation to preserve its flexibility.
Will replacing only the rubber seal fix water leaks along the wall?
Not necessarily. You must first diagnose where the water is entering:
- If water leaks between the glass pane and the aluminium sash, or past the opening frame edge, replacing the rubber weatherstripping will solve the problem.
- If water leaks between the metal window frame and the exterior house wall/drywall, the issue is caused by cracked exterior silicone caulking along the outer wall perimeter. This requires scraping away old exterior sealant and applying fresh structural silicone sealant along the frame-to-wall joint.
Conclusion
Executing an aluminium window rubber seal replacement is one of the smartest, most cost-effective home improvement tasks you can tackle. By eliminating drafty perimeter gaps, you immediately improve indoor comfort, stop rainwater intrusion, and reduce seasonal heating and cooling bills.
Here is a quick recap of the steps:
- Inspect your windows for drafts, hardening, or water leaks.
- Carefully measure your glass and channel width to pick the correct EPDM profile.
- Gently pull out the old gasket and clean the groove with isopropyl alcohol.
- Press the new seal into place without stretching, using V-notches or miter cuts at the corners.
- Test your work with an incense stick or light water spray to ensure a tight, draft-free fit.
If your aluminium window frames are bent, your glass units are fogged up between the panes, or you simply prefer having seasoned professionals handle your home’s envelope, our team at Martin & Sons is here to help. Serving St. Louis, St. Peters, St. Charles, Florissant, Chesterfield, Creve Coeur, Maryland Heights, and O’Fallon, we bring decades of hands-on expertise to every project.
We believe in making home repairs completely stress-free:
- Zero Upfront Deposits: You pay only when the job is 100% complete and you are totally satisfied.
- Lifetime Labor Warranties: We stand behind the quality of our craftsmanship for life.
- Honest, Upfront Pricing: The best prices from the start, with no hidden fees or high-pressure sales tactics.
Ready to make your home comfortable again? Explore more info about our window replacement and repair services or give Martin & Sons a call today to schedule your free home consultation!