
Why Window Screen Repair Is Worth Doing Before Bugs Move In
Window screen repair is something most St. Louis homeowners need at some point — and the good news is that many common fixes take less than two hours and cost under $25 in materials.
Here’s a quick look at how to handle the most common screen damage:
| Damage Type | Best Fix | Estimated Cost |
|---|---|---|
| Small hole or tear | Adhesive mesh patch or repair tape | $4 – $10 |
| Medium hole (up to 3 inches) | Self-adhesive fiberglass patch kit | $8 – $15 |
| Full mesh worn out or brittle | Complete mesh replacement kit | $15 – $22 |
| Bent or broken frame | Frame replacement or professional repair | $65+ |
The right fix depends entirely on what kind of damage you’re dealing with. A small pet-claw tear is a five-minute patch job. A sagging, shiny-looking mesh that lets in gnats? That’s a full re-screen. And if the frame itself is bent, no amount of new mesh will fix the real problem.
I’m John Martin, and at Martin & Sons we’ve been handling window screen repair and full window work across St. Louis for over 35 years. Whether it’s a quick patch or a full screen replacement, we’ve seen every type of damage a Midwest summer — and a determined cat — can cause.
Assessing the Damage: When to Choose Window Screen Repair vs. Replacement
Before you run out to the local hardware store in Florissant or O’Fallon to buy supplies, you need to take a close look at your damaged screen. Is it a candidate for a quick, budget-friendly patch, or is it time to strip the frame bare and start over?
Making the wrong choice can lead to wasted time, wasted money, and a screen that still looks like it went three rounds with a weed-whacker.
Small Tears vs. Large Holes
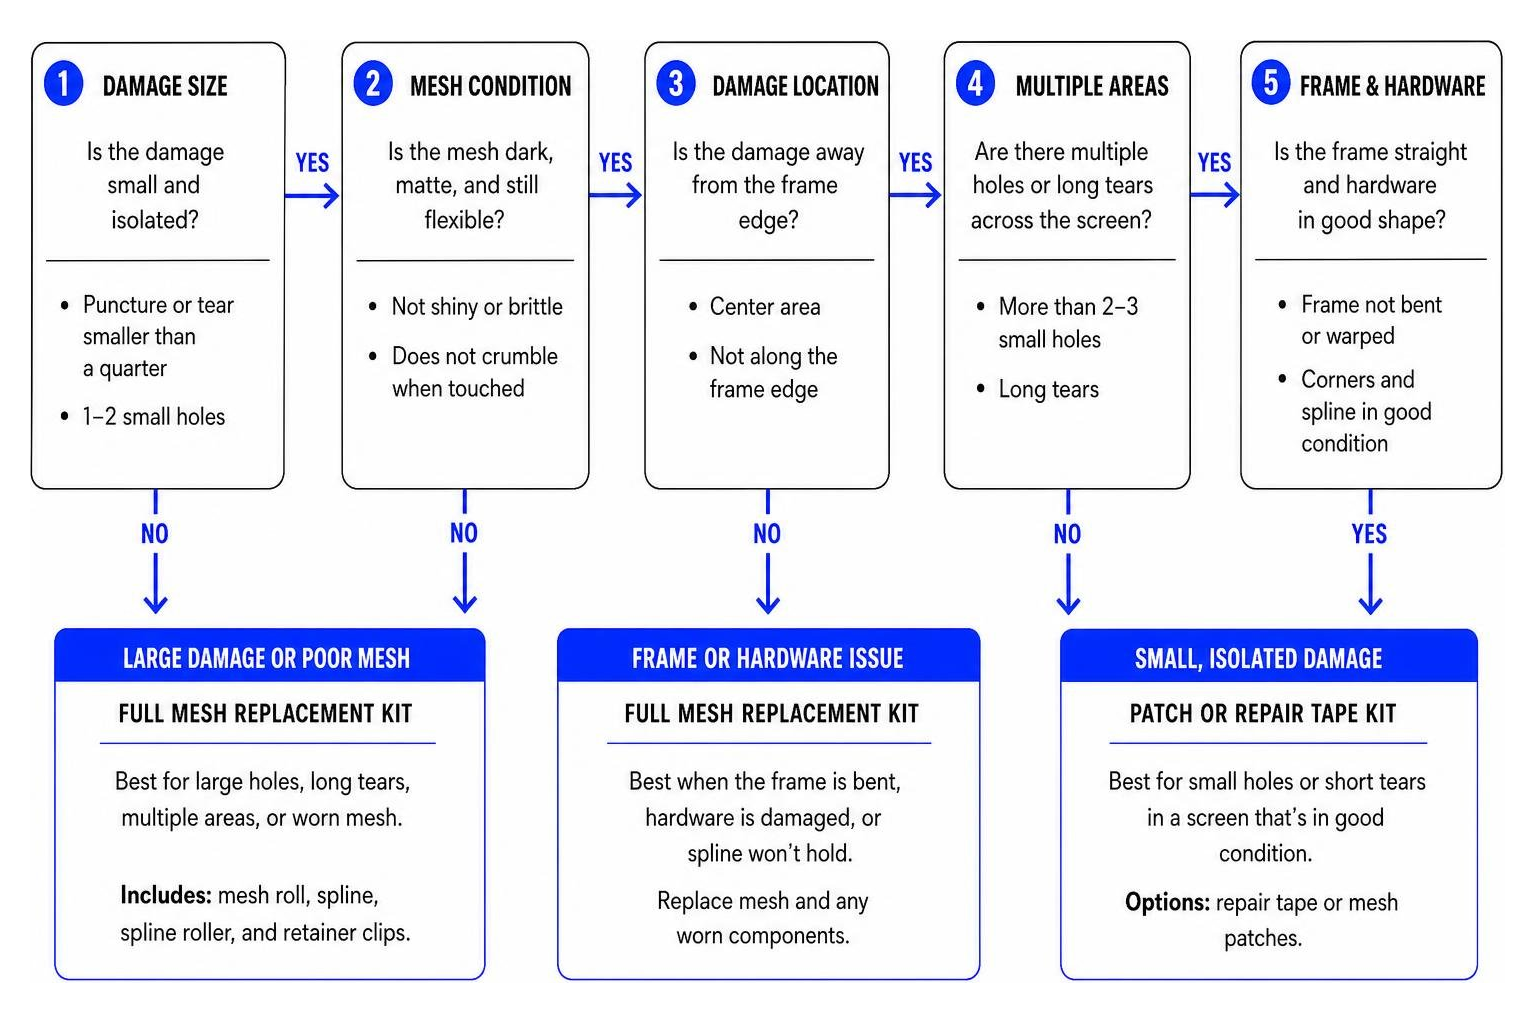
If you are dealing with a puncture smaller than a quarter—perhaps caused by a stray twig or an over-eager cicada—you can easily opt for a quick patch. However, if you have gaping holes, long tears running along the frame edge, or multiple punctures across the center of the mesh, patching will look messy and fail quickly. In these cases, replacing the entire mesh is the best way to go.
Shiny, Brittle, or Sagging Mesh
Take a look at the color of your screen. When fiberglass mesh is brand new, it has a dark, matte charcoal appearance. Over years of exposure to intense Missouri sunlight and high humidity, the fiberglass fibers degrade. If your screen has turned shiny, silver, or brittle to the touch, its structural integrity is gone. Touching a brittle screen will often cause it to crumble, meaning any attempt to patch a small hole will simply create a larger one. If you notice these signs during your regular Window Inspection to Protect Your Home, it is time for a full re-screening.
Evaluating the Frame and Hardware
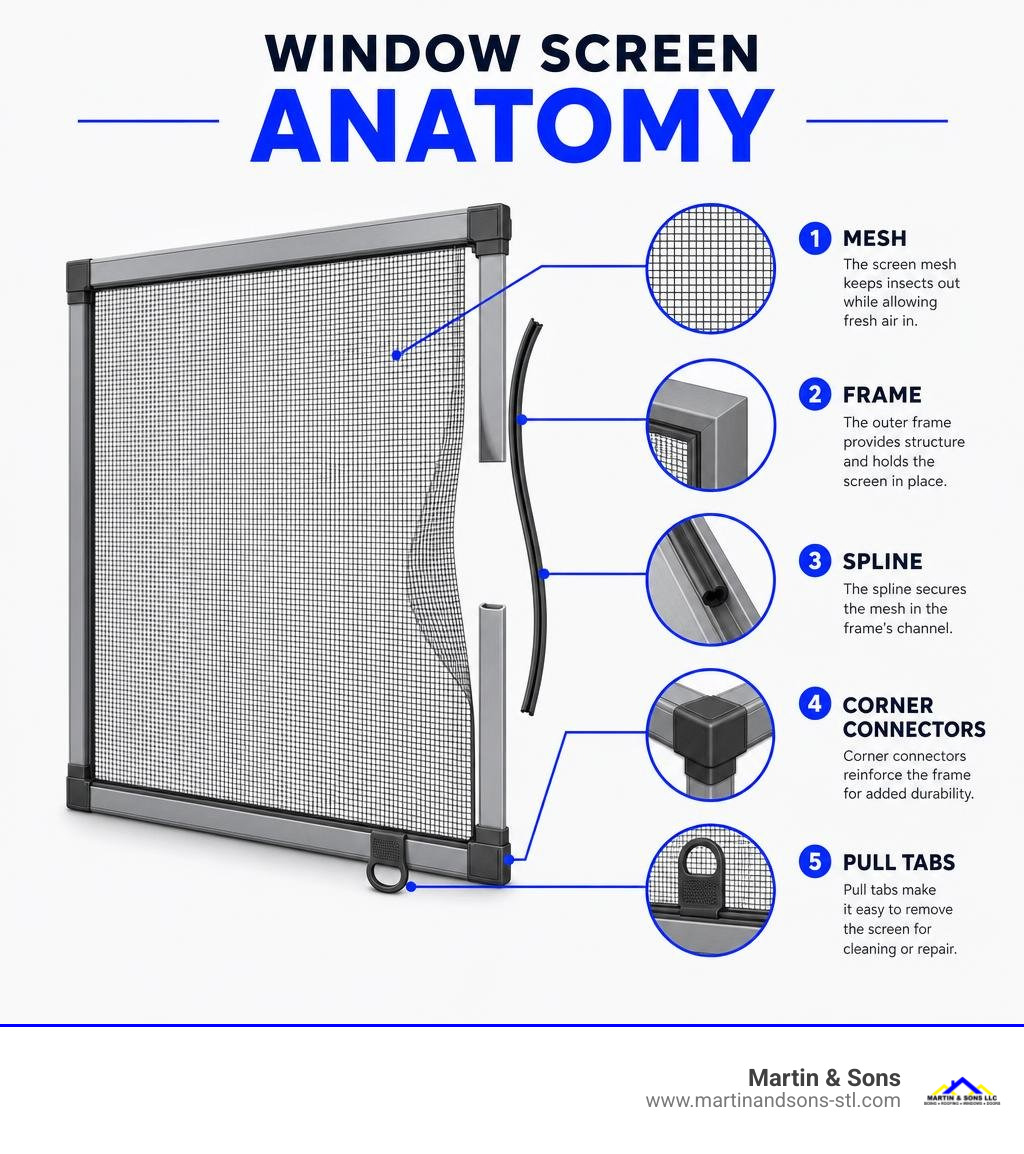
A screen is only as good as the frame holding it. If your aluminum frame is perfectly straight and the plastic or metal corner connectors are intact, you can reuse it indefinitely. However, if the frame is warped, bent, or corroded, it will not sit tightly in your window frame. This creates gaps that invite local pests inside.
Furthermore, check the flexible vinyl cord—known as the spline—that locks the mesh into the frame channel. If the spline is older than 10 to 15 years, it will lose its flexibility, crack, and fail to hold the screen taut. If you find yourself struggling with bent frames or complex window styles, you can explore professional options by Screening Your Options for Quick Window Screen Replacement Nearby.
Choosing the Right Window Screen Repair Kit for Your Home
If you decide to take the DIY route, you will find thousands of screen repair products on the market. In fact, there are over 3,000 results for “window screen repair kit” on Amazon alone, ranging from simple $4 adhesive sheets to $22 comprehensive rebuild kits. Choosing the right one depends on your specific project goals and your budget.
Types of Repair Kits Available
- Window Screen Repair Tape: Typically sold in rolls ranging from 15 to 30 feet long and 2 to 3 inches wide. Highly popular brands like Secopad Black (averaging 4.4 out of 5 stars with over 10,000 units bought monthly) or by.RHO (boasting over 37,520 ratings) offer incredible convenience. You simply cut, peel, and stick the tape over small tears.
- Mesh Patches: These are pre-cut square sheets (often 3″ x 3″ or 4″ x 4″) made of fiberglass or aluminum mesh with a strong adhesive backing. Budget-friendly packs like BukSuk sheets cost as little as $3.99 and are perfect for fixing isolated pet claw punctures.
- Full Mesh Replacement Kits: For complete overhaul jobs, these kits include a roll of fiberglass mesh (standard sizes are typically 48″ x 118″), a spline roller tool, replacement spline cord (usually around 50 feet), and retainer clips. Top-selling complete kits like those from TOOLTRIZ or King&Charles (averaging 4.6 stars) offer outstanding value for under $22.
Choosing Your Screen Material
When replacing the entire mesh, you must match the material to your household needs:
- Fiberglass: The modern industry standard. It is highly flexible, easy to roll into the frame without creasing, and offers excellent visibility and airflow.
- Aluminum: Highly durable and rust-resistant. It resists sag better than fiberglass but is harder to install because it creases easily if you make a mistake with the roller.
- Polyester (Pet-Resistant): Heavy-duty, vinyl-coated polyester mesh that is up to seven times stronger than standard fiberglass. If you have cats that climb screens or dogs that scratch at patio doors, upgrading to pet mesh is a lifesaver.
- No-See-Um Mesh: A tightly woven 20×20 mesh (compared to standard 18×16 mesh) designed specifically to block tiny biting gnats, midges, and dust.
| Kit Type | Best For | Typical Price Range | Key Features to Look For |
|---|---|---|---|
| Adhesive Tape / Patches | Small tears, punctures, and quick fixes | $3.99 – $9.99 | 3-layer strong adhesive, waterproofing, UV resistance |
| Standard Fiberglass Kit | Full mesh replacement on standard windows | $12.99 – $18.99 | Includes spline, utility knife, and basic roller |
| Heavy-Duty / Pet Kit | High-traffic areas, screen doors, pet owners | $19.99 – $24.99 | Vinyl-coated polyester mesh, heavy-duty steel roller |
Step-by-Step Guide: How to Patch a Small Tear or Hole
If you are dealing with a small tear or a isolated puncture, using a patch or repair tape is incredibly simple. When done correctly, a high-quality patch will withstand rain, wind, and hot St. Louis summers without peeling.
Step 1: Clean the Damaged Area
Adhesive will not stick to dusty, pollen-covered mesh. Mix a small amount of mild dish soap with warm water. Use a soft cloth to gently clean both sides of the screen around the hole. Let the area dry completely before proceeding.
Step 2: Trim the Edges
Use a sharp pair of scissors or a utility knife to trim away any loose, frayed, or unraveling strands of mesh around the tear. Try to shape the damaged area into a neat, clean square or rectangle. This makes it much easier to align the patch.
Step 3: Cut and Align the Patch
Cut a piece of screen repair tape or use a pre-cut mesh patch that is at least 1/2 inch larger than the hole on all sides. Keeping the patch slightly larger ensures the adhesive has plenty of undamaged mesh to grab onto.
Step 4: Apply and Secure the Patch
Peel off the adhesive backing. Carefully align the patch over the hole, ensuring the mesh pattern of the patch matches the orientation of your screen for a cleaner look. Press the patch firmly against the screen. For the strongest bond, place one hand on the opposite side of the screen to act as a backing support while you press the adhesive into place.
Step 5: Heat-Activate the Adhesive (Pro Tip)
Most high-quality screen repair tapes use pressure-sensitive, acrylic adhesives. To create a truly waterproof, permanent seal, run a hairdryer on medium heat over the patched area for 30 to 45 seconds. The gentle heat softens the adhesive, allowing it to fuse deeply into the fibers of the surrounding screen.
Step-by-Step Guide: How to Replace an Entire Screen Mesh
When a screen is sagging, brittle, or riddled with holes, a complete mesh replacement is the only way to restore its performance and look. Do not worry—this classic DIY project is highly rewarding and can easily be completed in under an hour per window.
Step 1: Remove the Screen and Lay It Flat
Pop the screen frame out of the window opening. Lay the frame flat on a sturdy workbench or table. Pro Tip: Use heavy-duty painters tape or clamps to temporarily secure the frame to your work surface. This prevents the frame from bowing inward or twisting while you pull the new mesh taut.
Step 2: Remove the Old Spline and Mesh
Locate the end of the vinyl spline cord in the frame’s perimeter groove. Use a flathead screwdriver, a small nail, or a specialized hook tool to pry the end of the spline up. Once you have a grip on it, pull the spline out of the channel like a long piece of spaghetti. Remove the old, damaged screen mesh and discard it.
Step 3: Clean the Frame Channels
Over time, dirt, dust, and spider webs accumulate inside the frame’s spline grooves. Take a stiff nylon brush or an old toothbrush and clean out the channels. Wipe down the entire frame with a damp cloth and let it dry.
Step 4: Roll Out and Align the New Mesh
Unroll your new fiberglass or aluminum mesh over the clean frame. Position it so that the mesh overlaps the frame by at least 1/2 inch to 1 inch on all four sides.
Step 5: Roll the Mesh into the Groove
Take your spline roller tool. Using the convex (raised) wheel, gently press the screen mesh down into the frame’s retaining channel along one of the long sides. This pre-creases the mesh and prepares the channel for the spline.
Step 6: Insert the New Spline
Lay your new spline cord over the pre-creased channel. Switch to the concave (grooved) wheel of your spline roller. Starting at one corner, roll the wheel firmly over the spline to push it and the mesh deep into the channel.
As you roll, use your non-dominant hand to pull the mesh slightly taut across the frame. Be careful not to pull too hard, or you will bow the aluminum frame inward. Repeat this process around all four sides of the frame.

Step 7: Trim the Excess Mesh
Once the spline is completely rolled in and the screen is tight and wrinkle-free, take a sharp utility knife. Hold the blade at a 45-degree angle pointing away from the spline, and carefully cut away the excess mesh overhang. Take your time to avoid slicing into your brand-new spline or scratching the aluminum frame.
If you are looking to tackle larger home improvement projects alongside your screen repairs, check out our Window Replacement Tips for Your Next Home Project.
Frequently Asked Questions about Window Screen Repair
Can I Use a Window Screen Repair Kit on Screen Doors?
Yes, you absolutely can. However, because sliding screen doors and swinging storm doors experience much higher traffic, vibration, and pet contact than standard window screens, standard fiberglass repair tape is usually only a temporary fix.
For screen doors, we highly recommend using heavy-duty vinyl-coated polyester pet screens. This material is incredibly tough and designed to withstand dog claws and active children. When repairing a screen door, replacing the entire mesh with a high-durability option is almost always a better long-term investment than using adhesive patches.
What Tools Are Included in a Standard Window Screen Repair Kit?
A comprehensive, all-in-one window screen replacement kit typically includes:
- A roll of fiberglass mesh (often 48″ x 118″)
- A spline roller tool (equipped with convex and concave wheels, ideally with smooth steel bearings)
- A roll of vinyl spline cord (usually 0.125″ to 0.140″ in diameter, and about 50 feet long)
- Retainer clips to hold the mesh in place during installation
- A basic utility cutter or hook tool for removing old spline
If you buy a basic kit, you will still need to supply a flathead screwdriver (to pry up the old spline), a pair of scissors, and a stable work surface.
How Do I Fix a Bent Window Screen Frame?
If your aluminum screen frame is only slightly bent or bowed—often a result of forcing it into a window opening or improper winter storage—you can sometimes fix it without buying a new one. Lay the frame on a flat hard surface, wear protective gloves, and apply gentle, steady pressure with your hands or channel lock pliers to carefully massage the aluminum back into alignment.
However, if the frame is severely crimped, cracked, or twisted, the aluminum has lost its structural strength. Trying to pull new screen mesh across a structurally compromised frame will only cause it to buckle further. In this scenario, you should purchase an aluminum screen frame kit to rebuild the frame, or contact a professional window team to fabricate a custom-fit replacement.
Conclusion
Taking care of your home’s screens is one of the easiest ways to enjoy the gorgeous spring and autumn breezes in St. Louis without inviting unwanted pests inside. Whether you choose to patch a tiny tear with a quick adhesive tape or roll out a brand-new sheet of heavy-duty pet mesh, a little patience goes a long way.
Of course, sometimes a DIY project reveals bigger issues. If you find yourself dealing with severely warped frames, broken window sashes, failing seals, or if you simply decide that your home is ready for a complete window upgrade, we are here to help.
At Martin & Sons, we have proudly served St. Louis, St. Charles, Florissant, and the surrounding areas since 1989. We believe in making home improvement completely stress-free: we require no upfront deposits, you only pay when you are 100% satisfied with our work, and we back our craftsmanship with a lifetime labor warranty.
Ready to upgrade your home’s comfort and curb appeal? Explore our professional services at Martin & Sons Windows and request your free estimate today!