
What You Need to Know About EIFS Siding Repair
EIFS siding repair is the process of fixing damage to Exterior Insulation and Finish Systems — the multi-layer synthetic stucco cladding found on many homes and commercial buildings.
Here’s a quick overview of the most common EIFS repairs:
| Problem | DIY Possible? | Typical Cost |
|---|---|---|
| Small cracks or holes (under 3″x3″) | Yes, with care | $300–$500 per 10 sq ft |
| Impact damage (hail, debris) | Sometimes | $300–$500 per 10 sq ft |
| Water damage and mold | No — call a pro | $8–$45 per sq ft |
| Discoloration and staining | Sometimes | $150–$1,400 per sq ft |
| Failed sealants at windows/doors | Yes, minor only | Varies |
| Moisture behind the wall, rot, or delamination | No — call a pro | Varies significantly |
That crack in your EIFS might look minor. But water doesn’t need a big opening to cause big problems. Once moisture gets behind the insulation layer, it can silently rot the wood sheathing and framing underneath — sometimes for years before you notice anything inside.
The good news? Most EIFS damage caught early is very fixable. The key is knowing what you’re dealing with before you reach for a caulk gun.
I’m John Martin of Martin & Sons, a family-owned contractor with over 35 years of hands-on experience in EIFS siding repair and exterior restoration. In this guide, I’ll walk you through exactly how to identify, repair, and prevent EIFS damage — so you can protect your home without overpaying or making things worse.
Understanding EIFS: What It Is and Why It Fails
To understand how to repair EIFS (Exterior Insulation and Finish Systems), we first have to understand what it actually is. Often referred to colloquially as “synthetic stucco,” EIFS is a multi-layered exterior wall cladding system. While it looks very similar to traditional stucco from a distance, the materials and engineering behind it are entirely different.
Traditional stucco is a thick, heavy, cement-based product applied over metal lath. It is incredibly rigid and breathes naturally, but it is prone to hairline cracking as a house settles. EIFS, on the other hand, is a lightweight, highly engineered system designed to provide both insulation and a waterproof exterior finish.
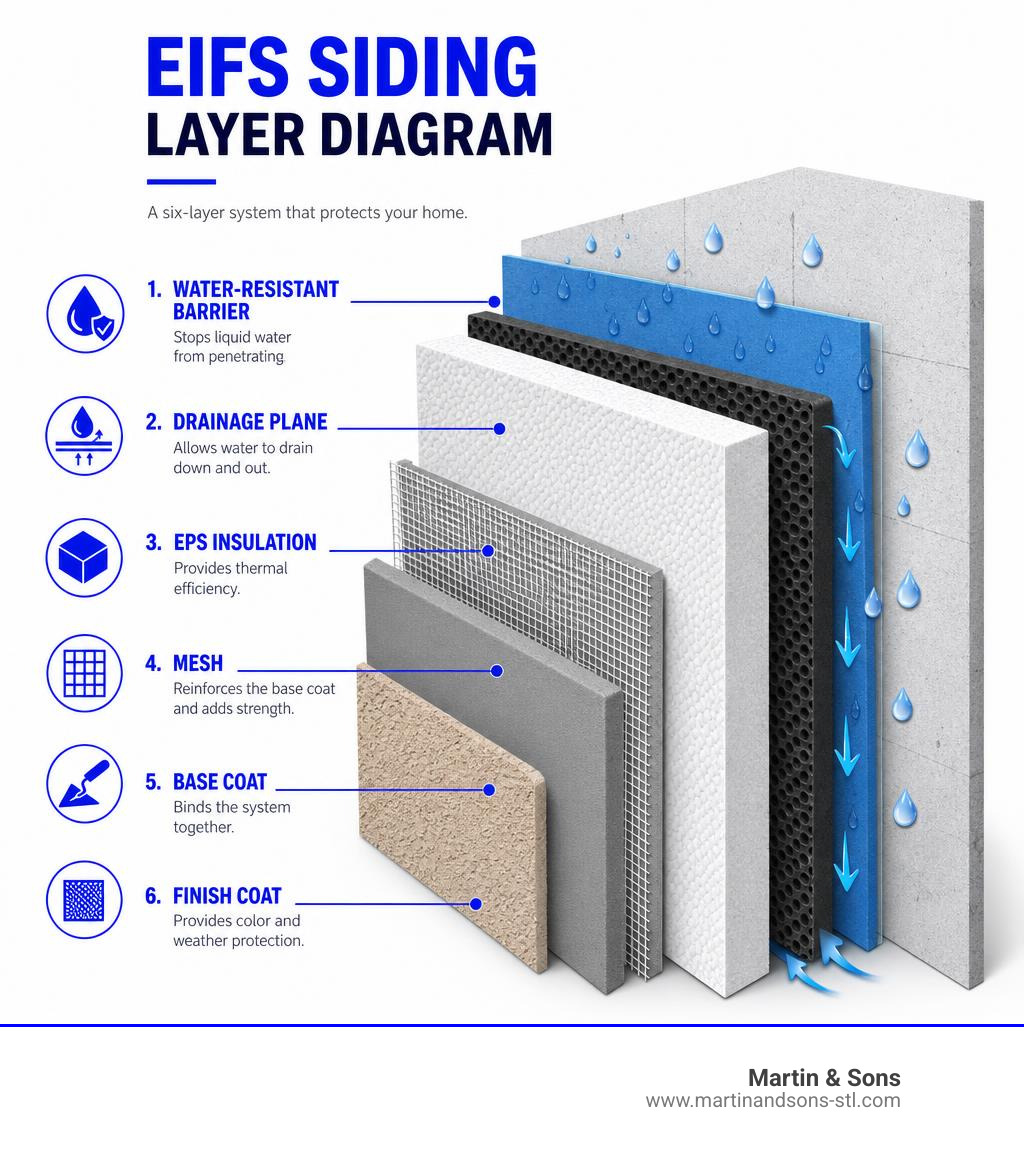
A classic EIFS installation consists of several distinct layers:
- A Water-Resistive Barrier (WRB): Applied directly over the home’s wood sheathing (like OSB or plywood).
- A Drainage Plane: In modern systems, this is a cavity or grooved path that allows any water that gets past the outer layers to safely drain down and escape through weep holes.
- Expanded Polystyrene (EPS) Insulation Board: Rigid foam boards that are glued or mechanically fastened to the substrate, providing exceptional thermal efficiency.
- Base Coat: A polymer-modified cementitious or non-cementitious layer applied directly over the EPS foam.
- Reinforcing Fiberglass Mesh: Embedded directly into the wet base coat to provide strength, impact resistance, and crack prevention.
- Finish Coat: An acrylic-based, textured outer layer that is highly resistant to water, mildew, and fading.
Traditional Stucco vs. EIFS Siding
| Feature | Traditional Stucco | EIFS (Synthetic Stucco) |
|---|---|---|
| Primary Material | Portland cement, sand, lime, and water | EPS foam insulation, acrylic polymers, fiberglass mesh |
| Weight | Heavy (approx. 10 lbs per sq ft) | Extremely lightweight (approx. 1–2 lbs per sq ft) |
| Flexibility | Rigid; prone to cracking from thermal expansion | Highly flexible; moves easily with structural shifts |
| Insulation Value | Low (negligible R-value) | Excellent (high R-value due to EPS foam core) |
| Moisture Strategy | Absorbs and breathes out moisture | Barriers block water; drainage cavities weep it away |
Because EIFS is so lightweight and thermally efficient, it has become incredibly popular across the St. Louis metro area, from Chesterfield to O’Fallon. However, its greatest strength is also its greatest vulnerability.
In older installations (specifically those built in the 1980s and 1990s), EIFS was designed as a “barrier system.” This meant it relied entirely on the outer finish coat and sealant joints to keep water out. If a single window sealant joint failed, or if flashing was missing around a chimney, water would enter the system. With no drainage plane behind the foam, that water became trapped.
Over time, trapped moisture leads to wood rot, mold growth, and structural delamination. When planning a project, understanding these structural differences is key, which is why we always emphasize smart siding replacement considerations before jumping into a cosmetic patch. For a deeper look at system differences, check out this comprehensive EIFS and Stucco Repair Overview.
How to Identify and Fix Common EIFS Damage

Living in Missouri means our homes face extreme weather swings. From freezing winters in Florissant to humid, hot summers in Creve Coeur, the constant thermal expansion and contraction puts incredible stress on our home exteriors.
Common types of EIFS damage property owners face include:
- Impact Damage: Landscaping equipment, stray baseballs, or falling tree limbs can puncture the thin outer base coat and crush the soft EPS foam underneath.
- Cracking: Hairline cracks often develop at high-stress areas, such as the corners of windows, doors, and HVAC wall penetrations.
- Discoloration and Staining: Rust stains from metal fixtures or dark mildew patches in areas shaded from the sun can ruin your home’s curb appeal.
- Blistering and Bubbling: This occurs when moisture gets trapped beneath the finish coat, causing the acrylic layer to separate and bubble.
- Woodpecker Damage: Birds love the hollow sound of EPS foam and will happily drill holes right through your siding to build nests.
- Hail Damage: Severe storms can pepper an entire wall with small, circular impact fractures. For instance, after a severe storm hit St. Charles, MO, the First Baptist Church Harvester required extensive EIFS resurfacing and patching to restore its watertight integrity.
To understand the industry standards for correcting these issues, we reference the official Dryvit Care EIFS Repair Procedures.
Step-by-Step Guide to Minor EIFS Siding Repair
For small punctures, woodpecker holes, or impact spots under 3″x3″, a meticulous homeowner or repair specialist can achieve a seamless look by following these manufacturer-approved steps:
Step 1: Clean and Prep the Damaged Area
Using a wire brush, scraper, and a damp sponge, clean away all loose debris, dirt, and mold. Let the area dry completely.
Step 2: Cut Out the Damaged Foam
Using a sharp utility knife, cut a clean rectangle around the damaged area. Cut all the way through the outer layers and the EPS foam down to the underlying substrate or water-resistive barrier. Be extremely careful not to slice into the barrier itself.
Step 3: Remove the Outer Finish Around the Patch
To ensure the new patch blends seamlessly, you must expose the existing base coat. Use a hand-held grinder or a specialty scraping tool to remove the finish coat at least 3 inches in all directions around the cut-out area. Do not grind into the existing reinforcing mesh.
Step 4: Install New EPS Foam
Cut a piece of new EPS foam insulation board to fit snugly into the void. Apply an EIFS-compatible base coat adhesive to the back of the foam and press it firmly into place. Ensure it sits flush with the surrounding foam.
Step 5: Apply Base Coat and Embed Mesh
Mix your polymer-modified base coat. Apply a layer over the patch, keeping it recessed about 1/16 of an inch below the surrounding finish so the final texture sits flush. While the base coat is wet, embed a piece of fiberglass reinforcing mesh into it. The mesh must overlap the existing, exposed base coat by at least 1 to 2.5 inches. Smooth it flat with a trowel.
Step 6: Texture and Color Matching
Once the base coat has cured completely (usually 24 hours), apply your color-matched finish coat. For small holes under 3″x3″, products like Dryvit RapidPatch can allow for same-day finish applications. Use a plastic float or trowel to match the texture of the surrounding wall, blending the wet edges carefully.
If you aren’t comfortable handling these steps or matching the complex textures, reading about how home siding repair can help can give you a better sense of what to expect from a professional repair.
Addressing Failed Penetrations and Sealants
Did you know that 85% of all EIFS moisture problems originate at wall penetrations?
Every time a contractor cuts a hole through your EIFS for a dryer vent, hose bib, electrical box, or HVAC line, they create a high-risk entry point for water. Unfortunately, many installers simply push the fixture through, squirt some cheap silicone caulk around it, and call it a day.
Because EIFS walls experience intense thermal movement — often seeing daily temperature shifts of up to 90°F on south-facing walls — caulk-only seals fail within just 3 to 7 years.
When caulk is applied directly between the fixture and the EIFS finish coat without a proper joint design, it suffers from “three-sided adhesion.” This means the sealant bonds to the left, the right, and the back of the joint. When the wall expands or contracts, the sealant cannot stretch, causing it to rip apart.
The 4 Essential Components of Proper Penetration Detailing:
- Flashing Membrane: Integrated directly with the water-resistive barrier behind the EIFS in a shingle-lap sequence.
- Sleeve or Mounting Block: A dedicated standoff block that keeps the penetration separate from the active drainage cavity.
- Closed-Cell Backer Rod: Sized 25% to 50% larger than the joint width, pushed into the joint to control sealant depth and prevent three-sided adhesion.
- ASTM C920 Sealant: A high-performance, elastomeric sealant tooled to a perfect 2:1 width-to-depth ratio, ensuring it can stretch and compress for decades.
To learn more about how to detail these vulnerable areas, read the detailed guide on EIFS Penetrations Done Right.
Professional vs. DIY EIFS Siding Repair: When to Call the Experts
While patching a small ding from a lawnmower is a reasonable DIY weekend project, larger repairs require specialized tools and expert training.
Why DIY EIFS Repair Has Serious Limitations
Unlike wood or vinyl siding, EIFS is a continuous, monolithic barrier. If you patch a crack with ordinary hardware-store caulk, you will seal moisture inside the wall rather than keeping it out.
Furthermore, matching the color and texture of weathered synthetic stucco is an art form. Improper DIY patches often look like highly visible blemishes, hurting your home’s resale value.
Professional Diagnostic Tools
When we assess an EIFS wall in St. Peters or Maryland Heights, we don’t just guess where the water is. We use advanced diagnostic equipment, including:
- Pin-Type and Pinless Moisture Meters: To measure the exact moisture percentage of the wood sheathing behind the foam without destroying the wall.
- Infrared Thermography: Thermal imaging cameras detect temperature variances caused by wet insulation, mapping out hidden water damage behind the surface.
- Borescope Inspections: Inserting tiny cameras through microscopic holes to visually inspect the condition of the framing.
If our testing reveals elevated moisture readings (typically above 15%), it indicates that water has bypassed the outer barrier and structural rot or mold remediation may be required. Knowing when to call the siding repair pros can save you thousands of dollars in compounding structural damage.
The Real Cost of EIFS Siding Repair
EIFS repair costs vary significantly depending on the severity of the damage, accessibility, and whether moisture has reached the structural sheathing.
- Cosmetic Repairs: Fixing minor cracks, small punctures, or woodpecker holes typically ranges from $300 to $500 for 10 square feet of repairs.
- Water Damage and Mold Remediation: If moisture has rotted the OSB sheathing or framing behind the foam, repairs can run anywhere from $8 to $45 per square foot.
- Staining and Discoloration Refinishing: Restoring the color of stained, faded, or dirty EIFS can cost $150 to $1,400 per square foot depending on whether localized cleaning or a full elastomeric recoating of the entire wall elevation is required.
To put these prices in context with other siding materials, refer to The Ultimate Siding Repair and Patching Guide. For local pricing tailored to the St. Louis climate and labor market, check out our guide on St. Louis siding repair quotes.
When to Hire a Certified Professional
When dealing with extensive EIFS failures, a simple patch may not be enough. In these cases, we look at advanced restoration methods:
- Overcladding: This involves installing a new, modern cladding system right over the existing EIFS. It allows us to redesign the building’s exterior with modern textures, architectural shapes, or alternative siding materials.
- Rainscreen Systems: Transitioning your home to a high-performance rainscreen system that utilizes a continuous ventilation cavity, ensuring that any moisture that enters can evaporate rapidly.
Hiring certified, experienced contractors ensures that your repairs comply with manufacturer specifications and local building codes. Protect your investment by reviewing this checklist for hiring siding replacement contractors.
Preventative Maintenance: Extending the Lifespan of Your EIFS
If installed correctly and maintained properly, EIFS is an incredibly durable material that can easily last 20 to 60 years without requiring complete replacement.
Keep your system in peak condition with these maintenance best practices:
- Periodic Cleaning: Wash your EIFS walls every 1 to 2 years to remove dirt, mold, and algae.
- Low-Pressure Washing Only: Never use high pressure on EIFS! Keep your pressure washer below 600 psi and use a wide 45-degree nozzle. High pressure can blast right through the thin acrylic finish.
- Use Safe Cleaners: Stick to mild, non-abrasive, non-caustic cleaning solutions. Pre-wet the wall before applying the cleaner, and rinse thoroughly from top to bottom before it dries.
- Landscaping Clearance: Keep tree branches trimmed back so they don’t rub against the walls during high winds. Keep shrubs, soil, and mulch at least 6 to 12 inches away from the bottom edge of the EIFS to prevent pests (like carpenter ants) and moisture from climbing up behind the system.
- Annual Inspections: Walk around your home every spring and fall. Look for cracked sealants, bubbling paint, or new cracks near windows and doors.
- Regular Sealant Replacement: Elastomeric sealants wear out much faster than the EIFS wall itself. Plan to replace the sealant joints around your windows and doors every 10 to 20 years to account for constant thermal movement.
Understanding how your maintenance routine affects your long-term product protection is crucial. Read more about siding warranties to keep your coverage intact.
Frequently Asked Questions About EIFS Repair
How long does EIFS siding last?
With proper installation, high-quality materials, and regular maintenance (such as prompt crack repairs and sealant replacement), EIFS siding can easily last between 20 and 60 years without needing to be completely replaced.
Can you install Hardie board or other siding over EIFS?
Yes, you can install James Hardie fiber cement siding or other materials over EIFS, but it must be done by a licensed professional. The contractor must install a proper nailing surface (such as wood furring strips) anchored directly through the EIFS into the home’s structural studs, and ensure a proper moisture barrier is maintained. For a look at how this process works, see the siding replacement steps.
How often should EIFS sealants be replaced?
EIFS sealants typically need to be removed and replaced every 10 to 20 years. Because sealants experience constant expansion and contraction due to temperature swings, they will dry out, crack, and lose adhesion long before the actual EIFS cladding fails.
Conclusion
Your home’s exterior is its first line of defense against the elements. While EIFS is an exceptionally beautiful, energy-efficient siding option, ignoring minor cracks or failed window sealants can lead to incredibly costly structural repairs down the road.
At Martin & Sons, we believe in doing things right the first time. Serving the greater St. Louis, MO region — including St. Peters, St. Charles, Florissant, Chesterfield, Creve Coeur, Maryland Heights, and O’Fallon — we bring over three decades of exterior expertise to every job.
We stand behind our work with our industry-leading customer protections:
- No upfront deposits — you pay only when the job is 100% complete and you are completely satisfied.
- Lifetime labor warranties on our installations.
- The best prices upfront with zero high-pressure sales tactics.
If you suspect your synthetic stucco has suffered wind, hail, or moisture damage, don’t wait for a small leak to turn into a major headache. Contact us today to schedule a professional, high-precision EIFS inspection.
To get started on protecting your home, find certified EIFS siding repair near me and let our family take care of yours.