
Why Adjusting Blum Hinges Is Easier Than You Think
Adjusting Blum hinges is a straightforward three-step process that most homeowners can complete in under 10 minutes per door — no professional required.
Quick answer: How to adjust Blum hinges
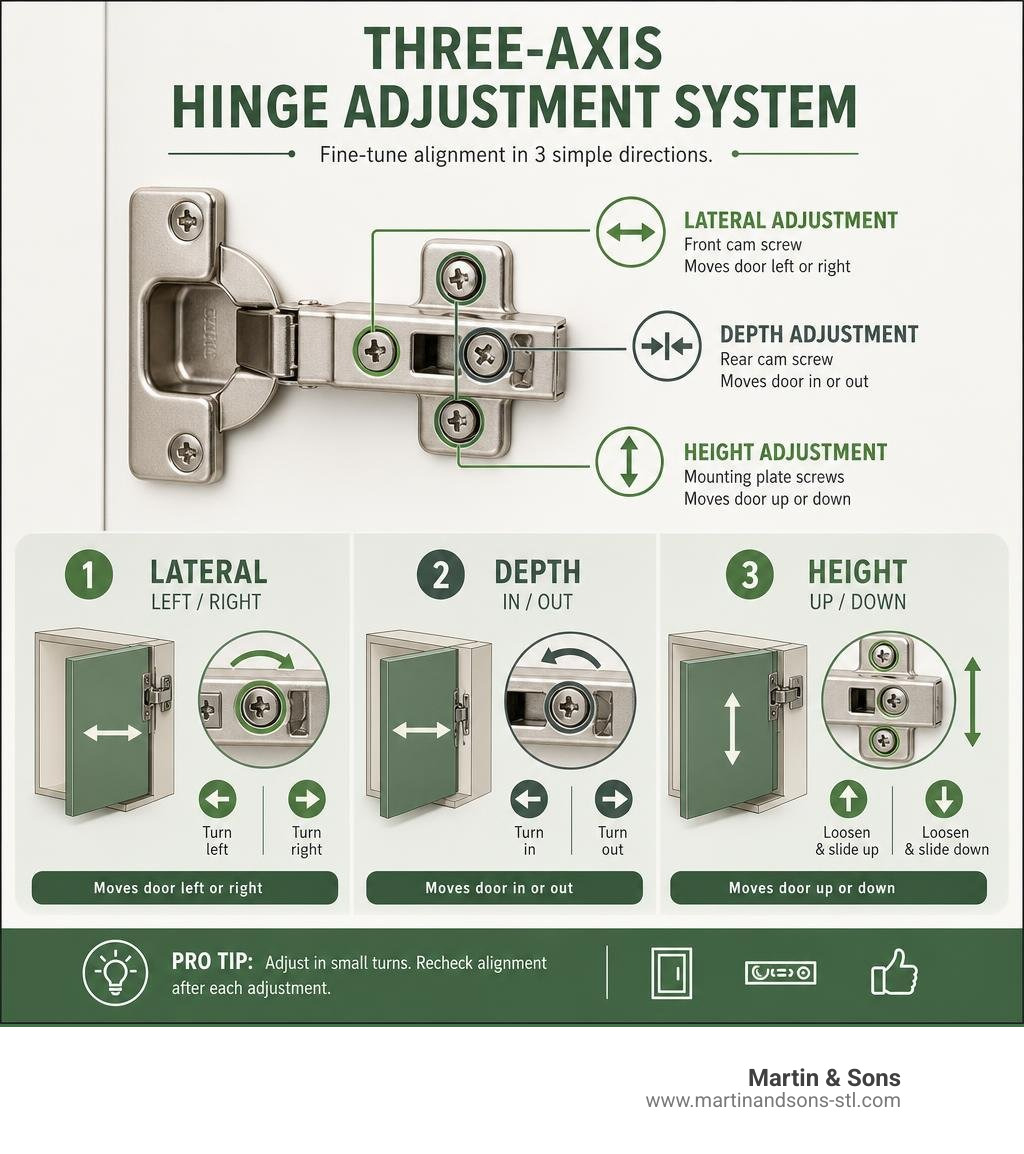
- Side-to-side (lateral): Turn the front cam screw clockwise to shift the door right, counterclockwise to shift left.
- Depth (in/out): Turn the rear cam screw clockwise to pull the door inward, counterclockwise to push it outward.
- Height (up/down): Loosen the mounting plate screws, slide the door up or down through the oblong holes, then retighten.
Work in quarter-turn increments and recheck the door after each adjustment.
If your cabinet doors are sagging, rubbing, or leaving uneven gaps, you’re not alone. Wood expands and contracts with humidity changes throughout the year — and even well-installed cabinets will drift over time. In fact, studies from professional cabinet installers show that roughly 40% of projects need at least minor hinge adjustments after installation, and proactive fixes can save up to 50% of rework time.
The good news? Blum hinges are specifically designed to make this easy. Their three-axis adjustment system lets you correct almost any alignment problem without removing the door or calling a professional.
I’m John Martin, and with over 35 years of hands-on cabinetry and home renovation experience at Martin & Sons, I’ve adjusted thousands of Blum hinges across kitchen remodels, bathroom vanities, and full home renovations — so I know exactly where most homeowners get stuck when adjusting Blum hinges. Let’s walk through everything you need to know.
Basic adjusting blum hinges glossary:
Identifying Your Hardware and Tools
Before you grab a screwdriver and start turning random screws, it helps to understand what you are working with. Blum cabinet hinges are renowned worldwide for their dependability and engineering. In fact, a genuine Blum hinge contains 58 micro-components, including 1.2mm steel balls and 0.21mm springs engineered to work together flawlessly.
To verify that you have authentic hardware, look closely at the hinge arm. Genuine hinges feature a laser-etched “BLUM” engraving and a “Made in Austria” stamp. If you don’t see these, you may be dealing with a knockoff, which often lacks the precise adjustment ranges and durability of the real thing.
Identifying Your Blum Hinge Model and Soft-Close Features
Blum designs a variety of hinges tailored to different cabinet styles. The two most common varieties you will encounter in residential kitchens are:
- Compact BLUMOTION (e.g., Compact BLUMOTION 38N): These are compact, one-piece hinges designed specifically for face-frame cabinets. They often feature a 105-degree opening angle and a 1/2″ overlay.
- CLIP top BLUMOTION: These are two-piece hinges commonly used on frameless (European-style) cabinets. They feature a distinct hinge arm that clips onto a separate mounting plate.
To confirm your hinge has integrated soft-close functionality, look for the built-in damper. On Compact BLUMOTION models, you will see a small steel ball point and an oval stamp on the hinge cup. On CLIP top models, there is a switch inside the hinge cup that allows you to manually turn the soft-close mechanism on or off.
If you are starting a new project or replacing old hardware, it is critical to get your measurements right. Poor measurements account for 80% of cabinet installation issues. You can use this guide to measure hinge cup placement accurately before drilling.
Essential Tools and the Pozidriv Advantage
To adjust your hinges like a seasoned carpenter, you only need a few basic tools:
- A bubble level (to check door plumb)
- A mechanical pencil (to mark original positions before adjusting)
- A high-quality screwdriver
However, there is one pro secret that will save you a massive headache: always use a Pozidriv screwdriver.
While a standard #2 Phillips screwdriver looks like it fits, it is actually slightly different. Blum hinges use Pozidriv screws, which feature a tiny second cross-mark rotated 45 degrees from the main slots. Using a standard Phillips screwdriver on a Pozidriv screw causes “cam-out” — where the screwdriver slips out under pressure, stripping the screw head. Investing in a $50 quality tool set that includes a #2 Pozidriv driver will cut your total project time by 25% and prevent stripped hardware.
The Complete Three-Axis Guide to Adjusting Blum Hinges
Modern European-style cabinet hinges share a three-axis layout. This means you can adjust the door in three dimensions: up and down (height), left and right (lateral), and in and out (depth).
Adjustments are made using eccentric cam screws. These screws do not back out like regular wood screws; instead, they act as tiny cams that shift the hinge arm relative to the cabinet box with millimeter precision.
| Hinge Series / Model | Height Adjustment | Lateral (Side-to-Side) | Depth (In/Out) |
|---|---|---|---|
| Compact BLUMOTION 38N | ±3.0 mm | ±1.5 mm | +2.0 mm / -1.0 mm |
| Series 200 / 700 | ±2.0 mm | -1.5 mm to +4.5 mm | 0.5 mm to 2.8 mm |
| Series F / 400 | ±2.0 mm | -0.5 mm to +5.5 mm | 0.5 mm to 2.8 mm |
| CLIP top BLUMOTION 110° | ±3.0 mm | ±2.0 mm | +3.0 mm / -2.0 mm |
The Recommended Sequence for Adjusting Blum Hinges
When cabinet doors are out of alignment, most homeowners make the mistake of turning screws at random. This usually results in “chasing your tail” — fixing one gap only to create a binding issue somewhere else.
To avoid this, always follow this strict diagnostic and adjustment sequence:
- Vertical Height first: Aligning the doors top-to-bottom stabilizes the door on its mounting plates.
- Lateral Side-to-Side second: This corrects any tilt and establishes even gaps between adjacent doors.
- Depth In-and-Out third: This ensures the door sits flush with the cabinet face without rubbing or binding.
Adjusting Vertical Height (Up and Down)
If one cabinet door sits lower than its neighbor, you need a vertical height adjustment.
On standard Blum hinges, height is adjusted by loosening the two mounting screws that secure the mounting plate to the cabinet frame. The plate features oval-shaped oblong holes that allow you to slide the entire hinge up or down.
- Locate the mounting plate screws on both the top and bottom hinges.
- Loosen the screws slightly (about a half turn) so the door can slide but won’t fall.
- Physically raise or lower the door to the desired height.
- Hold the door in place and firmly retighten the mounting screws.
Pro Tip: For heavy doors, have a helper hold the door level while you tighten the screws to prevent the door from slipping back down.
Adjusting Side-to-Side Lateral Alignment (Left and Right)
Uneven vertical gaps between double doors or a tilted door are solved with lateral adjustments. The lateral adjustment screw is the front-most screw on the hinge arm (closest to the cabinet door face).
Let’s look at a common scenario: the cabinet door is tilted to the left.
- Open the door and locate the lateral adjustment screw on the upper hinge.
- Turn this screw clockwise a half turn. This pulls the top of the door closer to the hinge side.
- Move to the lower hinge and turn its lateral screw counter-clockwise a half turn. This pushes the bottom of the door away from the hinge side.
- Close the door and check the gap. If you over-adjusted, simply turn the screws back slightly in the opposite direction.
By adjusting the top and bottom hinges in opposite directions, you can pivot the door until it is perfectly plumb.
Adjusting Depth and Door Overlay (In and Out)
If your cabinet door doesn’t close all the way, stands proud of the cabinet face, or catches on the cabinet frame when you open it, you need to adjust the depth.
The depth adjustment screw is the rear-most screw on the hinge arm (closest to the back of the cabinet). On modern Blum hinges, this is an eccentric cam.
- Locate the rear cam screw on both hinges.
- Turn the screw clockwise to pull the door closer to the cabinet box (reducing the gap).
- Turn the screw counter-clockwise to push the door further away from the cabinet box (preventing binding).
- Ensure you adjust both hinges by the same amount to keep the door parallel to the cabinet face.
Caution: Never back the depth screw out so far that it completely disengages from the hinge arm.
Advanced Features and Troubleshooting
Now that you understand the basic three-axis adjustments, let’s look at some of the advanced features built into Blum hardware that make long-term cabinet maintenance simple.
Activating and Deactivating BLUMOTION Soft-Close
One of the best features of Blum hinges is the integrated BLUMOTION soft-close dampener, which prevents doors from slamming. However, very small or lightweight doors can sometimes close too slowly (stalling) if the soft-close resistance is too high.
To fix this, Blum allows you to deactivate the soft-close mechanism on one of the hinges:
- Locate the small slider switch inside the hinge cup.
- The switch is marked with an “I” (activated) and a “0” (deactivated).
- Slide the switch to “0” on one of the hinges (usually the bottom one).
- Close the door once to complete the cycle. The door will now close with half the dampening force, preventing it from stalling.
Removing and Reattaching Hinges with CLIP Technology
If you ever need to paint your cabinet doors or remove them for a deep clean, Blum’s tool-free CLIP technology makes it incredibly easy. You do not need to unscrew anything from the cabinet.
- To Remove: Reach behind the hinge arm inside the cabinet. You will feel a small metal release lever. Press or pinch this lever, and the hinge arm will snap off the mounting plate. Support the door with your other hand so it doesn’t fall.
- To Reattach: Align the front lugs of the hinge arm with the corresponding hooks on the front of the mounting plate. Press firmly on the back of the hinge arm until you hear a distinct, solid click. The hinge is now securely locked back in place without losing any of your previous alignment adjustments.
Troubleshooting Common Issues When Adjusting Blum Hinges
Even with high-quality hardware, you may run into a few common issues over time:
- Sagging Doors: Sagging is incredibly common. In a typical 100-door tracking log, roughly 15% of doors will sag annually. Fortunately, a quick vertical adjustment takes less than 5 minutes per door and restores perfect alignment.
- Binding Hinges: If the door squeaks or catches on the cabinet frame, your depth adjustment is too tight. Back the rear cam screw out counter-clockwise by a quarter turn to give the door face more clearance.
- Soft-Close Failure: If a door starts slamming, first check if the soft-close switches are set to “I“. If they are, wipe the dampener mechanism with a dry microfiber cloth to remove dust. If the problem persists, the internal silicone dampener may have failed, requiring a quick hinge replacement.
For more complex issues, you can refer to the official Assembly & Adjustment – Blum portal, which offers instructional videos and digital configurators.
Seasonal Humidity and Wood Movement
Why do perfectly aligned cabinet doors suddenly start rubbing in the summer? The answer is relative humidity (RH).
Wood is a natural, porous material that acts like a sponge. When summer humidity spikes, wood doors absorb moisture and swell. In winter, dry indoor heating causes the wood to shrink. A typical wood door can sag up to 1/16-inch annually due to normal 5% to 10% seasonal humidity swings.
In our experience tracking cabinetry performance across St. Louis home renovations, we found that maintaining a controlled indoor relative humidity cuts cabinetry reworks by 60%. We recommend keeping your home’s indoor humidity between 35% and 55%. Even so, expect to do a quick 5-minute tune-up on your most frequently used cabinets twice a year — once in the spring and once in the fall.
Frequently Asked Questions about Cabinet Hinge Adjustments
What should I do if the adjustment screws are stripped?
If a mounting screw has stripped the wood inside the cabinet frame, the hinge will sag and won’t hold an adjustment. You can fix this easily with the “toothpick trick”:
- Remove the screw and the hinge plate.
- Dip a couple of wooden toothpicks in wood glue and insert them into the stripped screw hole.
- Snap off the excess toothpick length so they sit flush with the cabinet surface.
- Let the glue dry for 24 hours, then pre-drill a small pilot hole and reinsert the screw. The toothpicks provide fresh wood fibers for the screw threads to bite into.
Why do my cabinet doors drift and go out of alignment over time?
Cabinet doors drift due to a combination of gravity, daily use (the constant impact of opening and closing), and structural settling of the home. Fortunately, because Blum hinges use tight-tolerance micro-components, this drift slows down substantially after the first full year of new cabinet installation.
How do I know if my Blum hinge is damaged beyond adjustment?
If you have turned the adjustment screws to their maximum limits and the door is still misaligned, you may have a larger issue. True mechanical failure is characterized by:
- Cracked or bent metal on the hinge arm.
- A broken internal spring (the door will swing loosely without any tension).
- A warped cabinet door or a “racked” (out-of-square) cabinet box. If the cabinet box itself is twisted, no amount of hinge adjustment will make the door sit flush.
Conclusion
Adjusting your own cabinet doors is a great way to keep your kitchen looking sharp and prevent premature wear on your hardware. However, if you find that your cabinet boxes are warped, your doors are severely damaged, or you are ready for a complete home upgrade, we are here to help.
At Martin & Sons, we have been serving homeowners throughout the St. Louis metropolitan area — including Florissant, O’Fallon, St. Charles, and Chesterfield — for decades. We specialize in high-quality home exterior and interior renovations, and we stand by our unique customer protection plan: no upfront deposits, pay only on 100% completion and satisfaction, and lifetime labor warranties.
If you are planning a larger renovation or looking to upgrade the entryways in your home, check out our guide on Choosing the Best Doors for Your Home, or reach out to our team today to schedule a consultation!