
A Scratched Window Doesn’t Always Mean a Replacement
Glass scratch repair is often simpler than you think — and in many cases, you can fix it yourself without replacing the entire pane.
Here’s a quick overview of what’s possible:
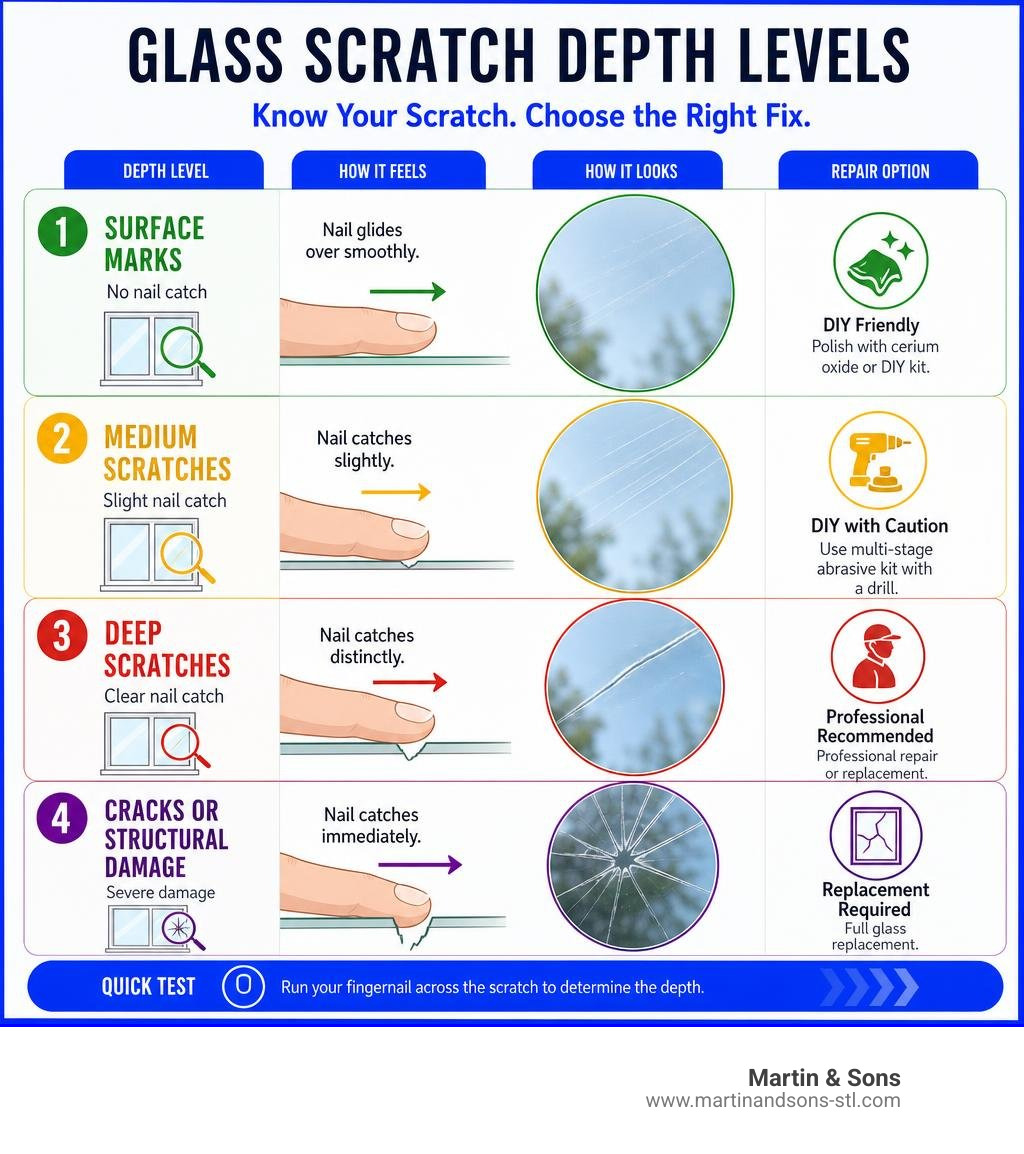
| Scratch Type | Can You DIY? | Recommended Fix |
|---|---|---|
| Light surface marks (no nail catch) | Yes | Cerium oxide polish or DIY kit |
| Medium scratches (slight nail catch) | Maybe | Multi-stage abrasive kit with drill |
| Deep scratches (clear nail catch) | Usually no | Professional repair or replacement |
| Cracks or structural damage | No | Full glass replacement |
A simple test tells you a lot: run your fingernail across the scratch. If it glides over smoothly, you’re likely dealing with a surface mark that a DIY kit can handle. If your nail catches, the damage goes deeper — and your options narrow.
Left untreated, even minor scratches can scatter light, reduce visibility, and get worse over time from dirt and moisture working into the groove.
I’m John Martin, and with over 35 years of hands-on experience in home improvement — including glass scratch repair on everything from old single-pane windows to modern insulated units — I’ve seen what works and what doesn’t. Let’s walk through exactly how to assess, treat, and prevent glass scratches the right way.
The Ultimate Guide to Glass Scratch Repair: DIY vs. Professional
When you first spot a scratch on your beautiful patio door in Chesterfield or a window pane in Florissant, your immediate reaction might be to panic and search for window replacement costs. But take a deep breath. Before you write a check for a brand-new window, understand that many glass imperfections can be safely buffed out. The trick is knowing where DIY limits end and professional intervention begins.
The feasibility of a repair comes down to scratch depth, glass type, and the tools at your disposal. For minor scuffs, a simple hand-polishing compound might do. For moderate scratches, you can step up to a drill-mounted kit. However, if the scratch is deep enough to compromise the structural integrity of the pane, attempting a DIY fix can actually shatter the glass, turning a minor cosmetic issue into an emergency cleanup.
If you are dealing with extensive damage across multiple windows in your home, it is always a good idea to read through Detailed Reviews of the Top 10 Window Repairs Near Me to see how local specialists handle these projects. For heavy-duty glass restoration, professionals often rely on high-end systems like the Professional Glass Scratch Removal xNet™ System for Rotary Polishers – GLASS POLISH SHOP , which uses structured abrasives to level the glass surface without creating optical distortion.
Assessing Scratch Severity
To determine if your glass is a candidate for a simple polish or if it requires a professional touch, we use three main criteria:
- The Fingernail Test: Run your fingernail gently across the scratch. If your nail glides over it without catching, it is a light surface mark (less than 0.003 inches deep). If your nail catches slightly but doesn’t sink in, it’s a medium scratch. If your nail drops into a distinct groove, it’s a deep scratch.
- The Optical Distortion Risk: Glass is transparent, meaning any uneven sanding or aggressive buffing will create a “lens effect.” If you grind too deeply into one spot, the view through the window will look warped and wavy.
- Glass Type: Tempered glass (commonly found in sliding doors, shower enclosures, and modern double-pane windows) behaves differently than standard annealed glass. While tempered glass is incredibly strong, localized friction heat from a high-speed drill can cause it to shatter into thousands of tiny pieces. Laminated glass (used in car windshields and high-security home windows) consists of a plastic vinyl layer sandwiched between two sheets of glass, which requires specialized resin injection if the damage is structural.
Choosing the Right Glass Scratch Repair Kit
If your scratch passes the fingernail test and is deemed safe for a DIY approach, you will need to select the right kit. The market is flooded with options, but they generally fall into three categories:
- Cerium Oxide Powders: This is the industry-standard polishing compound. It is a fine rare-earth mineral powder that you mix with water to create a slurry. It works beautifully for ultra-light surface hazing, hard water stains, and fine wiper marks.
- Multi-Stage Abrasive Kits: For scratches you can just barely feel, a simple liquid polish won’t be enough. You need physical abrasives to level the surrounding glass down to the depth of the scratch. A high-quality kit like the DIY Glass Scratch Removal Kit 2″ – Deep Scratch Repair with Drill – GLASS POLISH SHOP provides silicon carbide or structured abrasive discs that attach to a standard household drill, allowing you to gradually sand away the scratch before polishing the glass back to crystal clarity.
- Resin-Based Kits: These do not remove glass; instead, they fill the scratch or chip with a clear, UV-activated epoxy resin. These are highly popular for automotive windshield stars and bullseyes but are rarely used for wide architectural window scratches because the resin remains visible on flat residential glass.
Comparing Glass Scratch Repair Methods and Costs
Before you run out to buy supplies, let’s look at how the different repair options stack up in terms of cost, time, and expected results.
| Repair Method | Average Cost | Time Required | Best Suited For | Success Rate |
|---|---|---|---|---|
| Cerium Oxide Polishing | $15 – $30 | 30 – 60 mins | Light hazing, water stains, micro-scratches | High (90%) |
| DIY Multi-Stage Drill Kit | $35 – $60 | 1 – 2 hours | Medium scratches, wiper paths | Moderate (70% – requires patience) |
| Resin-Based Fillers | $20 – $40 | 30 mins | Deep chips, windshield cracks | High for chips; Low for long window scratches |
| Professional Restoration | $150 – $350 | 1 – 3 hours | Deep scratches, acid etching, graffiti | High (95% – preserves optical clarity) |
| Full Glass Replacement | $200 – $700+ | 1 – 2 weeks | Cracked glass, failed double-pane seals | 100% (New glass) |
If you find that the scratch is too severe and you are leaning toward replacing the glass entirely, it helps to understand the financial scope. Check out our Beginners Guide to Window Replacement Cost to get a clear breakdown of what a new window installation entails.
Cerium Oxide Polishing vs. Resin Kits
The choice between polishing the glass down or filling it in comes down to physics.
Cerium oxide is a chemical polishing agent. On a microscopic level, it doesn’t just scratch the glass smoother; it actually creates a chemical reaction with the silica in the glass, smoothing out micro-imperfections and restoring the original luster. It is highly effective for surface-level scuffs but will not fix a deep scratch because you would have to polish away too much glass, leaving a noticeable dip that warps the light.
Resin kits, on the other hand, rely on optical matching. The liquid acrylic resin has a refractive index very close to that of glass. When injected into a crack or deep scratch and cured under UV light, the resin hardens and “disappears,” structurally bonding the glass back together. While perfect for stopping a windshield crack from spreading, it is not an ideal cosmetic fix for a large living room window where you look directly through the glass daily.
Household Glass vs. Automotive Windshields
It is a common mistake to treat household window glass exactly like car glass. While both are transparent, their construction and safety hazards differ significantly:
- Laminated vs. Tempered: Car windshields are made of laminated glass. If a rock hits it, the plastic interlayer keeps the glass from shattering into your face. This lamination makes windshields highly receptive to vacuum-sealed resin repairs. Most household windows, especially older ones, are annealed glass, while newer sliding doors are tempered. Tempered glass cannot be resin-filled in the same way, and annealed glass is highly fragile under concentrated pressure.
- The Safety Hazard of DIY Heat: When using a drill-mounted buffing pad on household glass, friction builds up heat rapidly. If annealed glass gets too hot in one spot, thermal shock will cause the entire pane to crack instantly.
If you are unsure whether your home windows are tempered or annealed, or if you want to avoid the risk of breaking the glass yourself, it is always safest to consult with local professionals. You can learn how to locate a reputable local specialist in our guide on How to Choose the Best Home Window Glass Repair Shops Near Me.
How to Restore Your Glass Surfaces Safely
If you have decided to tackle a light-to-medium scratch using a DIY kit, safety and patience must be your top priorities. Glass restoration is a slow, methodical process. Rushing or applying too much pressure will almost certainly ruin the glass.

Before you begin, ensure you have the proper gear. You will need safety goggles, a dust mask (inhaling cerium oxide dust or glass particles is highly hazardous), a spray bottle filled with clean water, and a variable-speed drill or rotary polisher.
For those looking to achieve professional-grade results on larger residential panes or light commercial glass, upgrading to a professional-grade setup like the Professional xNet™ Scratched Glass Repair Kit for Rotary Polishers – GLASS POLISH SHOP is highly recommended. This kit utilizes larger 3-inch pads and advanced abrasive discs designed to distribute heat evenly and minimize the risk of optical distortion.
Step-by-Step Instructions for Glass Scratch Repair
Here is the exact process we recommend for restoring a scratched window pane using a standard drill-mounted cerium oxide kit, such as the popular Glass Repair Kit | The Scratch Doctor :
- Clean the Glass Thoroughly: Any dirt, grit, or dust left on the glass will act as an extra abrasive and create new scratches. Wash the window with glass cleaner, dry it completely, and use painter’s tape to mask off the surrounding window frame to protect it from splatter.
- Prepare the Compound: If using cerium oxide powder, mix a small amount with warm water in a small container until it reaches a paste-like consistency (similar to milk or thin yogurt). If using a pre-mixed compound, shake the bottle thoroughly.
- Mount the Polishing Pad: Attach the backing plate to your electric drill. Secure the felt polishing pad to the hook-and-loop surface of the backing plate. Apply a dollop of the polishing paste directly to the pad.
- Begin Polishing: Place the pad flat against the glass before turning the drill on to prevent splattering. Start the drill at a low speed (between 1,000 and 1,500 RPM). Move the drill in a continuous, overlapping circular motion across the scratch.
- Control the Temperature: Keep a spray bottle of water handy. As you buff, the compound will dry out and the glass will warm up. Lightly mist the area to keep the glass cool and the compound active. Never let the glass get hot to the touch. If it feels warm, stop, mist it with water, and let it cool down before continuing.
- Wipe and Inspect: Every few minutes, stop the drill, wipe away the slurry with a clean microfiber cloth, and inspect your progress. Repeat the process until the scratch is no longer visible.
Crucial Safety and Prevention Tips
- Never Hold the Drill in One Spot: Always keep the polishing pad moving. If you dwell on one spot for more than 10 to 15 seconds, you will create a permanent optical dip in the glass or cause thermal breakage.
- Avoid High RPMs: Do not exceed 2,000 RPM. High speeds generate dangerous levels of heat very quickly.
- Wear a Mask: When dry, cerium oxide and glass dust can become airborne. Protect your lungs by keeping the work area wet and wearing a particulate mask.
Frequently Asked Questions about Glass Restoration
Can you repair a scratch that catches your fingernail?
Technically, yes, but it is highly risky for a DIYer. If your fingernail catches in the scratch, it means the damage is deeper than a surface mark. To polish it out, you have to grind down the surrounding glass to match the depth of the bottom of the scratch. This requires a multi-stage abrasive process (sanding with coarse, medium, then fine discs) before polishing. Doing this over a small area will create a noticeable optical lens effect, warping the view through the window. For deep scratches, full glass replacement is usually the best and safest option.
How long does a typical glass scratch repair last?
A proper glass scratch repair is permanent. Because you are physically leveling the glass or filling a chip with structurally sound resin, the repair will last for the remaining lifespan of the window. However, to maintain the clarity of the repaired area, it is wise to apply a hydrophobic glass sealant after polishing. This prevents dirt, minerals, and acid rain from settling into any microscopic pores left behind by the polishing process.
Is it safe to use toothpaste or household remedies on glass scratches?
While the internet loves to recommend toothpaste, baking soda, or nail polish for glass scratches, we strongly advise against them. Toothpaste contains mild abrasives, but they are designed for tooth enamel, not silica glass. At best, toothpaste will do absolutely nothing; at worst, it will leave a dull, hazy patch on your glass that is harder to remove than the original scratch. Stick to dedicated cerium oxide compounds designed specifically for glass.
Conclusion
A scratched window can be incredibly frustrating, but with the right tools, a bit of patience, and the fingernail test in your back pocket, you can save yourself a lot of money and hassle.
However, if you have tried polishing and the scratch is just too deep, or if the glass has cracked, it is time to call in the professionals. At Martin & Sons, we have been serving the St. Louis metro area — including St. Peters, St. Charles, Florissant, Chesterfield, Creve Coeur, Maryland Heights, and O’Fallon — for decades.
We believe in doing business the right way. That is why we offer no upfront deposits — you pay only when you are 100% satisfied with our work. Plus, we back our window installations with lifetime labor warranties and give you our best, honest prices upfront. If you are considering upgrading your home’s windows to durable, energy-efficient options, take a look at The Complete Guide to Vinyl Windows to see why vinyl is the top choice for St. Louis homeowners. Or, if you want to understand how to select the right team for the job, read The Pane-Free Guide to Local Window Contractors.
Ready to restore your home’s view? Schedule a Professional Window Consultation with Martin & Sons today, and let our family take care of yours!