
Why Replacing a Vinyl Window Is Easier Than You Think
Replacing a vinyl window is one of the most rewarding home improvement projects you can tackle — and it’s more straightforward than most homeowners expect.
Quick answer: How do you replace a vinyl window?
- Measure the existing opening at multiple points — use the smallest width and height
- Order a replacement window sized to fit (typically 1/4″ smaller than the opening)
- Remove the old sashes, stops, and any sash weights or springs
- Prep the opening — clean it, check for level, and apply flashing tape
- Dry-fit the new window, then apply caulk and secure with shims and screws
- Insulate gaps with low-pressure expanding foam
- Finish with trim and caulk inside and out
Old windows are one of the biggest sources of energy loss in a home — heat loss through aging windows can account for up to 30% of your heating energy use. On top of that, drafts, fogged glass, and windows that stick or won’t lock are everyday frustrations that chip away at your comfort and your wallet.
The good news? Modern vinyl windows are low maintenance, energy efficient, and built to last. Done right, a replacement can cut your energy costs by 15–25% annually — and the installation process is well within reach for a careful DIYer.
That said, not every situation calls for a DIY approach. Frame rot, lead paint in pre-1978 homes, and out-of-square openings are all situations where professional help pays off.
I’m John Martin, owner of Martin & Sons LLC — a family business with over 35 years of hands-on experience replacing vinyl windows throughout St. Louis. In this guide, I’ll walk you through every step of the process so you can move forward with confidence.
Related content about replacing a vinyl window:
Understanding Your Options: Full-Frame vs. Pocket Windows
When you decide to embark on replacing a vinyl window, your first major choice is selecting the right type of replacement method. This decision impacts your budget, the installation time, and how much of your existing wall structure you will need to disturb. The two primary methods are full-frame replacement and insert (or pocket) replacement.
An insert window, commonly called a pocket replacement, allows you to slip a new, fully self-contained window unit directly into the existing wood frame. This is highly popular for DIYers because you do not have to tear out your exterior siding or touch the interior trim. However, this method only works if the existing wooden frame, sill, and jambs are structurally sound, square, and completely free of rot. If you want to learn more about how these units are designed, check out The Complete Guide to Vinyl Windows.
On the other hand, a full-frame replacement involves removing the entire window structure, including the old frame, sashes, casing, exterior trim, and sill. You are left with the raw studs of the rough opening. This is the only acceptable route if you have existing frame damage, water leaks, or wood rot. While it requires more labor and material, it allows us to inspect the surrounding wall studs for hidden moisture damage and apply modern flashing systems directly to the house wrap. To understand the long-term value of doing a complete overhaul, read about The Benefits of Replacing the Windows on Your Home.
| Feature | Pocket / Insert Replacement | Full-Frame Replacement |
|---|---|---|
| DIY Friendliness | Very High (Easiest for homeowners) | Moderate to Low (Requires advanced carpentry) |
| Saves Trim & Siding | Yes, interior trim and exterior siding remain intact | No, trim must be removed; siding may be disturbed |
| Frame Requirement | Existing frame must be perfectly square and rot-free | Handled by exposing the raw rough opening |
| Glass Area | Slightly reduced (the new frame fits inside the old) | Maximized (fits directly to the wall studs) |
| Cost | 40-50% lower than full-frame | Higher due to increased labor and materials |
Preparing for Replacing a Vinyl Window
Proper preparation is the secret to a stress-free window installation. Before you pick up a pry bar, you need to set up a safe workspace and verify the age of your home.
If your home in St. Louis, Chesterfield, or Florissant was built before 1978, there is a strong possibility that the existing window trim and sashes contain lead-based paint. Distributing this paint by scraping, sanding, or prying releases toxic dust. In these older homes, EPA-compliant lead-safe work practices must be followed. This includes sealing off the interior room with heavy plastic sheeting, wearing specialized respirators, and using HEPA-filtered vacuums. If you suspect lead paint, we highly recommend consulting a certified professional.
Safety gear is non-negotiable for this project. Always wear heavy-duty work gloves to protect your hands from splintering wood and sharp glass edges. Safety glasses are crucial when prying old trim, as dried paint chips and rusty nails can fly in any direction. Additionally, lay down drop cloths both inside and outside the window to catch debris and make clean-up a breeze.
Essential Tools and Materials for Replacing a Vinyl Window
Having the right tools lined up before you begin ensures you won’t have to make a frantic mid-project run to the hardware store in St. Charles or O’Fallon. For a detailed look at the physical steps, you can also cross-reference Installing Vinyl Replacement Windows: Easy DIY Steps.
Gather the following items:
- Tape measure (high-quality steel tape)
- 4-foot level and a smaller torpedo level
- Pry bar (flat bar) and a broad chisel
- Utility knife (for scoring paint and caulk)
- Power drill/driver with various driver bits
- Hammer and a nail set
- Wooden shims (for leveling and plumbing the frame)
- Self-adhesive flashing tape (for protecting the sill)
- Low-pressure expanding polyurethane foam (specifically formulated for windows and doors; standard high-expansion foam will warp vinyl frames!)
- Neutral-cure silicone sealant (highly compatible with vinyl; avoid cheap latex caulks)
- Sill adapter (often included with insert windows)
- Hacksaw (to trim the sill adapter to size)
How to Measure Your Opening Before Replacing a Opening
Measuring is the most critical step of the entire process. If your measurements are off by even a quarter of an inch, your new window will either not fit into the opening or will be too small to secure and seal properly. To ensure accuracy, measure inside the existing frame rather than prying away the stops first. For detailed measurement diagrams, you can refer to How to Measure for Replacement Windows | Family Handyman.
To find the correct width, measure the distance between the side jambs at three different locations: the bottom, the middle, and the top of the window opening. Write down all three numbers.
To find the height, measure from the highest point of the sloped sill (right next to the stool inside) to the top head jamb. Do this on the left side, the middle, and the right side. Again, write down all three numbers.
Once you have your three width and three height measurements, identify the smallest width and the smallest height. This is the size you will use to order your new window. Ordering based on the smallest dimensions ensures that the window will slide into the pocket even if the old frame has settled or warped slightly over time. Typically, a replacement window is ordered 1/4 inch to 1/2 inch smaller than these minimum dimensions to leave a small gap around the perimeter for shimming and insulation.
Finally, perform a diagonal check. Measure from the top-left corner to the bottom-right corner, and then from the top-right corner to the bottom-left corner. If these two diagonal measurements differ by more than 1/4 to 1/2 inch, your opening is significantly out-of-square. If this is the case, installing an insert window will be highly difficult, and a full-frame replacement is usually required to correct the framing.
Step-by-Step Guide to Removing and Installing Your Window
With your new vinyl window delivered and verified against your original measurements, it is time to remove the old unit.
Start by scoring the painted seam where the interior wood stops meet the window frame using your utility knife. This prevents the paint from peeling off in large, ugly strips when you pry the stops loose. Carefully slide your flat pry bar behind the side stops and gently pop them loose. Save these stops! You will need to reinstall them later to hold the new window in place.
Next, remove the lower sash. If you are working on an older double-hung window, the sashes may be held by sash cords connected to heavy iron weights suspended inside the wall cavity (the weight wells). Cut these cords and let the weights drop inside the pocket. If your window uses modern spring tension balances, carefully release the tension according to the manufacturer’s design to prevent the spring from snapping back and causing injury.
Once the lower sash is out, remove the parting stop—the thin strip of wood running horizontally and vertically in the center of the jamb. This can be pried out and discarded. Now, you can easily lift out the upper sash. If you are dealing with an older aluminum or steel frame window, you may need to use a reciprocating saw or a cold chisel to cut the frame into manageable pieces before prying it out. For a visual walkthrough of this demolition stage, see How to Replace a Window: Easy Steps.
With the old sashes gone, vacuum all the accumulated dust, dirt, and old paint flakes out of the empty frame pocket. If you uncovered open weight wells, fill these large cavities with fiberglass batts or expanding foam insulation to eliminate a major source of home drafts.
Preparing the Opening and Dry-Fitting
Before applying any sealants, you must prepare the sill and verify the fit of the new window.
Inspect the raw wood sill for any minor damage. Fill old screw holes or minor gouges with exterior-grade wood filler. Next, apply a layer of self-adhesive flashing tape across the entire width of the sill, wrapping it slightly up the side jambs. This creates an impermeable waterproof barrier that protects your home’s framing from any water that might bypass the window’s outer seals.
Place your level across the sill. If the sill is sloped or uneven, place wooden shims at each end and in the middle until your level shows a perfectly flat surface.
Now, perform a dry-fit. Lift the new vinyl window into the opening, placing the bottom in first and then swinging the top into place. Do not apply any caulk yet. The goal here is to ensure the window fits comfortably in the opening with about an 1/8 to 1/4-inch gap around the sides and top. Check that the window is plumb (vertical), level (horizontal), and square.
Securing, Insulating, and Sealing
Once you are satisfied with the dry-fit, tilt the window back out of the opening. Apply a thick, continuous 3/8-inch bead of high-quality neutral-cure silicone caulk along the inside face of the exterior blind stops (the wood lip on the outside of the window frame) and across the sill where the new window frame will rest.
Carefully lift the window back into the pocket, pressing it firmly against the fresh beads of caulk. This creates a primary weather seal against wind and rain.
Insert wooden shims at the screw hole locations on the side jambs. Shims should always be placed directly behind the pre-drilled installation holes in the vinyl frame to prevent the frame from bowing outward when you tighten the screws. Drive the provided mounting screws through the vinyl frame, through the shims, and into the wooden wall studs. Use 2-inch screws for initial positioning, and secure them without over-tightening.
Open and close both sashes to ensure they slide smoothly, lock easily, and seal tightly. If the window binds or the lock does not align, adjust your shims to tweak the frame until everything operates perfectly. Once secure, snap off the protruding ends of the wooden shims so they are flush with the frame.
To maximize your home’s thermal boundary, fill the remaining gaps around the window frame with low-pressure expanding polyurethane foam. Be extremely careful to use foam labeled specifically for “Windows & Doors.” Standard expanding foam expands with immense force and can easily bow the vinyl jambs, rendering your new window inoperable. To understand how proper insulation pays off on your utility bills, read New Windows and Doors Can Increase Your Homes Energy Efficiency.
Finishing Touches: Trim and Caulking
With the window secured and insulated, you can focus on the final aesthetic details.
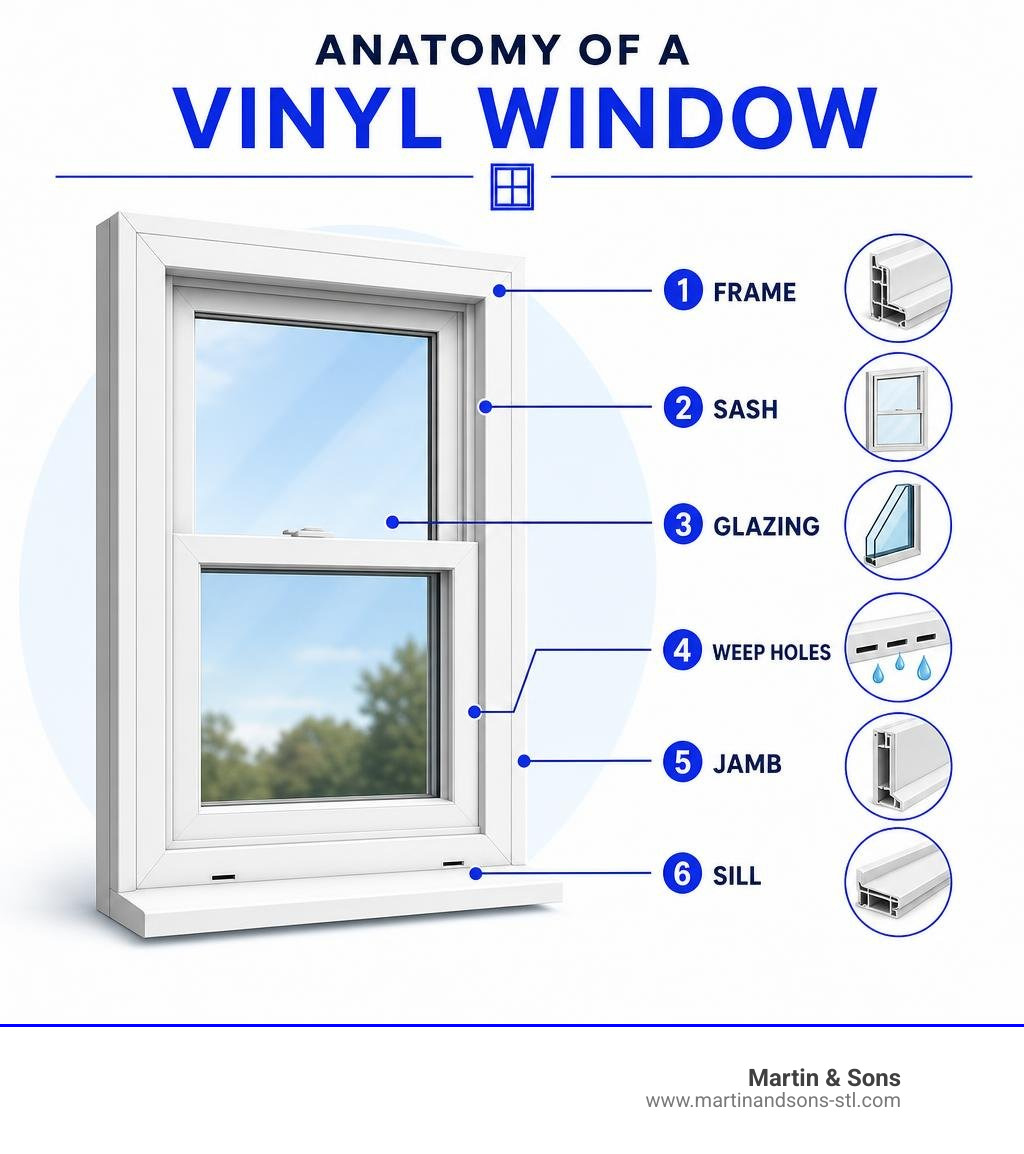
On the exterior of the window, you will likely have a gap between the new vinyl frame and the old wood casing. Install a vinyl sill adapter (often supplied with the window) to bridge the slope of the old sill. Trim it to the exact width using a hacksaw, and drill small weep holes in the bottom edge to allow any trapped water to drain out.
Reinstall the interior wood stops you saved earlier. Secure them with finish nails, using a nail set to drive the nail heads slightly below the wood surface. Fill the nail holes with wood putty and touch up the paint as needed.
Finally, apply a neat bead of caulk around the entire interior and exterior perimeter of the window. For gaps wider than 1/4 inch, push a foam-rubber backer rod into the gap before caulking. This provides backing support and ensures a long-lasting, flexible seal. For professional caulking techniques, consult How to Caulk Windows | Bob Vila.
Comparing Vinyl to Wood, Aluminum, and Fiberglass
When looking at the broader window market, vinyl remains the most popular choice for homeowners in the Greater St. Louis area, and for good reason. How does it stack up against wood, aluminum, and fiberglass?
- Cost: Vinyl replacement windows typically cost 40–50% less than wood windows and are significantly cheaper than high-end fiberglass. This makes vinyl the most budget-friendly option for whole-house upgrades.
- Maintenance: Wood windows require sanding, repainting, or restaining every 3 to 4 years to prevent rot and warping. Aluminum windows can corrode or pit over time. Vinyl, however, is virtually maintenance-free. It never needs painting, will not rot, and resists fading and cracking under Missouri’s harsh sun.
- Energy Efficiency: Vinyl frames feature multi-chambered designs that trap air, providing excellent insulation. When paired with double or triple-pane Low-E glass, they dramatically outperform conductive aluminum frames. While fiberglass offers similar thermal performance, the massive cost premium makes vinyl the clear winner in terms of return on investment.
To explore how these material choices impact your wallet and your home’s value, check out the Beginners Guide to Window Replacement Cost and see how energy-efficient upgrades pay for themselves in Energy Efficient Windows Help You Save.
Common Mistakes to Avoid During Installation
Even experienced DIYers can fall into traps that compromise the performance of their new windows. Keep these critical mistakes in mind:
- Over-tightening Jamb Screws: When securing the window frame to the studs, it is easy to drive the screws too far. Without proper shimming behind the screw holes, this pulls the vinyl frame outward, causing the sashes to bind or stick in their tracks.
- Using the Wrong Expanding Foam: Never use standard “gaps and cracks” expanding foam. It expands too rapidly and cures rock-hard, which will warp the vinyl frame and prevent the sashes from opening. Always use low-pressure window and door foam.
- Covering the Weep Holes: Vinyl windows are designed with built-in drainage pathways called weep holes at the bottom of the exterior frame. If you accidentally cover these holes with exterior caulk or trim, water will pool in the tracks and eventually overflow into your home’s walls.
- Skipping the Diagonal Check: Assuming your old window frame is perfectly square is a recipe for disaster. Always measure diagonally before ordering and installing.
For a deeper dive into how these errors can impact your project’s overall cost and longevity, read about the Top 8 Factors That Affect Replacement Window Prices.
Frequently Asked Questions about Vinyl Window Replacement
When should I choose professional installation over DIY?
While pocket replacement is a manageable project for an experienced DIYer, you should hire a professional if you discover structural wood rot, if your home was built before 1978 and contains lead paint, or if the window opening is severely out of square. Additionally, working on second-story windows poses significant safety risks.
If you want to evaluate whether your project requires a professional touch, read our guide on Window Installation in Greater St. Louis MO: 5 Key Signs.
What are weep holes and why do they matter?
Weep holes are small, engineered slots located on the exterior bottom edge of a vinyl window frame. Because vinyl windows are designed to manage water rather than block it entirely, rain that hits the screen or glass drains into the bottom track. Weep holes allow this water to escape back outside, preventing mold growth, wood rot, and water damage to your interior drywall.
How much energy can I save by replacing my windows?
By upgrading from old, drafty single-pane windows to ENERGY STAR® certified vinyl windows with Low-E glass, you can expect to reduce your heating and cooling costs by 15–25% annually. Look for windows with a low U-factor (which measures heat transfer) to ensure maximum insulating performance during cold St. Louis winters and hot, humid summers.
Conclusion
Replacing a vinyl window is an excellent investment that pays immediate dividends in the form of lower energy bills, improved curb appeal, and whisper-quiet indoor spaces. Whether you decide to tackle this project yourself or choose the peace of mind that comes with professional installation, understanding the process ensures you get the best possible results.
At Martin & Sons, we have spent decades serving homeowners throughout St. Louis, St. Charles, Florissant, Chesterfield, and the surrounding areas. We believe in doing business differently: we require no upfront deposits, meaning you only pay when you are 100% satisfied with our work. Plus, we back our craftsmanship with a lifetime labor warranty and offer our best prices upfront.
If you are weighing the benefits of upgrading your home’s windows, take a look at our detailed breakdown in Vinyl Windows: What Are the Pros and Cons of This Material. Ready to get started? Contact us today for a straightforward, hassle-free estimate!