
Find the Roof Leak Source Before Damage Spreads
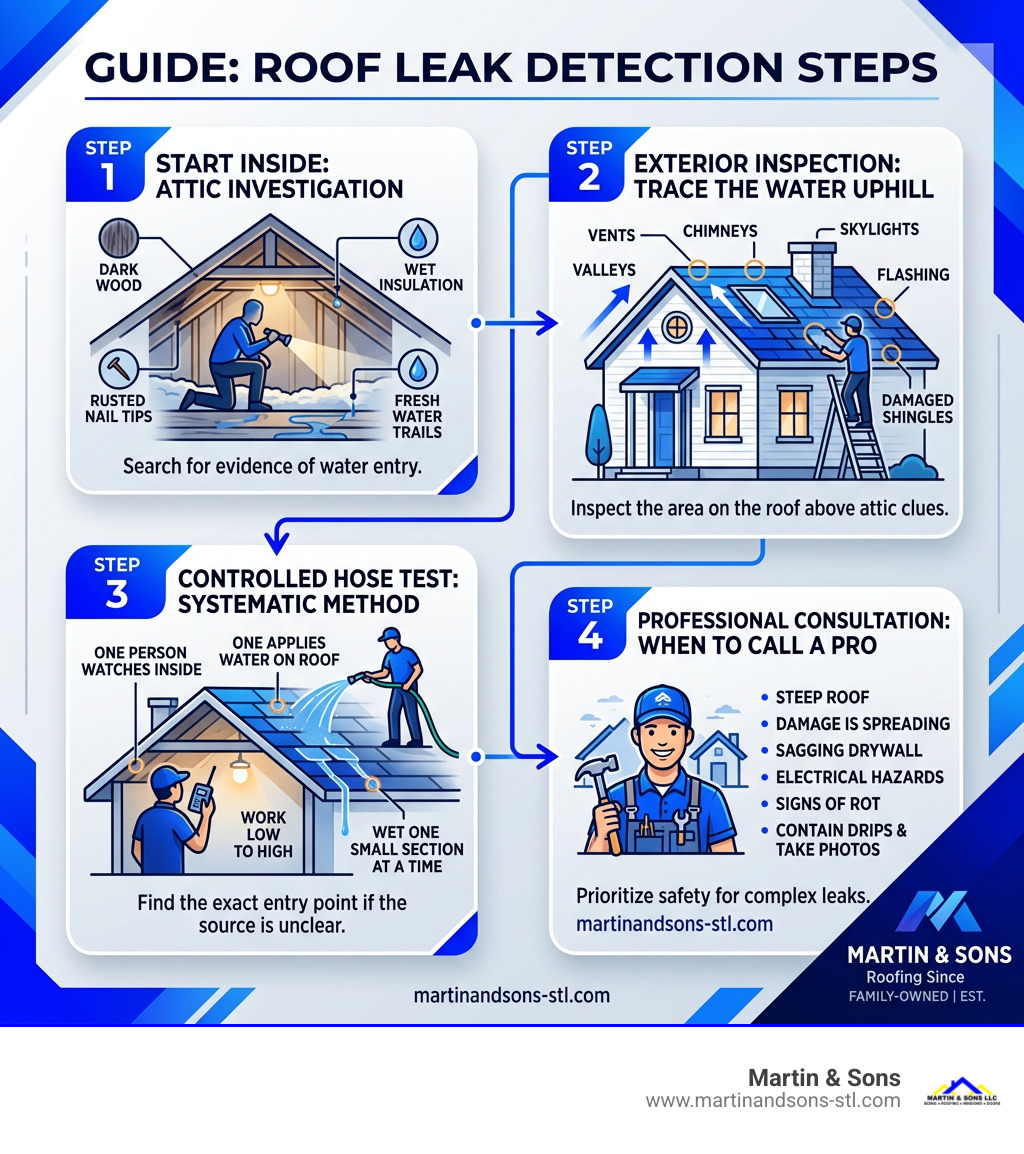
Start inside, then trace the water uphill. Check the attic with a flashlight for dark wood, wet insulation, rusted nail tips, or fresh water trails. Then inspect the roof area above those clues, especially around vents, chimneys, skylights, flashing, valleys, and damaged shingles. If the source is still unclear, use a controlled hose test: have one person watch inside while another wets one small roof section at a time, working from low to high.
A ceiling stain is rarely directly below the leak. Water can travel along decking, rafters, and framing for several feet before it reaches drywall. That is why fast roof leak detection is less about guessing where to apply sealant and more about following the evidence.
If the roof is steep, the damage is spreading, or you see sagging drywall, active electrical hazards, or signs of rot, skip the roof climb and call a professional. Take photos, contain drips with a bucket, and avoid treating a temporary patch as a permanent repair.
I am John Martin of Martin & Sons, a family-owned roofing company with more than 35 years of industry experience. We use practical roof leak detection methods to help St. Louis homeowners identify the real source of water intrusion before repair work begins.
Why Roof Leaks Are Deceptive: Understanding Water Travel and Common Failure Points
Water is relentless, lazy, and tricky. When rain penetrates your roof’s outer defenses, it does not drop straight down like an elevator; it acts more like a skier choosing the path of least resistance down a mountain.
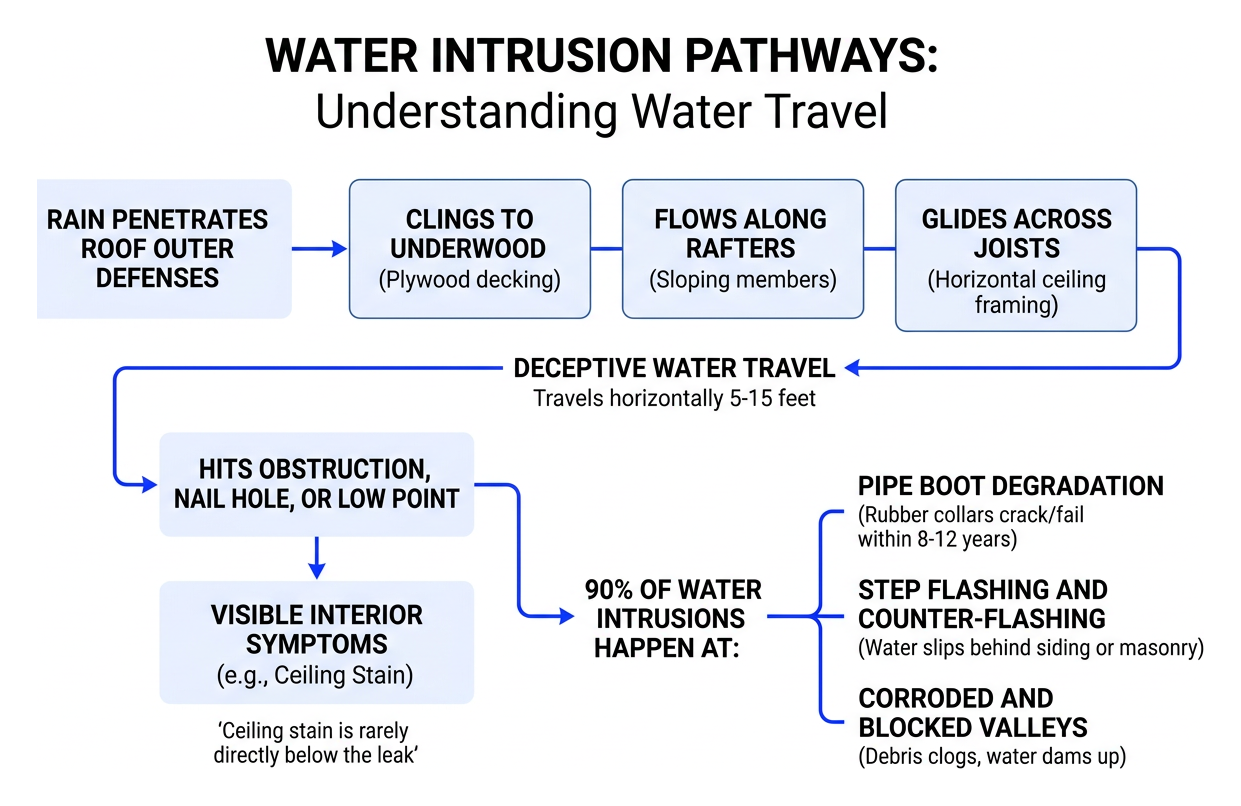
Thanks to physics—specifically surface tension, capillary action, and gravity—water clings to the underside of plywood decking, flows along sloping rafters, and glides across horizontal ceiling joists. It travels horizontally for 5, 10, or even 15 feet until it hits an obstruction, a nail hole, or a low point in your drywall.

This deceptive behavior explains why water-related construction defect claims constitute roughly 80% of all roofing claims. If you want to know how to locate elusive roof leaks, you must understand the vulnerable failure points on your exterior and why interior symptoms can be so misleading.
Common Culprits Behind Hidden Ingress
Roof leaks rarely punch straight through the middle of a healthy shingle. Instead, about 90% of water intrusions happen at transitions, penetrations, and joints.
The primary culprits behind hidden water ingress include:
- Pipe Boot Degradation: Rubber plumbing vent boots bake under direct sunlight and weather cycles. In our Midwest climate, these rubber collars typically crack and fail within 8 to 12 years—well before the surrounding shingles reach the end of their lifespan.
- Step Flashing and Counter-Flashing: Metal flashing creates a watertight seal where the roof meets vertical surfaces like exterior walls, dormers, and chimneys. When sealant dries out, fasteners pull loose, or rust forms, water slips directly behind the siding or masonry.
- Corroded and Blocked Valleys: Roof valleys channel massive volumes of rushing rainwater. When debris clogs a valley or the underlying metal corrodes, water dams up and forces its way under adjacent shingles.
- Nail Pops and Lifted Shingles: Temperature fluctuations cause wood decking to expand and contract, occasionally backing roofing nails out of place. A lifted nail pops through the shingle above it, creating a tiny funnel that directs water straight into your roof deck.
- Wind-Driven Rain: High gusts push rainwater sideways and upward, forcing moisture underneath overlapping shingle tabs and past ridge vent baffles that would easily shed normal downward rainfall.
Why Water Stains Mislead Homeowners
The brown, ringed stain blooming across your ceiling drywall is not a bullseye marking the roof breach.
When moisture reaches the top side of your ceiling drywall, it pools. Drywall acts like a sponge, absorbing water until it reaches full saturation. Only after the gypsum core is soaked does water discolor the paint or begin dripping through a light fixture or drywall seam.
Because ceiling joists deflect slightly toward the center of a room, water that entered near an exterior wall often rolls down the framing and produces a stain in the middle of your living room ceiling. Patching the roof directly above that visible ceiling stain almost guarantees you are sealing the wrong spot.
Step-by-Step Fast Triage: Tracing the Intrusion from Inside Out
When you discover indoor water damage, avoid running straight outside with a ladder and a bucket of roofing tar. A systematic triage process from the inside out will save you hours of frustration and keep you safe.
First, examine your living spaces. Look for soft spots, peeling paint, or bubbling drywall. If a drywall ceiling is visibly sagging under the weight of trapped water, carefully puncture the center of the blister with a screwdriver while holding a bucket directly underneath. Relieving that hydrostatic pressure prevents the entire drywall panel from collapsing unexpectedly.
Attic Flashlight Inspection and Moisture Trails
Your attic is the single most valuable crime scene for leak detection. Head up into the attic during daylight hours—or ideally during a rainstorm—equipped with a high-lumen flashlight and a sturdy walking board across joists.
- Look for Darkened Wood: Wet plywood and timber framing turn dark brown or black. Dry wood remains light-toned.
- Check Roofing Nails: Look up at the underside of the roof deck. Rusted nail tips or nails coated with white frost/condensation are clear indicators of moisture infiltration.
- Inspect Insulation: Look beneath the attic insulation directly above the ceiling stain. Wet fiberglass or cellulose clumps together, mats down, and gives off a sour, musty odor.
- Trace Uphill: Once you find a damp rafter or dark spot on the decking, follow that moisture trail upward toward the roof peak. Look for the highest point of dampness; that high point corresponds to your actual exterior breach.
Performing a Controlled Isolation Test
If you are inspecting on a dry day and visual clues in the attic are inconclusive, a controlled water test will help you pinpoint the leak. This method requires two people: one stationed inside the attic with a flashlight and phone, and one outside managing a garden hose.
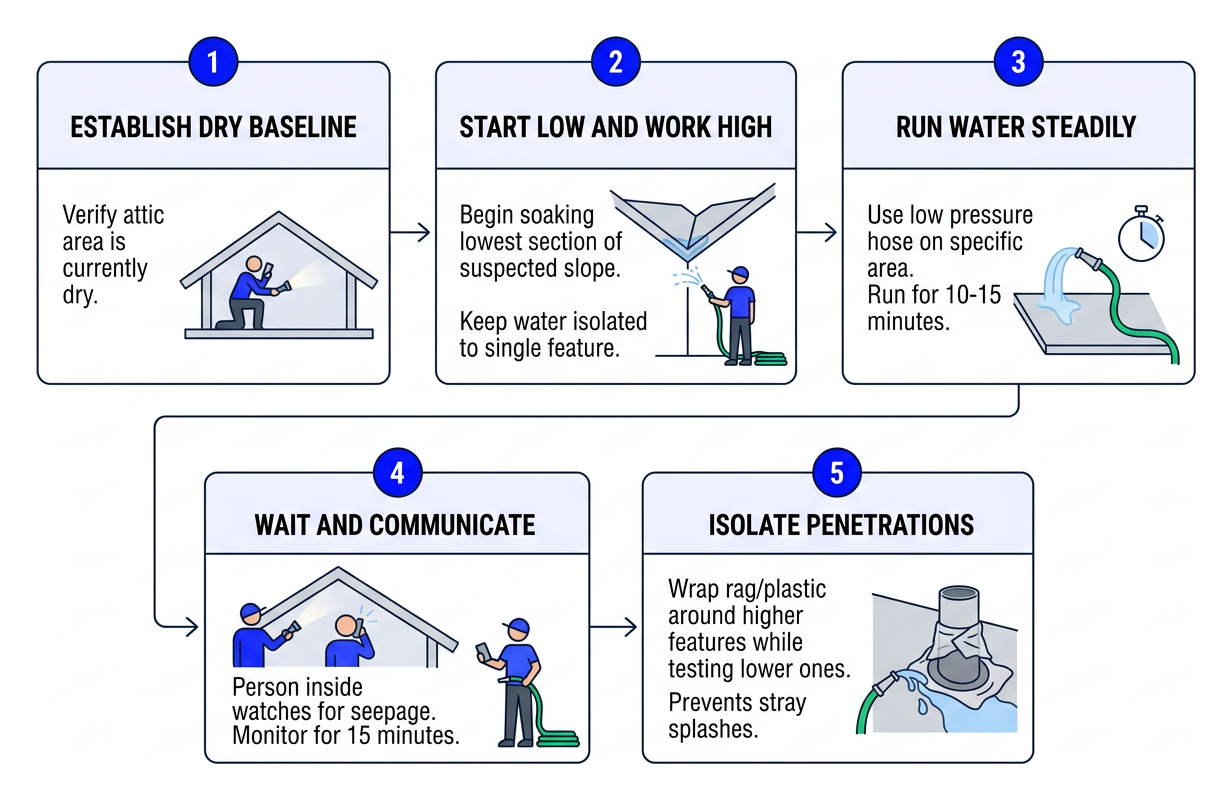
- Establish a Dry Baseline: Verify that the attic area is currently dry so you can spot new moisture instantly.
- Start Low and Work High: Never spray the entire roof at once. Begin soaking the lowest section of the suspected roof slope, keeping water isolated to a single feature (such as the base of a valley or the bottom of a pipe boot).
- Run Water Steadily: Let the hose run on low pressure directly onto that specific area for at least 10 to 15 minutes. High-pressure spraying creates false leaks by driving water where normal rain never reaches.
- Wait and Communicate: The person inside watches for the first sign of seepage. If nothing appears after 15 minutes, move the hose upward to the next penetration, step flashing section, or shingle course.
- Isolate Penetrations: Wrap a rag or plastic around higher features while testing lower ones to ensure stray splashes do not confuse your results.
Advanced Roof Leak Detection: Non-Invasive Technologies and Standards
While basic visual checks and water testing work well for steep-slope residential roofs, complex commercial assemblies and low-slope flat roofs require scientific, non-destructive evaluation tools. Up to 40% of flat roofs develop serious problems within their first year, making precision testing essential for building owners.
| Detection Method | Best Roof Types | Location Accuracy | Primary Advantage |
|---|---|---|---|
| Infrared Thermography | Low-slope flat roofs, commercial built-up, asphalt shingles | Within 1–2 feet | Scans large square footage rapidly without contact |
| Low-Voltage ELD (Vector Mapping) | Fully adhered single-ply membranes, inverted roofs, green roofs | Pinpoint: 2–3 inches | Locates microscopic breaches before moisture spreads |
| High-Voltage Sweep | Dry, exposed non-conductive membranes (EPDM, PVC, TPO) | Pinpoint: Exact breach | Fast verification on steep pitches or dry vertical flashing |
Electronic Roof Leak Detection and Membrane Standards
Electronic Leak Detection (ELD) is the gold standard for waterproofing verification, governed by rigorous industry guidelines such as the ASTM D7877 Standard Guide for Electronic Leak Detection.
ELD works on a simple electrical principle: modern roofing membranes (like EPDM, PVC, and TPO) are electrical insulators, while water and grounded building structures are electrical conductors. By introducing an electrical potential across the membrane, technicians can detect minute breaches down to 2–3 inches of accuracy.
- Low-Voltage Vector Mapping: A low-voltage direct current is applied to a wet roof surface bounded by a perimeter grounding wire. If a hole exists, electrical current flows through the breach to the grounded roof deck below, allowing sensitive probes to trace the directional voltage gradient straight to the puncture.
- High-Voltage Spark Testing: A technician sweeps a high-voltage, direct-current broom across a completely dry, non-conductive membrane. When the conductive brush passes over a pinhole, an electrical spark jumps through the defect to the grounded deck, emitting an audible beep.
- Conductive Primers and Substrates: Traditional wood or rigid foam decks do not conduct electricity naturally. Innovative conductive primers (such as TruGround technology) applied directly beneath the waterproofing layer provide the required conductive grounding plane, enabling ELD testing on conventional roof decks.
- Continuous Monitoring Grids: High-value properties can install embedded sensor grids beneath the membrane, providing real-time alerts the moment moisture penetrates the outer barrier.
Infrared Thermography and Drone Moisture Mapping
Infrared thermography relies on the natural thermodynamic properties of building materials. Water has a high thermal capacity—it absorbs heat during warm daylight hours and releases that heat much slower than dry roofing insulation after sunset.
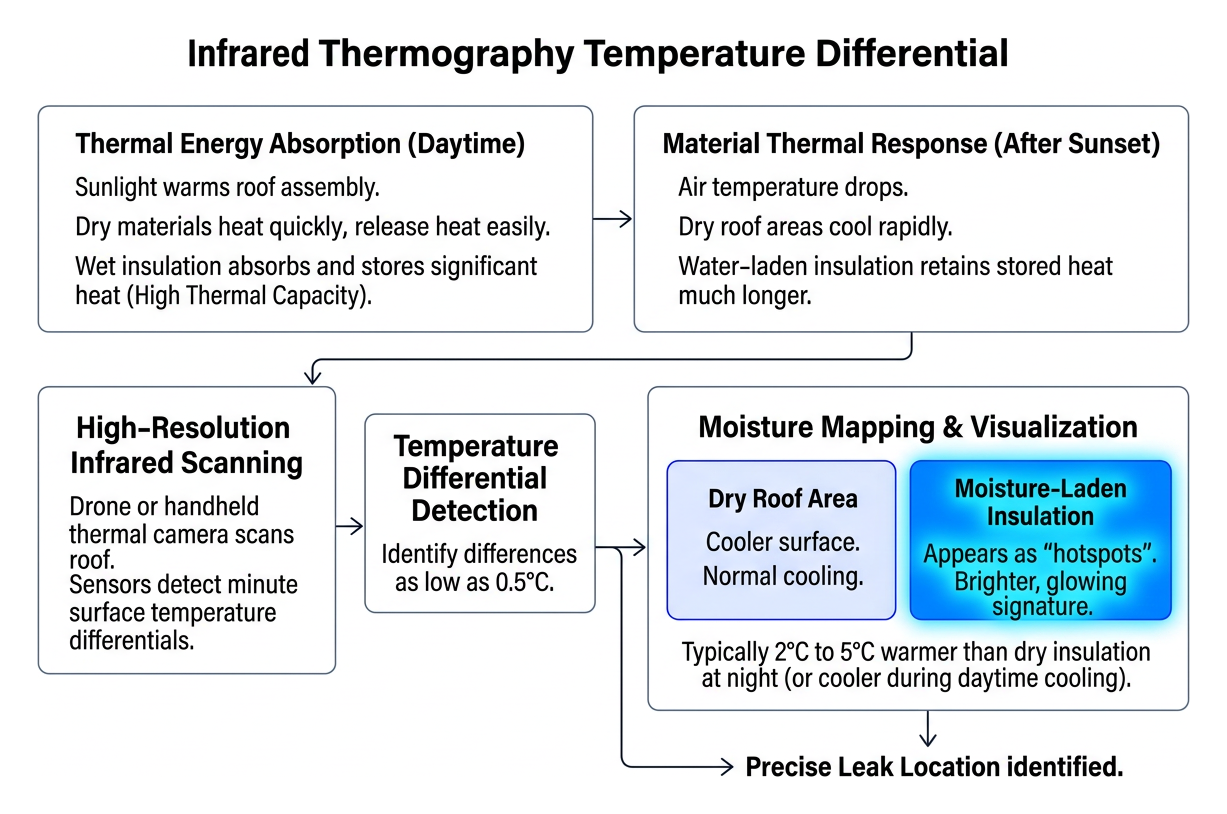
When an infrared drone or handheld thermal camera scans a roof within a few hours after sunset, moisture-laden insulation appears as bright, glowing “hotspots.” High-resolution thermal sensors detect temperature differentials as low as 0.5°C, clearly differentiating dry substrates from trapped, waterlogged insulation (which is typically 2°C to 5°C warmer than dry insulation at night, or cooler during peak evaporative daytime cooling). This aerial moisture mapping identifies the full perimeter of subsurface rot without drilling a single core sample.
Knowing Your Limits: Safety, Costs, and Next Steps
Hunting for leaks can be satisfying detective work, but safety must always come first. Roof falls remain one of the leading causes of residential construction injuries.
Never climb onto a wet roof, a steep-pitch structure (slopes greater than 6:12), or a roof exhibiting structural sag. If you cannot safely access your roof from a stable ladder position, keep your feet on the ground and consult a professional.
When comparing your options, consider the real price of fixing your roof. Minor boot replacements or flashing resealing are inexpensive fixes that preserve your home’s equity, while unaddressed water leaks lead to thousands of dollars in rotted structural rafters, ruined insulation, and interior drywall replacement.
DIY vs. Professional Roof Leak Detection
Knowing when to manage a repair yourself versus calling an experienced team protects both your home and your wallet.

- DIY-Friendly Tasks: Clearing debris from roof valleys, identifying attic moisture trails with a flashlight, securing temporary tarps on low-pitch roofs, or applying silicone to a small, obvious nail pop.
- When to Call a Pro: If you have an active leak you cannot locate after a thorough attic check, recurring leaks that return after heavy winds, multi-layer roofing systems, or signs of rotted decking. Scheduling preventative roof inspections or an emergency leak repair ensures hidden rot and underlying structural hazards are properly diagnosed with industrial-grade moisture equipment.
Temporary Mitigation and Insurance Documentation
If water is actively entering your living space during a severe storm, focus on damage control and documentation before worrying about permanent repairs:
- Contain the Ingress: Place deep plastic bins under drips. Line the floor beneath bins with old towels to catch splatter.
- Protect Valuables: Move furniture, rugs, and electronics out of the room, or cover them completely with plastic drop cloths.
- Document Thoroughly: Take clear, well-lit photos and video clips of the active leak, the ceiling water stains, and any damaged personal property. Detailed visual evidence is indispensable when navigating your roof leak insurance claim.
- Tarp Securely (Weather Permitting): If safe conditions allow, slide a heavy-duty waterproof tarp over the damaged roof section. Extend the tarp over the roof ridge to prevent water from running underneath the top edge, and secure the edges with 2×4 lumber battens rather than nailing straight through your good shingles.
Frequently Asked Questions About Finding Roof Leaks
Why does my ceiling stain appear far away from the actual roof leak?
Water flows along the path of least physical resistance. Once rain passes through a roofing breach, it encounters plywood decking, roof rafters, and horizontal ceiling joists. Surface tension allows the water to track horizontally along sloping framing members for several feet until it pools in a low spot or hits a drywall joint, causing an interior stain far from the exterior entry point.
How does electronic leak detection pinpoint punctures without tearing up the roof?
Electronic leak detection (ELD) uses an electrical voltage differential between the non-conductive roof membrane surface and the grounded structural deck below. Because dry membrane material acts as an insulator while water conducts electricity, electrical current completes a circuit directly through any physical pinhole or breach. Sensitive scanning equipment measures this flow to identify membrane punctures within 2 to 3 inches without invasive demolition.
When is a hose test safe to perform on an asphalt shingle roof?
A hose test is safe on a calm, dry day with two people present. Always begin testing at the lowest point of the roof slope using a gentle, continuous stream rather than a high-pressure jet. Gradually work your way upward in 10-to-15-minute intervals while the second person monitors the attic interior, ensuring you isolate individual penetrations without artificially driving water under intact shingle laps.
Conclusion
A leaking roof does not fix itself, and guessing where water enters is a recipe for wasted money and ongoing damage. By taking a methodical, inside-out approach—checking attic framing, following moisture trails uphill, and leveraging non-invasive detection techniques—you can pinpoint vulnerabilities before structural decay sets in.
At Martin & Sons, we believe homeowners across St. Louis, St. Peters, St. Charles, Florissant, Chesterfield, Creve Coeur, Maryland Heights, and O’Fallon deserve honest diagnostics and top-tier craftsmanship. We operate on a strict customer-first model: we require zero upfront deposits, you only pay upon 100% completion and total satisfaction, and our work is backed by lifetime labor warranties with our best prices delivered upfront.
Please note that we provide gutter services exclusively when performing a comprehensive roofing project, as we are a dedicated exterior roofing company and not a standalone gutter contractor.
If you suspect moisture is sneaking past your home’s defenses, explore our professional Maryland Heights roof leak solutions or contact Martin & Sons at our Florissant location (8460 N. Lindbergh Blvd. Suite 11) to schedule your comprehensive roof diagnostic today.