
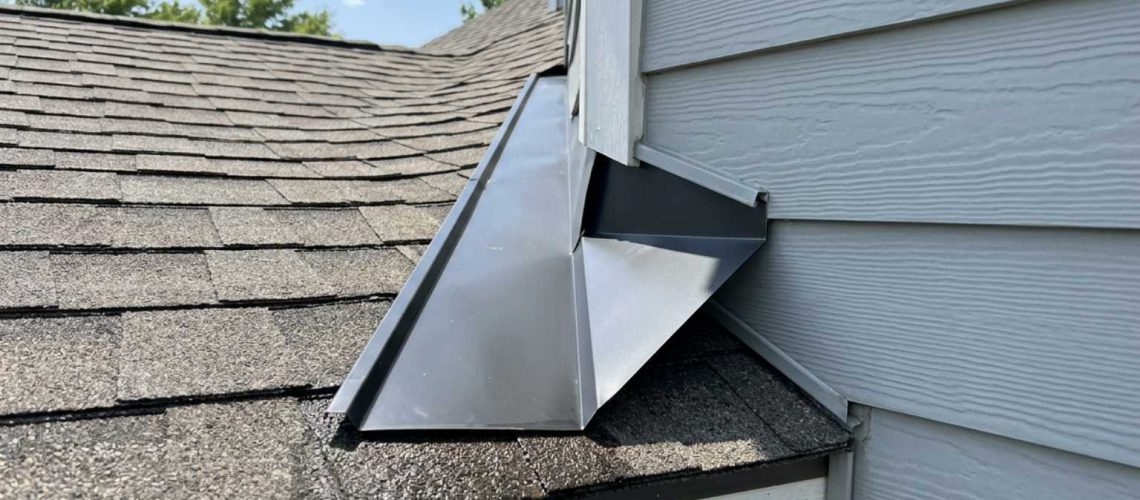
Why Kickout Flashing Prevents Costly Wall Leaks
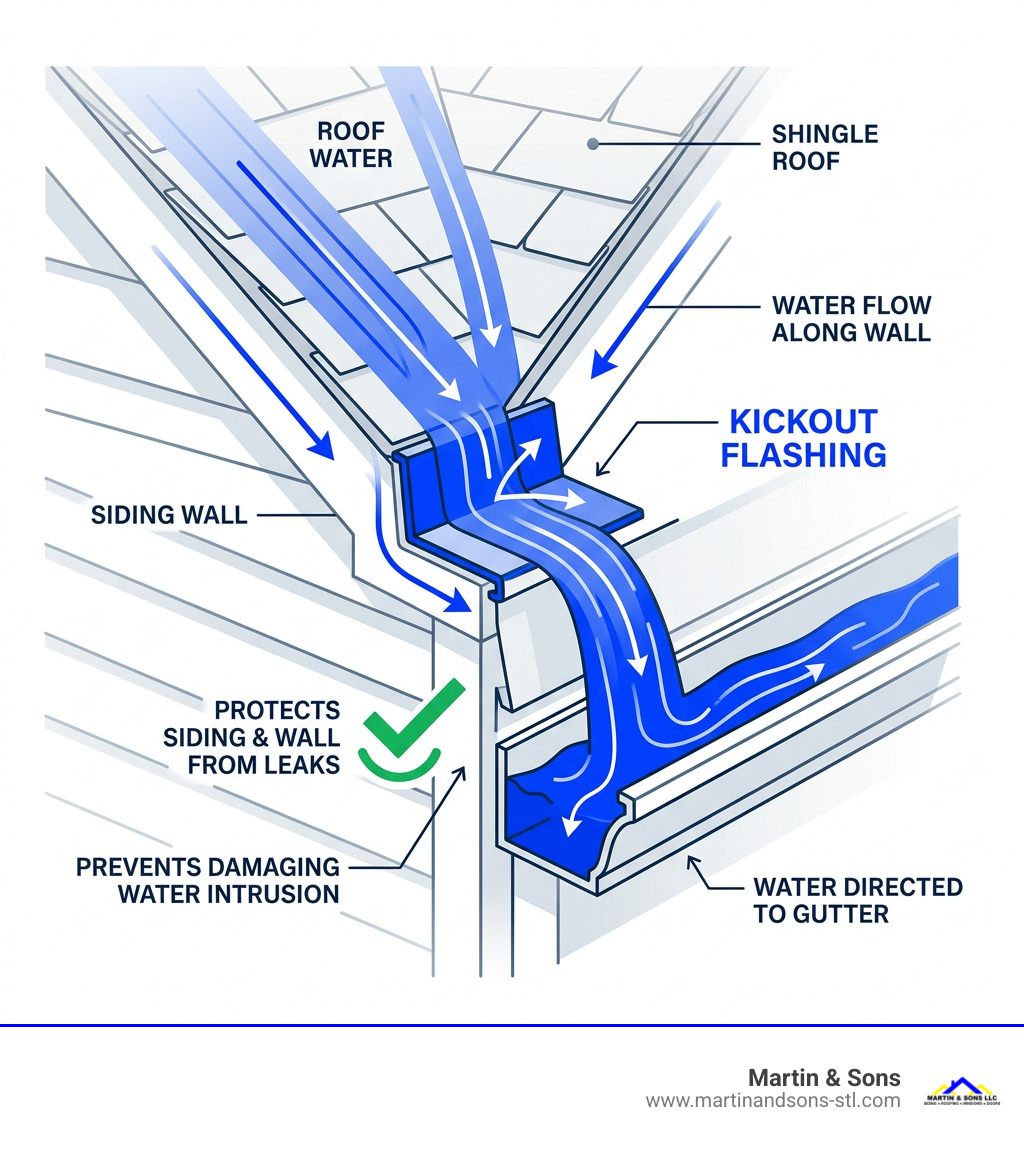
Kickout flashing is a small diverter installed at the bottom of a roof-to-wall flashing run. Its job is simple: catch water coming down the roof-wall junction and send it into the gutter, away from siding and the wall behind it.
For a proper installation, the diverter must extend past the finished siding, integrate with the step flashing and water-resistive barrier, and discharge into the gutter trough. A piece that is missing, too short, aimed at the wall, or sealed only with caulk can still allow water behind the cladding.
This detail matters because roof-to-wall intersections handle a lot of runoff. Research estimates that missing or poorly installed kickouts contribute to as much as 80% of damaging water intrusion on side walls. Left alone, that water can stain siding, rot wall sheathing, feed mold, and turn a modest roofing correction into a major siding repair.
I am John Martin of Martin & Sons. With more than 35 years in the exterior construction industry, I have seen how correct kickout flashing protects a roof-and-wall system and how often a small missed detail leads to expensive hidden damage. Martin & Sons provides gutter services as part of roofing projects, not as a standalone gutter company, because gutters and roof drainage details must work together.
The Crucial Role of Kickout Flashing in Roof Drainage
A roof does not merely keep water out of your attic; it acts as a massive collection plane. During a typical Midwest downpour, thousands of gallons of rainwater pour over the shingles. When a sloped roof section terminates alongside a vertical sidewall—such as at a dormer, a split-level wall, or a chimney intersection—that entire volume of runoff is channeled along a narrow seam.

Without an angled diverter at the end of the run, water cascades directly down the exterior cladding. Even worse, surface tension pulls a significant portion of that runoff behind the siding, soaking the exterior sheathing. When we evaluate roof-to-wall intersections, our focus is ensuring that every drop sheds outward into the gutter rather than inward toward your framing. Adhering to recognized diverter flashing standards transforms a notorious vulnerability into a watertight drainage path.
Water Infiltration Cascade and Hidden Wall Rot
When a kickout diverter is missing or incorrectly detailed, water damage does not happen overnight—it follows a predictable, destructive timeline.
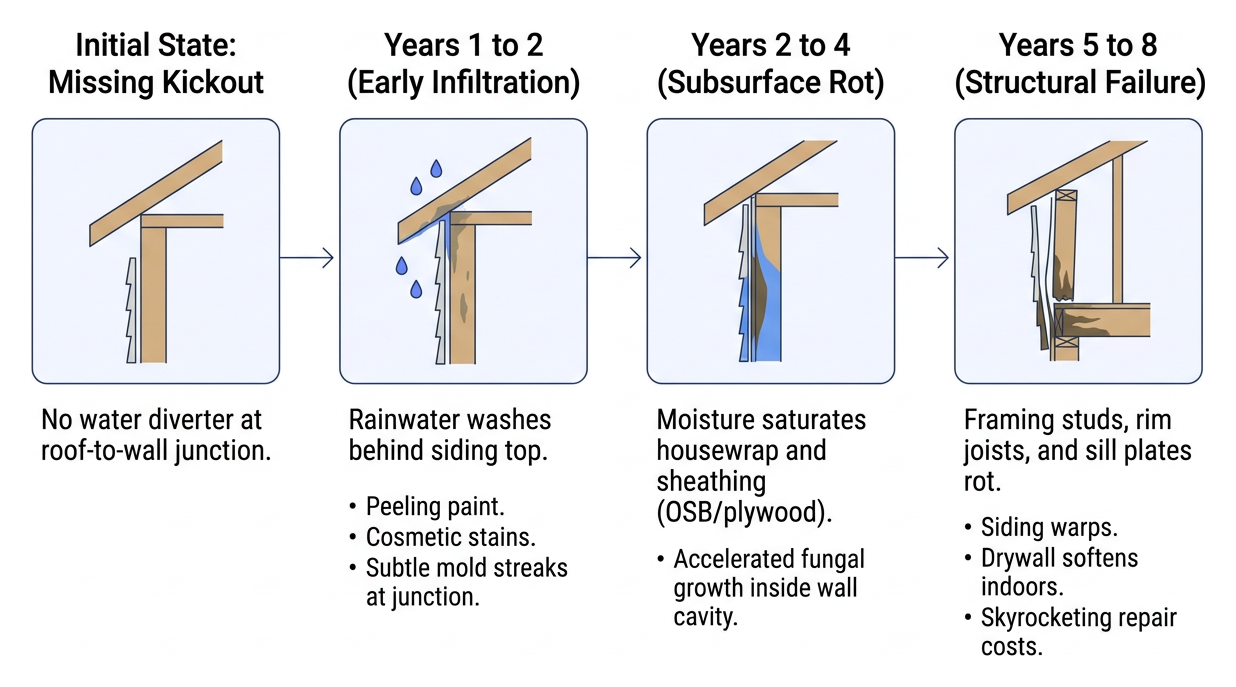
- Years 1 to 2 (Early Infiltration): Rainwater washes behind the top of the siding. Paint starts peeling, and cosmetic stains or subtle mold streaks appear at the junction.
- Years 2 to 4 (Subsurface Rot): Moisture saturates the housewrap and soaks the oriented strand board (OSB) or plywood sheathing. Fungal growth accelerates inside the closed wall cavity.
- Years 5 to 8 (Structural Failure): The framing studs, rim joists, and sill plates begin to rot. Siding warps, drywall softens indoors, and repair costs skyrocket into thousands of dollars.
Because this destruction is concealed behind siding, learning how to locate elusive roof leaks early can save you from whole-wall rebuilds.
IRC Building Codes and History
Building codes were surprisingly slow to address this issue. The International Residential Code (IRC) first mandated diverters in the 2009 edition under Section R903.2.1. This code section requires flashing at roof-to-wall intersections to prevent water from entering the wall assembly, specifying that the lower end of the flashing run must direct water away from the wall cladding and into gutters or off the building.
Modern building code requirements mandate that the flashing:
- Stand at least 4 inches high along the vertical sidewall leg.
- Flare outward at an angle of 100 to 110 degrees from the wall plane.
- Extend past the finished cladding surface (including any rigid foam or furring).
While model codes were updated in 2009, many regional jurisdictions in Missouri did not formally adopt and enforce the requirement until 2012 to 2015. Consequently, thousands of homes constructed prior to rigorous enforcement remain vulnerable.
Integration and Anatomy of Roof-to-Wall Weatherproofing
Kickout flashing cannot function as an isolated component. It serves as the terminus of a continuous weatherproofing system comprising roofing underlayment, ice and water shield, step flashing, and the weather-resistive barrier (WRB).
Proper integration relies on shingle-style gravity lapping. Water running down the wall must hit the WRB, flow over the vertical leg of the flashing, and drain down to the roof deck without ever contacting bare wood. Implementing proper roofing underlayment essentials establishes this secondary line of defense before the first piece of metal is nailed down. Any on-site seams should be backed by an exterior-grade, non-hardening sealant meeting ASTM C920 standards.
Selecting the Right Kickout Flashing Material
The diverter material you choose dictates the longevity of the roof-to-wall junction. Using substandard metal or thin, unsealed seams will lead to early breakdown under Missouri’s temperature swings.
- Heavy-Duty Welded Aluminum (0.040-inch): Excellent rigidity, seamless construction, and UV resistance. Often powder-coated to match trim.
- Galvanized Steel: Sturdy and cost-effective; galvanized steel diverters must feature soldered or factory-sealed seams to prevent split joints.
- Polypropylene / Molded Plastic: One-piece, seamless design that eliminates joint leaks, though prolonged UV exposure can eventually make lower-grade plastics brittle.
- Soldered Copper: The gold standard for historical and premium masonry applications, offering a 50+ year service life.
| Material Type | Typical Thickness | Seam Construction | Expected Lifespan | Best Application |
|---|---|---|---|---|
| Welded Aluminum | 0.040″ | Fully Welded | 30–50 Years | Asphalt Shingle & Siding |
| Galvanized Steel | 26–30 Gauge | Soldered / Factory Formed | 20–30 Years | Budget-Conscious Builds |
| Polypropylene Composite | Heavy Gauge | One-Piece Molded | 25–40 Years | Fast Retrofit Installs |
| Custom Solder Copper | 16–20 oz | Hand-Soldered | 50+ Years | Slate, Tile & Masonry |
Managing the Gutter and Siding Transition
The interface between the diverter, the siding, and the gutter requires precise spacing:
- Gutter Placement: The gutter trough must sit tight against the roof fascia, positioned with its outer lip outside the diverter discharge to catch all runoff. However, maintain a 1-inch clearance between the gutter end cap and the siding to permit airflow and siding maintenance.
- Siding Clearance: Siding must never touch the roof shingles or rest inside the kickout pocket. Maintain a 1.5- to 2-inch gap between the bottom of the siding boards and the roofing material to keep cladding edges out of standing water.
Best Practices for New Construction and Retrofits
Whether you are building a new home in Chesterfield or updating an existing roof in Florissant, the golden rule of exterior water management is simple: never rely on caulk as a primary defense. Mechanical overlaps provide lasting protection.
New Build Layering Sequence
In new construction, sequencing the trades properly guarantees a watertight building envelope.
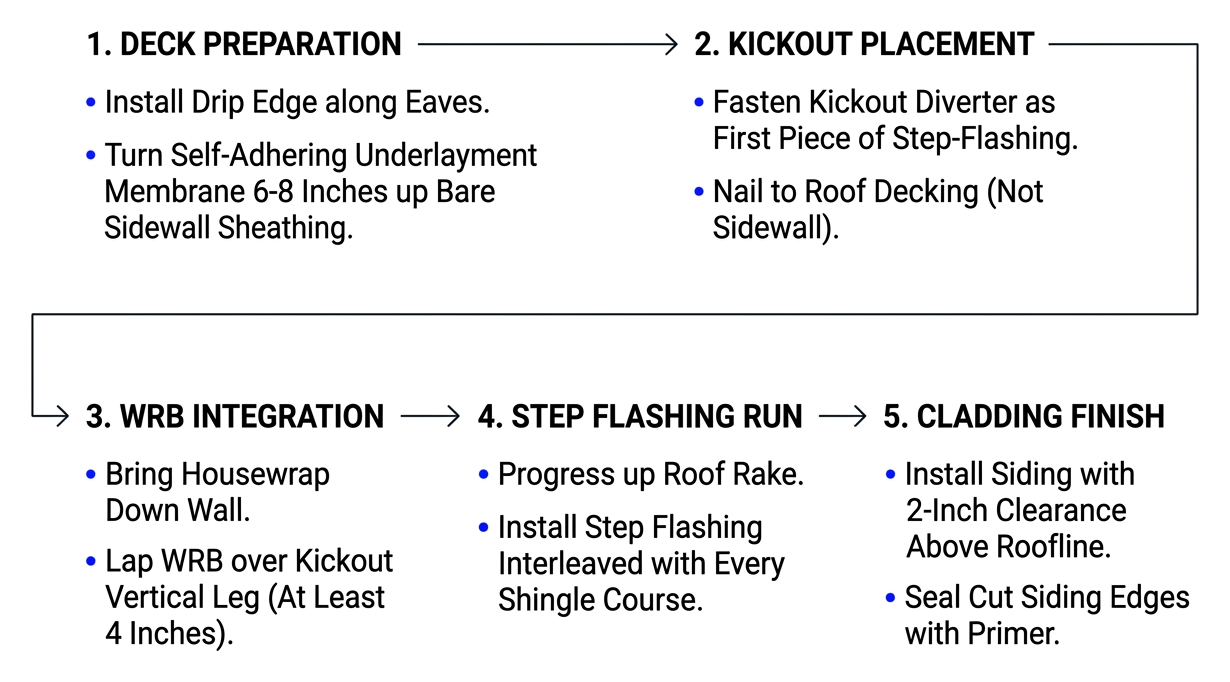
- Deck Preparation: Install drip edge along the eaves and turn the self-adhering underlayment membrane 6 to 8 inches up the bare sidewall sheathing.
- Kickout Placement: Fasten the kickout diverter as the very first piece of the step-flashing run. Nail it into the roof decking, never into the sidewall.
- WRB Integration: Bring the housewrap down the wall and lap it over the outside of the kickout’s vertical leg by at least 4 inches.
- Step Flashing Run: Progress up the roof rake, installing individual step flashing cards interleaved shingle-fashion with every course.
- Cladding Finish: Install siding with a 2-inch clearance above the roofline, sealing cut siding edges with primer.
Step-by-Step Kickout Flashing Retrofit Workflow
Retrofitting an existing home requires surgically opening the cladding to tuck the diverter under the weather barrier.
- Expose the Junction: Carefully unhook or cut back the bottom courses of vinyl, fiber cement, or cedar siding at the roof-wall transition.
- Remove the Bottom Flashing Card: Extract the old, straight step flashing card that dumps runoff down the wall.
- Slit the Housewrap: Make a clean, upward horizontal incision in the existing WRB to create a flap.
- Seat the Diverter: Slide the vertical flange of the new diverter up underneath the WRB flap and over the roof starter shingle.
- Secure and Seal: Fasten the roof flange to the decking. Apply butyl flashing tape over the WRB slit to re-establish a seamless drainage plane.
- Reinstall Siding: Trim the siding to allow proper clearance above the roof deck, reinstall, and test the runoff path with a water bucket.
Frequently Asked Questions About Roof Diverters
Can a Homeowner Install a Diverter Flashing as a DIY Project?
While seasoned DIYers with exterior carpentry experience can manage vinyl siding retrofits, integrating flashing into stucco, brick veneer, or fiber cement carries significant leak risks. An improperly tucked diverter can trap water inside the wall instead of repelling it. For peace of mind, a professional roof and siding evaluation is recommended.
How Much Does a Flashing Retrofit Cost in 2026?
In 2026, the typical retrofit cost ranges from $75 to $300 per location when installed alongside roofing work. If extensive siding removal or custom masonry cutting is needed, labor can push complex individual retrofits higher. However, spending a couple of hundred dollars on a diverter prevents $5,000 to $15,000 in future framing repairs.
Why Do Homes Built Before 2005 Frequently Lack This Detail?
Prior to the 2009 IRC update, model residential codes lacked explicit wording mandating kickout geometry. Subcontractor silos also played a role: roofers stopped their work at the roofline, siding crews hung their material without addressing roof water, and neither trade took ownership of the transition.
Conclusion
A durable roof system relies on the disciplined execution of its smallest components. Missing roof diverters remain one of the most expensive building oversights in modern construction, quietly routing thousands of gallons of runoff into exterior wall cavities.
At Martin & Sons, we believe in building exterior envelopes that stand up to the toughest weather. When you work with us on a complete roof replacement, we evaluate every roof-to-wall intersection, install high-performance diverters, and back our craftsmanship with a lifetime labor warranty. We never ask for upfront deposits—you pay only when your project is 100% complete and you are fully satisfied.
If you are ready to protect your home’s structural integrity, schedule a professional kickout flashing installation with our team today.