

Why Checking Roof for Leaks Is Harder Than You Think
Checking your roof for leaks early can be the difference between a $150 repair and a $5,000 structural nightmare. Here is a quick overview of how to find a roof leak:
- Check inside first — look for ceiling stains, bubbling paint, or musty smells
- Inspect your attic — trace dark wood stains uphill along rafters toward the source
- Look up, not down — the actual entry point is almost always 3–10 feet uphill from where water drips inside
- Focus on penetrations — roughly 90% of leaks start at flashing, pipe boots, chimneys, vents, or skylights
- Do a hose test — systematically soak sections of the roof from bottom to top with a helper watching inside
- Call a pro when the source is unclear, the roof is steep, or previous repairs have failed
By the time a water stain appears on your living room ceiling, the damage to your roof decking, insulation, and drywall has already begun. The stain is not the leak — it is just where water finally ran out of places to go. Water enters your roof at one point, then travels silently along rafters, decking, and insulation — sometimes 10 to 20 feet — before it ever drips onto your ceiling. That is what makes finding the true source so frustrating for most homeowners.
I’m John Martin, and my family has been solving roof leaks in the St. Louis area since 1953. With over 35 years of hands-on experience checking roofs for leaks across every type of home and weather condition this region throws at us, I’ve seen how a small, ignored drip can quietly rot out an entire roof deck. This guide walks you through exactly how to find the source — safely and systematically — before the damage gets out of hand.
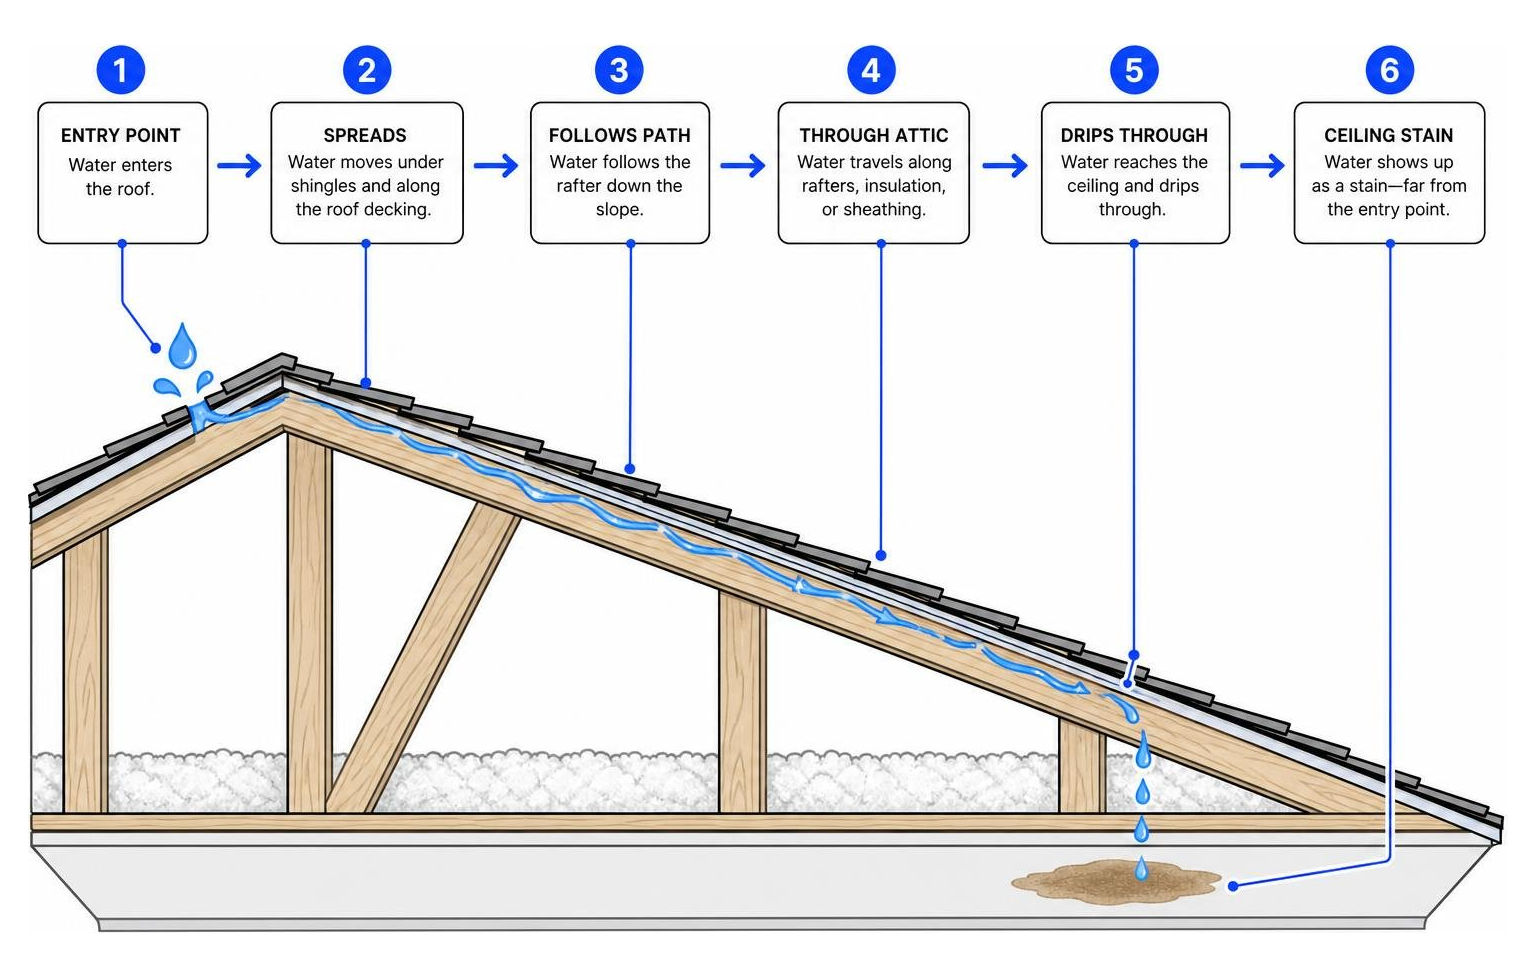
The Physics of Water Travel: Why Checking Roof for Leaks is Harder Than It Looks
Water is incredibly lazy, but it is also highly opportunistic. It always takes the path of least resistance. When rain breaks through your roof’s outer defenses, gravity pulls it downward. However, it rarely falls in a straight vertical line.
Instead, water clings to the underside of your roof decking, running horizontally or diagonally along the slope. It will slide down a rafter, pool on top of a horizontal ceiling joist, travel along an electrical wire, and finally drip onto your ceiling drywall once it hits a low point or an obstruction.
This means the water entry point on your roof is almost always 3 to 10 feet uphill from where stains actually appear on your ceilings. In some extreme cases, we have traced a living room ceiling leak to a roof puncture on the opposite side of the ridge line, 20 feet away!
Because water behaves this way, you cannot simply look at a water spot on your ceiling and assume the hole on the outside is directly above it. If you try to patch the shingles directly above the stain, you will likely miss the actual culprit entirely. Understanding this pattern of lateral movement is the first step in recognizing the true signs of roof damage.
Furthermore, water can leave what we call “dry footprints.” During a brief storm, water may enter the roof, run down a rafter, and soak your drywall. By the time you notice the damp spot hours later, the path the water took along the wooden rafter may have already dried out, leaving only a faint stain on the wood. Knowing how water travels along roof framing is essential to tracing these dry footprints back to the point of origin.
Step-by-Step Guide to Finding Leaks From the Inside
Before you ever grab a ladder, your leak detection work should begin safely inside your home. The interior of your living space and your attic hold the most reliable clues for tracking down water intrusion.

Step 1: Spotting Interior Warning Signs
The most obvious indicator of a leak is a brown, ringed stain on your ceiling or walls. These stains often look like tea rings, with darker edges where the water has dried and deposited minerals. Other interior warning signs include:
- Bubbling or peeling paint: Water gets trapped behind the paint layer, causing it to stretch and blister.
- Warped or sagging drywall: As drywall absorbs water, it loses its structural integrity and begins to bow downward.
- Musty odors: A persistent damp smell in a specific room or closet often points to hidden moisture in the walls or ceiling.
- Active drips: If water is actively dripping, you have an immediate emergency.
If you spot a bulging spot in your ceiling drywall where water is actively pooling, do not let it sit. The weight of trapped water can cause a sudden, catastrophic ceiling collapse. As a temporary emergency measure, place a large bucket underneath the bulge, and use a small nail or screwdriver to puncture a hole right in the center of the bulge. This drains the water safely and relieves the weight on your drywall, preventing a much larger mess. Taking quick action is key to preventing major living room leaks.
Step 2: Checking Roof for Leaks in the Attic
Once you have identified the general area of the ceiling stain, it is time to head into the attic. This is where the real detective work happens.
First, safety is paramount. Always wear long sleeves, gloves, safety goggles, and a dust mask to protect yourself from fiberglass insulation. Never step directly onto the drywall ceiling or insulation; you will fall straight through into the room below. Only step on the solid wooden ceiling joists or temporary plywood boards laid across them. That a DIY attic inspection typically only allows you to safely access and see about 1/3 of your actual roof area due to tight, low-clearance spaces near the eaves.
Take a high-powered flashlight with you. If it is raining, look for the glisten of active wet wood, water trails, or dripping water. If you are inspecting on a dry day, look for:
- Dark wood stains: Wet wood appears significantly darker than dry wood. Look for black or dark brown streaks along the rafters and the underside of the plywood decking.
- Rusted nails: Look at the shanks of the roofing nails protruding through the decking. If they are rusted or have white water-deposit rings around them, water has been traveling down those nails.
- Matted or moldy insulation: Saturated insulation loses its loft and clumps together. It may also show signs of black or dark mold growth.
Trace any dark wood stains or water trails upward. The highest point where the wood transitions back to its normal, dry color is the likely point of water entry.
Step 3: Differentiating Condensation from Active Roof Leaks
Not every wet spot in an attic is a roof leak. In many St. Louis homes, especially during our humid summers and freezing winters, attic condensation is a major issue that mimics a roof leak.
When warm, moist air from your living space escapes into a cold attic during winter, it hits the cold underside of your roof decking. This moisture condenses into water droplets, which can drip onto your insulation and ceiling, creating stains that look exactly like roof leaks.
Here is how to tell the difference:
- Location: Condensation issues are usually widespread across the entire underside of the roof deck, often causing rusty nail tips throughout the attic. Roof leaks are typically isolated to a single path or area.
- Bathroom Exhaust Fans: Check if your bathroom exhaust fans vent directly into your attic space instead of venting outside through the roof or soffit. Dumping hot, humid shower air directly into a closed attic is a primary cause of severe condensation.
- Seasonality: If your ceiling stains only appear or worsen during extreme winter cold snaps (when no rain is falling), you are likely dealing with condensation or ice dams rather than a standard rain leak.
Tracking Down the Source: Exterior Inspection and the Hose Test
If your interior search does not yield a clear answer, you will need to inspect the exterior of your roof. While we always advise caution, a systematic approach can help you isolate the leak safely.
Step 4: Ground-Level Visual Checks
You do not always have to climb onto your roof to inspect it. In fact, we highly recommend starting with a ground-level visual check using a pair of binoculars. Walk around your yard and look closely at the roof surface for:
- Missing, curling, or cracked shingles: Damaged shingles expose the underlayment beneath.
- Exposed or raised nails: Wind can back nails out of the decking, lifting shingles and creating direct pathways for water.
- Damaged flashing: Look at the metal transitions around chimneys, dormers, and valleys. If they look warped, rusted, or separated, they are highly suspect.
- Gutter backups: Look for sagging gutters or areas where debris is overflowing, which can force water under the lower edge of your shingles.
Using binoculars is a safe, highly effective way to gather clues before deciding if a physical climb is necessary. It is a vital step in learning how to find a roof leak without putting yourself in harm’s way.
Step 5: Safely Performing a Garden Hose Test
If you still cannot find the leak, the garden hose test is the most reliable DIY method for isolating stubborn, elusive leaks. However, this is strictly a two-person job. Never attempt this alone. One person must stand on the roof with the hose, while the other sits inside the attic with a bright flashlight and a phone, watching for the first sign of moisture.
Follow these rules for a successful hose test:
- Work on a dry day: This ensures any water you see inside is coming directly from your hose, not from previous rainfall.
- Start low and work upward: This is the golden rule of water testing. If you start spraying at the top of the roof, water will run down and soak the entire slope, making it impossible to tell exactly which shingle or penetration is leaking.
- Isolate your spray: Start at the very bottom of the suspected area (near the eaves). Direct a gentle, low-pressure stream of water at a specific, 2-foot section. Do not use a pressure washer, as high pressure can force water upward under perfectly good shingles and create false leaks.
- Be patient: Soak each isolated spot for at least 5 to 10 minutes before moving uphill. It takes time for water to saturate the shingles, underlayment, and decking before it finally drips into the attic.
- Communicate constantly: The person in the attic should alert the hose operator the second a drip appears. When moisture is spotted, note the exact position of the hose on the roof to pinpoint the entry point.
For more details on this diagnostic process, you can read this step-by-step leak detection guide.
Step 6: Checking Roof for Leaks on Flat or Low-Slope Surfaces
Flat and low-slope roofs (common on home additions, porches, or commercial spaces in St. Louis) present a unique set of challenges. Water does not run off them quickly, meaning it can pool or “pond” on the surface for days.
Because flat roofs use continuous membranes (like EPDM rubber, TPO, or modified bitumen) rather than individual shingles, water can travel horizontally between the membrane layers. A leak inside your home could be located 20 feet away from where the membrane is actually punctured.
When inspecting a flat roof, look for:
- Debris rings: Circular patterns of dirt or leaves indicate where water regularly ponds.
- Failed seams: Check the seams where the membrane sheets overlap. Over time, adhesive can dry out and fail, allowing water to seep under.
- Splits or blisters: Walk carefully and look for physical tears, cracks, or air bubbles in the membrane.
- Penetrations: Roughly 80% of flat roof leaks occur within 3 feet of a penetration, such as an HVAC curb, drain, or pipe vent.
If you are dealing with a low-slope metal roof, leaks are usually found at backed-out screws, failed neoprene washers, or unsealed seam overlaps. Understanding these differences is critical for metal roof repair and leak prevention.
Common Failure Points and Quick Temporary Fixes
While a roof can leak anywhere, the vast majority of leaks occur at specific, predictable weak points. Identifying these areas first can save you hours of searching.
The Usual Suspects: Flashing and Pipe Boot Failures
In our decades of experience, we have found that roughly 90% of all residential roof leaks originate at flashings and penetrations, not in the open field of shingles. In fact, 65% of leaks start at flashing points in valleys, chimneys, and vents.
- Pipe Boots: These are the rubber and metal collars that seal the plumbing vent pipes sticking out of your roof. Pipe boots are the single most common failure point on asphalt shingle roofs. The rubber collar is constantly exposed to harsh UV rays and temperature cycling, causing it to crack, rot, and split after 8 to 15 years.
- Chimney Flashing: Chimneys require a complex system of step flashing (interwoven with shingles) and counter flashing (embedded into the brick mortar). Over time, the mortar can crack and the sealant can fail, allowing water to run down the brickwork directly into your walls.
- Valley Flashing: Roof valleys channel massive amounts of water during heavy rains. If the flashing in these valleys is improperly installed, or if nails were placed too close to the center of the valley, water will eventually find its way through.
- Skylight Seals: While beautiful, skylights are notorious leak hazards. The rubber seals around the glass can degrade, or the flashing surrounding the frame can become clogged with leaves and debris, backing water up under the shingles.
For a deeper dive into diagnosing these common weak spots, refer to this comprehensive roof leak diagnosis.
Emergency Temporary Fixes to Stop the Drip
If you find an active leak during a storm, your primary goal is damage control. You need to stop the water from destroying your home’s interior until a professional roofer can perform a permanent repair.
- The Attic Plywood Trick: If you can safely access the leak in your attic, slide a piece of plywood or a rigid plastic sheet under the drip. Angle it so the water runs down the board and drains directly into a bucket. This prevents water from pooling on your ceiling drywall.
- The Bucket Towel Trick: To eliminate the annoying, loud “drip-drop” sound of water hitting a plastic bucket in your attic or living room, place a towel or a small scrap of wood in the bottom of the bucket. The water will hit the soft surface and absorb quietly.
- Emergency Tarping: If the weather clears up but rain is in the forecast, you can install a heavy-duty woven plastic tarp over the damaged area. Secure the tarp by wrapping the edges around 2×4 wooden boards and screwing them into the roof. Always run the top edge of the tarp over the ridge of the roof so water cannot run underneath it.
- Roofing Tape and Sealant: For quick, temporary patches on minor shingle cracks or failed pipe boots, you can apply self-adhering roofing tape or a high-quality polyurethane roof cement. Avoid using standard household silicone caulk, as it does not adhere well to asphalt shingles and degrades rapidly under UV exposure.
Always remember that these are temporary band-aids. If you are dealing with a sudden roofing emergency, refer to our emergency roof leak guide for immediate steps to protect your property.
When to Call a Professional and How to Prevent Future Leaks
While DIY detective work can locate many basic leaks, some situations require specialized equipment, training, and safety gear.
Knowing When DIY Inspection Reaches Its Limit
Roofing is inherently dangerous. Falls from ladders and roofs cause thousands of severe injuries every year. If your roof has a steep pitch (above a 4:12 slope), is wet or icy, or if you simply do not feel comfortable climbing, stay on the ground. A slipped shingle can be replaced; a fall cannot.
Additionally, some leaks are virtually invisible to the naked eye. In these cases, professional roofers use advanced diagnostic tools:
- Thermal Imaging / Infrared Cameras: These cameras detect minute temperature differences in your ceiling and roof decking. Because wet insulation and wood hold heat differently than dry materials, thermal imaging can pinpoint the exact boundaries of a hidden leak instantly.
- Infrared Drone Inspections: For high, steep, or delicate roofs (like slate or tile), we can fly drones equipped with thermal cameras to safely map out water intrusion from the air.
- Electronic Leak Detection: Commonly used on flat roofs, this method uses electrical currents to find micro-punctures in the waterproofing membrane with 95% accuracy.
If you want to explore how these high-tech diagnostic tools work, check out these advanced leak detection methods.
Proactive Maintenance to Prevent Future Leaks
The best way to handle a roof leak is to prevent it from happening in the first place. A small leak sealed within 48 hours is a simple $150 repair. The exact same leak ignored for three months can easily rot your roof decking and lead to a $2,000 replacement job. If left unaddressed for 6 to 12 months, that minor drip can escalate into $3,000 to $5,000 in major structural repairs, drywall replacement, and mold remediation.
Implement these maintenance habits to keep your roof dry:
- Trim Tree Limbs: Keep tree branches trimmed back at least 6 feet from your roof line. Scraping branches can strip the protective asphalt granules off your shingles, and falling limbs can puncture your roof deck.
- Clean and Align Gutters: While Martin & Sons is not a dedicated gutter cleaning company, we always inspect and handle gutter issues in relation to our roofing projects. Clogged gutters trap water, forcing it to back up under the lower edge of your roof deck (the eave) and rot out the fascia boards.
- Schedule Regular Inspections: Have a professional inspect your roof at least once a year, especially after severe St. Louis storms. To understand why this is so critical, read about the importance of regular roof inspections.
| Leak Detection / Repair Type | Estimated Cost Range | Best Suited For |
|---|---|---|
| DIY Visual Attic Inspection | $0 (Free) | Catching early interior drips, tracing dark stains on rafters |
| Professional Visual Inspection | $250 – $350 | Standard asphalt shingle roofs, checking flashing and pipe boots |
| Professional Infrared Drone Survey | $550 | Steep, high, or complex roofs; hard-to-reach areas |
| Complex Slate / Tile Inspection | $800 | Specialized, delicate historic roofing materials |
| Simple Pipe Boot Replacement | $150 – $400 | Cracked rubber collars around plumbing vent pipes |
| Chimney or Skylight Flashing Repair | $500 – $1,500 | Failed metal transitions, deteriorated mortar joints |
Frequently Asked Questions about Roof Leaks
Why does my roof only leak during heavy rain?
A roof that only leaks during torrential downpours or wind-driven rain usually indicates that water is bypassing your flashing. During a light shower, water flows smoothly down the shingles. However, heavy rains increase water volume and velocity, causing water to pool in valleys or overflow gutters. Furthermore, strong winds can blow water sideways, pushing it upward and under step flashing or ridge caps that normally seal perfectly fine during calm weather.
Can a small roof leak cause mold growth?
Yes, absolutely. Mold spores are present everywhere, but they require moisture, warmth, and food (like drywall paper or wood) to grow. Mold can begin growing within 24 to 48 hours of insulation or drywall becoming saturated. If you ignore a small, slow leak because it “only drips a little bit,” you are creating a prime breeding ground for mold that can spread through your attic and affect your family’s health.
How much does a professional roof leak repair cost?
Most standard roof leak repairs in the St. Louis area run between $300 and $1,500, depending on the source and extent of the damage. A simple, straightforward pipe boot replacement typically costs $150 to $400. More labor-intensive repairs, such as rebuilding the flashing around a chimney or skylight, generally range from $500 to $1,500.
Conclusion
Finding a roof leak can feel like looking for a needle in a haystack, but with a systematic approach—checking the interior, inspecting the attic, and performing a careful hose test—you can locate the source of the drip before it ruins your home.
If you are dealing with a stubborn leak that you simply cannot track down, or if you prefer to keep your feet safely on the ground, we are here to help. At Martin & Sons, we have been serving homeowners throughout St. Louis, St. Peters, Florissant, Maryland Heights, and the surrounding communities for over seven decades.
We believe in doing business the right way. That is why we offer no upfront deposits, meaning you only pay when the job is 100% complete and you are entirely satisfied. Plus, we back our craftsmanship with our industry-leading lifetime labor warranties and provide our best, most honest prices upfront.
Don’t wait for a small drip to turn into an expensive disaster. If you suspect your roof is compromised, contact us today to schedule a professional inspection, and let us help you find the perfect Maryland Heights roof leak solutions to keep your home safe, dry, and comfortable.