
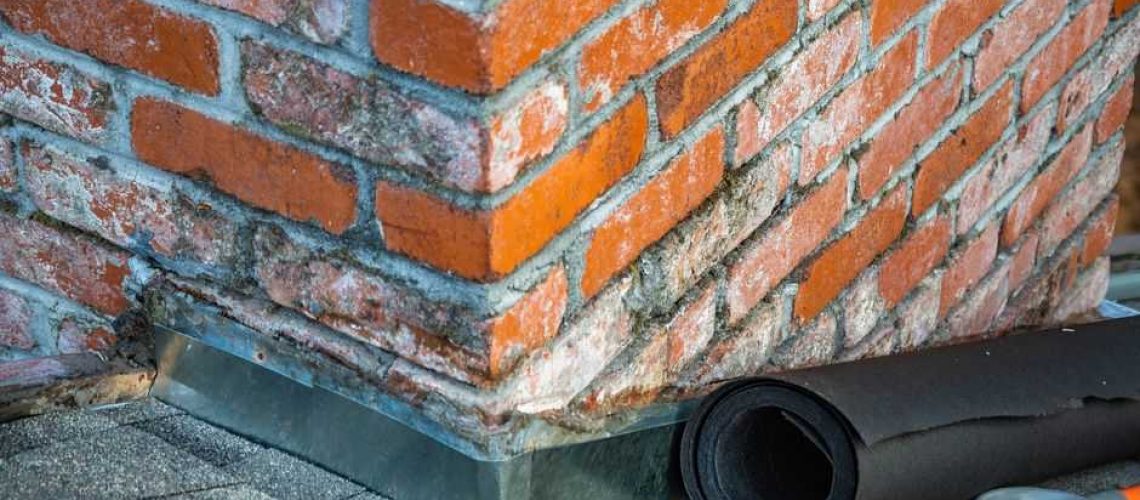
Why Getting Flashing Roof to Wall Right Is the Difference Between a Dry Home and a Rotting One
Flashing roof to wall is the metal barrier installed at every junction where your roof meets a vertical wall — and it is one of the most important (and most misunderstood) parts of your entire home’s exterior.
Here’s what you need to know at a glance:
- What it does: Directs rainwater away from the gap between your roof surface and your wall, preventing it from entering your home
- Where it goes: At headwalls (where a wall rises straight up from a level roof edge) and sidewalls (where a sloped roof runs alongside a wall)
- Key types: Step flashing (for shingle roofs), continuous flashing (for metal or membrane roofs), and kick-out flashing (at the bottom corner where roof meets wall meets gutter)
- Minimum code size: At least 4 inches up the wall and 4 inches across the roof deck, made from corrosion-resistant metal at least 0.019 inches thick
- Biggest risk of failure: Missing kick-out flashing, using sealant instead of metal, or skipping the 1.5-inch gap between siding and shingles
When flashing fails — or was never installed correctly — water doesn’t announce itself. It quietly works its way behind your siding, into your wall cavity, and rots your framing from the inside out. Some claddings like vinyl or fiber cement can hide that damage for years before you notice anything wrong.
“Flashing is the most underrated of building enclosure components and arguably one of the most important.” — Building America Solution Center
I’m John Martin, and between founding Martin & Sons in the St. Louis area and my 35-plus years of hands-on roofing experience, I’ve seen more water damage traced back to bad flashing roof to wall details than almost any other single cause. In the sections below, I’ll walk you through everything you need to know to get it done right — or to make sure your contractor does.
Understanding the Basics of Flashing Roof to Wall
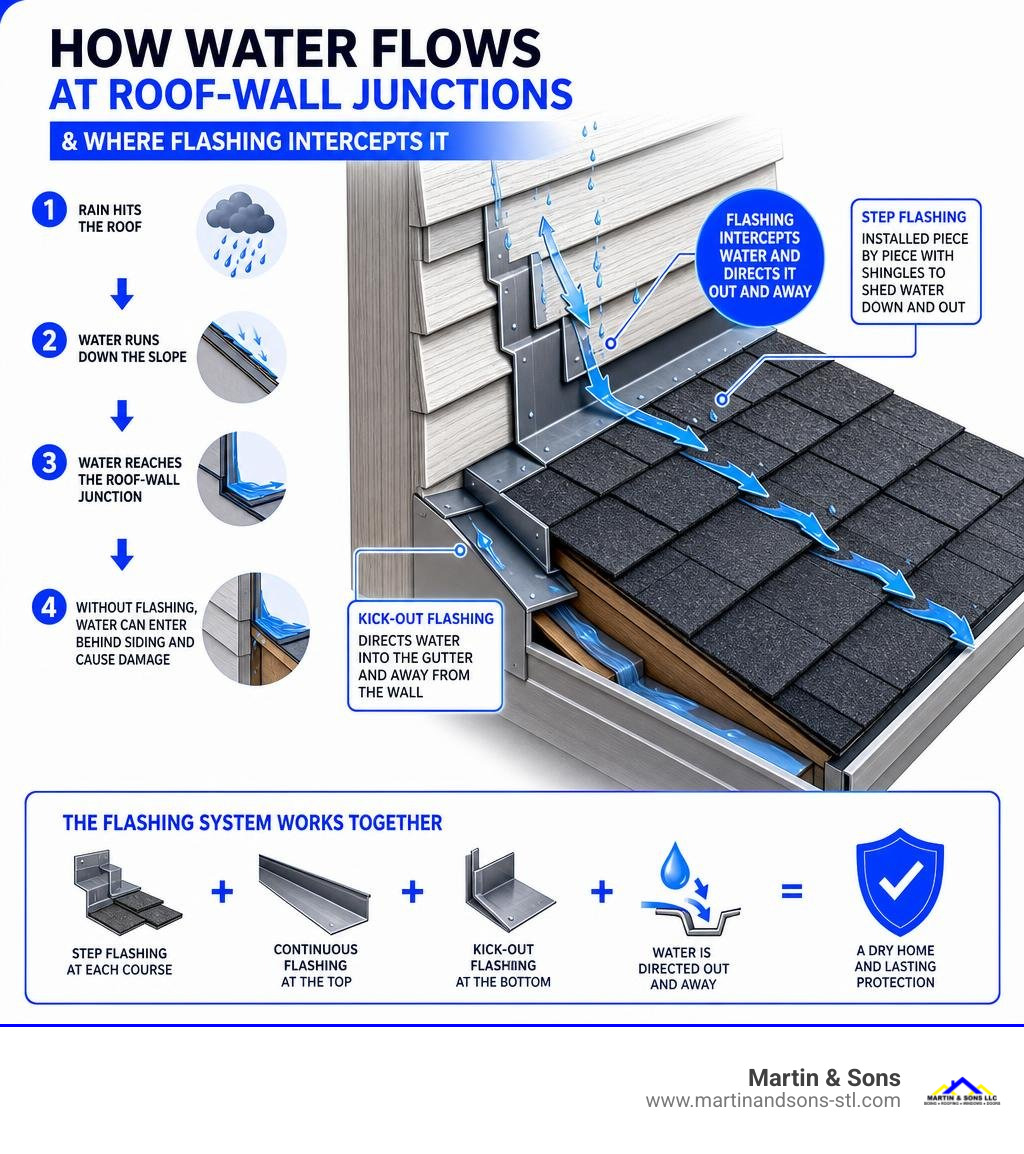
To understand how to prevent water intrusion, we have to look at how a home is built. Your roof and your walls are two completely different structural systems. They expand, contract, and settle at different rates. Where these two planes meet, there is a natural gap. Without proper flashing roof to wall installation, gravity and wind-driven rain will force water directly into that gap.
Flashing acts as a dynamic bridge. It allows the roof and the walls to move independently while keeping the entire intersection completely watertight. When water runs down your wall or your roof, the flashing intercepts it and diverts it safely onto the exterior roofing material where it can drain away.
Headwall vs. Sidewall Flashing Roof to Wall
Not all roof-to-wall intersections are created equal. Depending on how the roof slope meets the wall, we categorize these junctions into two main types:
- Headwalls (Level Junctions): This occurs where a horizontal, level roof edge meets a vertical wall rising above it. An example is where a lower-level family room roof meets the second-story wall of your home.
- Sidewalls (Sloped Junctions): This occurs where a sloped portion of the roof runs parallel alongside a vertical wall. Think of a garage roof slanting upward against the side of the main house.
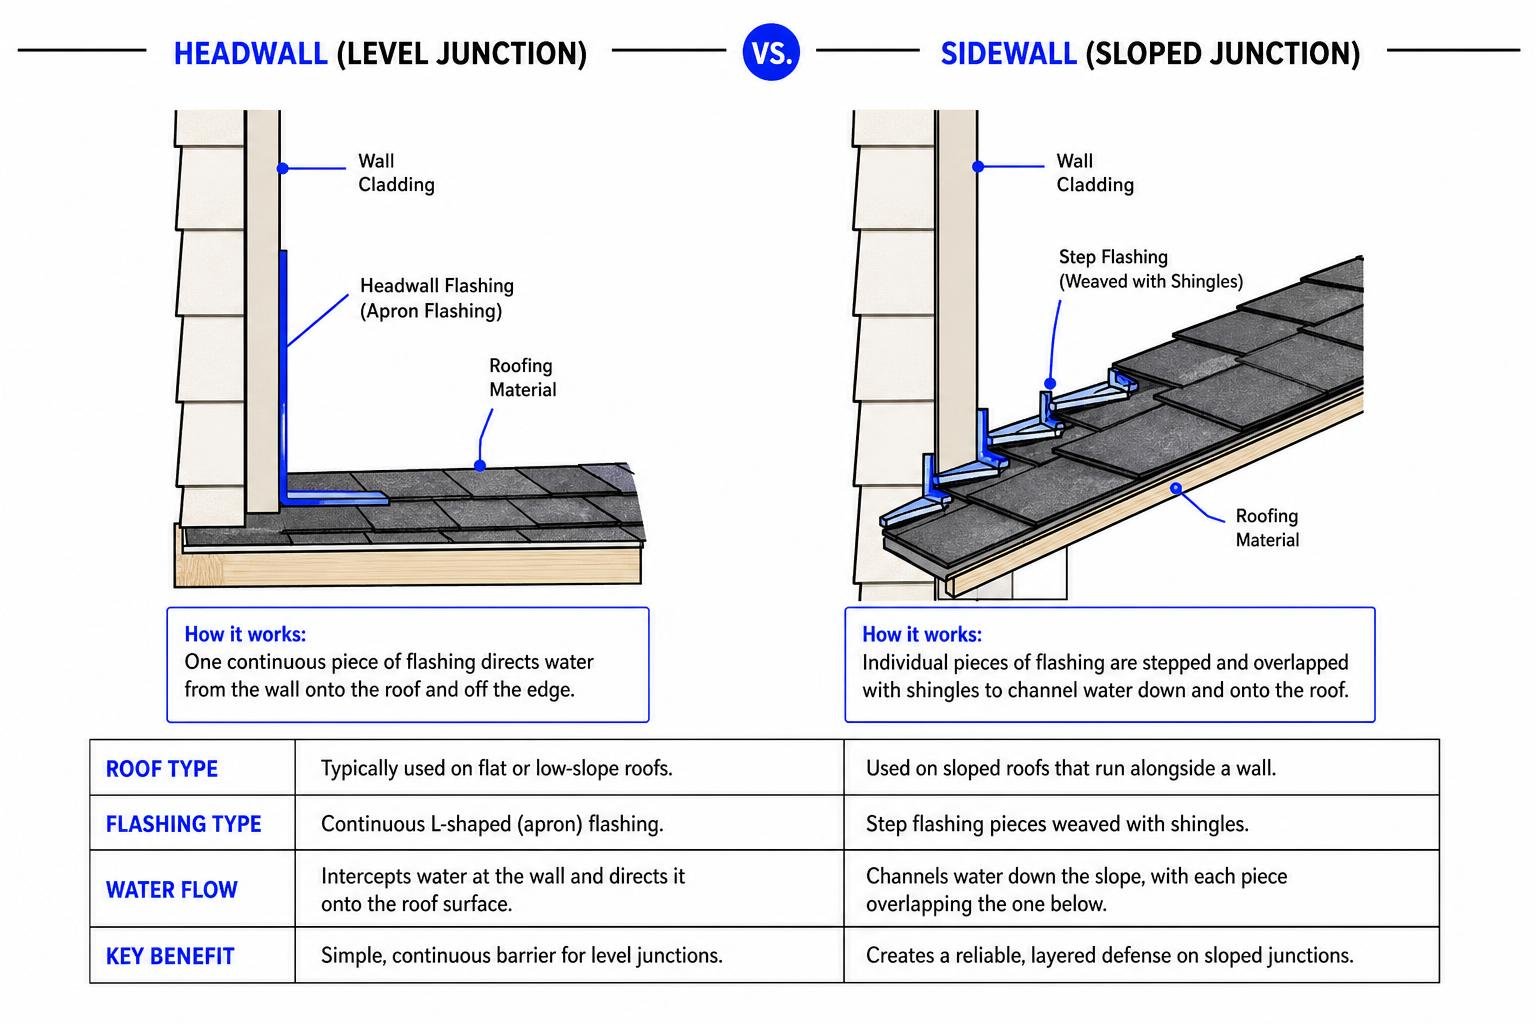
For headwalls, we use headwall flashing (often called apron flashing). Because the junction is level, we can use a continuous, single piece of L-shaped metal. This flashing typically comes pre-bent to a 110-degree or 120-degree angle to accommodate the pitch of the roof, sitting flat on the shingles and extending up behind the wall cladding.
For sidewalls, the angle is sloped. If you tried to use a single, continuous piece of L-metal here on a shingled roof, water would inevitably find its way under the shingles. Instead, sidewalls require a series of overlapping metal pieces woven directly into the courses of shingles. This brings us to a major industry debate: step flashing versus continuous flashing. You can learn more about how these parts fit into the bigger picture in our Roof to Wall Flashing guide.
Step Flashing vs. Continuous Flashing Roof to Wall
The choice between step flashing and continuous flashing isn’t a matter of preference — it is dictated by your roofing material:
- Step Flashing: This is the gold standard for asphalt shingles, wood shakes, and slate. It consists of individual, L-shaped metal pieces. As each row (course) of shingles is laid, a piece of step flashing is installed over it, which is then covered by the next shingle. This “weaving” process ensures that if water gets past one shingle, the metal step flashing underneath immediately channels it back out onto the surface of the next shingle down.
- Continuous Flashing (L-Metal): This is a single, long piece of metal. It is highly effective for metal panel roofs or rubber membrane roofs where there are no individual shingle courses to weave. However, using continuous flashing on a shingle sidewall is a major defect. Water will run down the continuous channel, find a tiny gap or nail hole, and leak directly into the roof deck.
To see how these components play a role in the entire roof assembly, check out our handy Cheat Sheet To Roofing Installation.
Building Codes and Material Specifications
Here in the St. Louis region — from Florissant down to Chesterfield — our roofs take a beating from severe weather. We get heavy spring downpours, high winds, and freezing winter temperatures that cause ice dams. Because of this, we strictly adhere to the International Residential Code (IRC) to ensure every flashing installation is code-compliant and built to last.
According to building codes (including 2018 IRC Section R903.2.1), all roof-to-wall flashing must be completely corrosion-resistant. It must also be installed in a way that prevents water from entering the wall cavity or structural framing.
Minimum Dimensions and Thickness Standards
You cannot just use any scrap metal for flashing. The IRC sets very specific minimum standards for both size and thickness:
- Height and Width: For asphalt shingle roofs, the base flashing against a vertical sidewall must extend at least 4 inches high against the wall and 4 inches wide across the roof deck (above the underlayment).
- Step Flashing Dimensions: Standard pre-formed step flashing pieces are typically 5 inches high, 5 inches wide, and 7 inches long. This size provides the necessary overlap to cover nail holes and shingle joints.
- Metal Thickness: If metal is used, it must be at least 0.019 inches thick (which is equivalent to 26-gauge galvanized sheet metal).
Using thinner, cheaper metals (like 28-gauge steel) is a recipe for disaster. Thin metal easily bends, dents, and warps under wind pressure, breaking the watertight seal. For detailed technical guidelines on these code requirements, you can refer to the Step and Kick-Out Flashing at Roof-Wall Intersections | Building America Solution Center .
Material Selection: Copper, Galvanized Steel, and Aluminum
The metal you choose for your flashing has a direct impact on how long your roof will remain leak-free. Here is a breakdown of the three most common materials we use in the field:
| Material | Durability | Corrosion Resistance | Compatibility | Best For |
|---|---|---|---|---|
| Copper (16 oz or 20 oz) | Outstanding (50+ years) | Excellent (Self-protecting patina) | Poor (Causes galvanic corrosion with steel/aluminum) | Historic homes, slate/tile roofs, premium metal roofs |
| Galvanized Steel (26-gauge) | Very High (20-30 years) | High (Requires zinc coating) | Good (Compatible with most standard fasteners) | Standard residential roofs, high-wind areas |
| Aluminum | Moderate (15-20 years) | High (Does not rust) | Moderate (Incompatible with wet concrete/mortar) | Budget-friendly installs, vinyl siding transitions |
Copper is the undisputed king of flashing. It is incredibly durable and does not require protective coatings like Kynar500 because its natural chemistry prevents corrosion, cracking, and warping. However, you must be careful with galvanic corrosion — if copper touches steel or aluminum in the presence of moisture, a chemical reaction will rapidly eat away the weaker metal.
No matter which metal you choose, ensuring it is properly maintained is key to preventing major structural failures. Read our guide on The Essential Guide To Metal Roof Repairs And Leak Prevention for more on preserving your metal roof components.
Proper Integration with House Wrap and Underlayment
The absolute most important rule of roofing is to layer all materials in “shingle fashion.” This means the top layer must always overlap the bottom layer so that water is naturally directed down and away from the home.
If you install flashing on top of your house wrap (weather-resistant barrier), any water that gets behind your siding will run straight down the wall, slide behind the flashing, and rot your roof deck.
Layering the Water-Resistive Barrier (WRB)
To create a continuous drainage plane, follow this step-by-step layering sequence during installation or a retrofit:
- The Deck Underlayment: Install your roof underlayment (such as synthetic underlayment or a self-adhered ice and water shield) and wrap it up the vertical wall by at least 8 inches.
- The Flashing: Install your metal step flashing or headwall flashing flat on top of the underlayment.
- The Transition Membrane: Apply a self-adhesive flashing tape (transition membrane) over the top edge of the metal flashing, extending it at least 2 inches up onto the wall sheathing.
- The House Wrap (WRB): Lap your exterior house wrap over the top of the transition membrane and flashing.
By layering the house wrap over the flashing, you ensure that any moisture trapped behind the siding safely exits back onto the outer surface of the roof. For more on selecting the right base layers, check out our guide on Roofing Underlayment Replacement And Decking Essentials.
The Critical Role of Kick-Out Flashing
What happens when water runs down a sloped sidewall and reaches the very edge of the roof? If there is nothing to stop it, the water will run straight down the side of your house, pouring behind the siding at the eave-wall intersection. This is where kick-out flashing (or a water diverter) becomes critical.
A kick-out flashing is a specially molded metal or plastic piece installed at the very bottom of the roof-wall intersection. It features a unique, angled flange that physically “kicks” the water away from the siding and channels it directly into your gutter system.
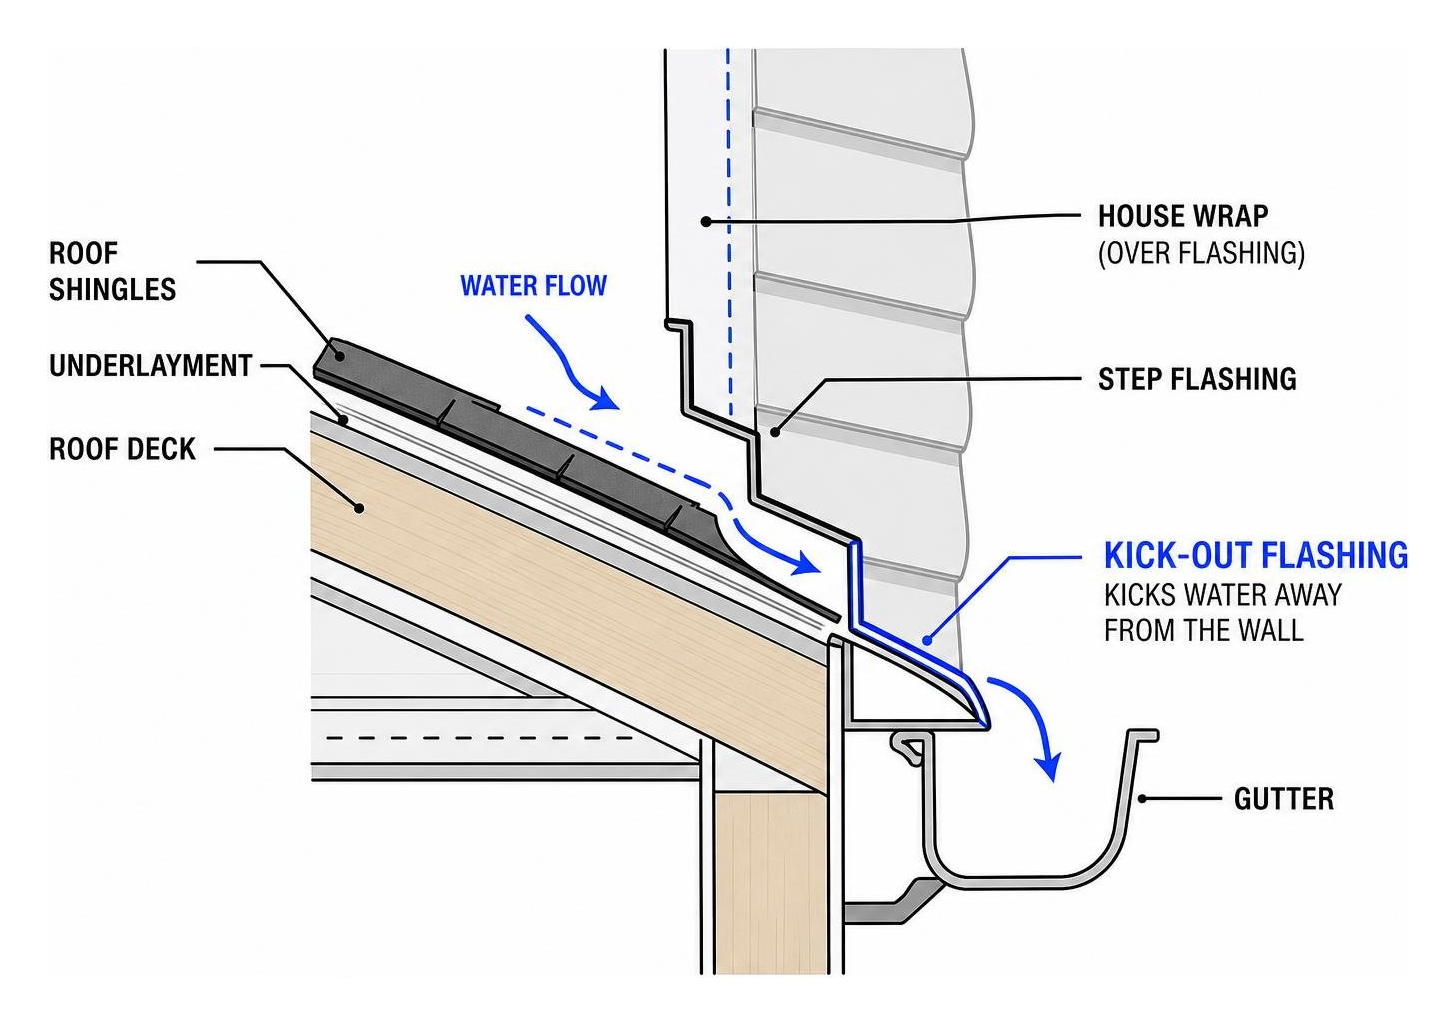
Without kick-out flashing, concentrated water runoff will quickly rot out your wall framing, mold your sheathing, and ruin your home’s structure. If you want to see exactly how we install these lifesavers, take a look at our dedicated Kick Out Flashing Install page.
Installation Best Practices Across Different Roof Types
Different roofing materials require specialized flashing techniques to ensure a watertight seal. Let’s look at the best practices for the most common roof types in St. Louis.
Asphalt Shingle Roofs
For standard asphalt shingle roofs, step flashing is the only acceptable method for sidewalls.
- The Process: Start at the lowest point of the roof-wall intersection (where the kick-out flashing is installed). Lay your first shingle. Place a 5″x5″x7″ step flashing piece over the shingle, flush with the wall. Nail the flashing to the wall only (never to the roof deck). Lay the next shingle over the flashing, overlapping the previous piece by 0.5 to 0.75 inches to cover the nail holes. Repeat this process all the way up the slope.
- Inside Corners: At inside corners, cut the step flashing down the middle of one side and fold it to form a clean, custom 90-degree angle.
For a deeper dive into retrofitting these intersections on existing homes, read the technical guide on Flashing of Roof-Wall Intersections in Existing Homes | Building America Solution Center .
Metal and Tile Roof Systems
Metal and tile roofs cannot use standard step flashing because they do not have individual, overlapping shingle courses. Instead, they rely on continuous apron flashing and specialized counter-flashing systems.
- Apron and Pan Flashing: For tile roofs, we install continuous pan flashing with a raised water-channel lip. This channels water down the slope beneath the tiles.
- The Z-Bar and Vertical Blocking Method: On metal panel roofs, thermal expansion causes the metal sheets to expand and contract. If you fasten flashing directly to the metal panels, the movement will tear the fasteners loose. We use vertical blocking (nominal 1″x6″ lumber matching the thickness of the wall cladding) and a Z-bar flashing that extends up the wall 3 inches and down over the roof flashing by 3.5 inches. This allows the roofing panels to slide freely underneath without breaking the weather seal.
If you are considering upgrading to a durable metal roof, check out our walkthrough on How To Install Metal Roof Panels An Easy And Affordable Guide.
Common Installation Defects and How to Avoid Them
Improperly installed flashing is one of the most common defects found during home inspections. Here are the top mistakes we see in the field — and how you can avoid them:
- Using Continuous Flashing on Shingles: This is a major defect. Continuous L-metal on a shingle sidewall traps water and inevitably leaks.
- Missing Kick-Out Flashing: This leads to severe water damage behind the siding at the eave corners.
- Relying on Sealant Instead of Metal: Sealant is a temporary fix. Over time, UV rays and temperature swings cause it to dry, shrink, and crack. Proper metal flashing should always be the primary water barrier.
- Capillary Action Failures: When two pieces of metal are pressed tightly together, water can actually be sucked upward between them. To prevent this, we incorporate anti-capillary offset folds or maintain a small physical gap of up to 5mm at the edges of the flashing.
For more technical details on metal flashing design, you can read the FLASHING GUIDE or review the architectural specifications in the FLASHING GUIDE – Lysaght / flashing-guide-lysaght.pdf / PDF4PRO and the Stramit Roof & Wall Flashing Architectural Detailing Design Guide .
The 1.5-Inch Siding Clearance Rule
One of the most common installation mistakes is installing siding directly on top of roof shingles.
Except for brick, all exterior wall claddings (including vinyl, fiber cement, and wood siding) must be kept a minimum of 1.5 inches (and up to 2 inches) off the surface of the roof shingles.

If the siding touches the shingles, it will wick up standing or running water from the roof. In wood siding, this causes rapid rot and peeling paint. In fiber cement, it leads to delamination and crumbling. Keeping this gap clear allows the flashing to do its job, prevents moisture wicking, and lets you easily inspect the flashing over time. Ignoring this clearance is one of the major Signs Of Roof Damage You Should Never Ignore.
Fastening and Sealing Mistakes
A common rule of thumb in professional roofing is: never anchor roof-to-wall flashing to the roof deck itself.
You should only anchor the vertical leg of the flashing to the wall. If you nail the flashing to both the roof deck and the wall, the natural settling and thermal movement of your home will pull the flashing apart, tearing nail holes open and creating active leaks.
Additionally, wind blowing over your roof creates a pressure differential (suction) that can lift loose flashing. To combat wind uplift, we use high-shear screws instead of rivets to secure flashings tightly to the wall framing. If you are dealing with an active flashing leak right now, don’t panic — read our Dont Panic Your Emergency Guide For A Fast Roof Leak Fix.
Frequently Asked Questions About Roof-to-Wall Flashing
Can I use sealant instead of metal flashing?
No. While high-quality exterior sealant is useful for sealing joints and seams, it should never be used as a substitute for metal flashing. Sealant is a temporary fix that will eventually dry out, shrink, and crack under the St. Louis sun, leading to sudden water intrusion. Metal flashing is a permanent, physical barrier designed to last the lifetime of your roof.
Does a faulty flashing installation void my shingle warranty?
Yes, it can. Shingle manufacturers only warrant their products against manufacturing defects. If your roof leaks because of an accessory failure or improper flashing installation, the manufacturer will not cover the cost of the interior or structural damage. This is why hiring a certified, experienced contractor is so important.
How do I handle flashing around chimneys and brick walls?
Brick and masonry walls require a two-part flashing system: base flashing and counter-flashing. The base flashing sits on the roof deck and goes up the brick wall. The counter-flashing is then embedded directly into the mortar joints of the brick, hanging down over the top of the base flashing. This prevents water from running down the face of the brick and slipping behind the base flashing.
Because chimneys are often wide and block water flow, we also recommend installing a roof cricket (a small, peaked structure behind the chimney) to divert water around it. Learn more about chimney care in our A Homeowners Guide To Chimney And Flashing Repair and explore cricket installation details in our Best Practices For Installing A Roof Cricket Essential Guide.
Conclusion
Getting your flashing roof to wall details right is not just about keeping the rain out today — it is about protecting the structural integrity of your home for decades to come. Whether you are dealing with a headwall, a sidewall, or a complex chimney intersection, proper materials, correct layering, and code-compliant clearances are non-negotiable.
At Martin & Sons, we have been serving homeowners across St. Louis, St. Charles, Florissant, and the surrounding areas for over 35 years. We believe in doing the job right the first time. That is why we offer:
- No upfront deposits — you only pay when the job is 100% complete and you are totally satisfied.
- Lifetime labor warranties on our work.
- Best prices upfront without the high-pressure sales games.
If you suspect your roof-to-wall flashing is failing, or if you are ready for a worry-free roof replacement, we are here to help. Head over to our https://www.martinandsons-stl.com/kick-out-flashing-install page to schedule your professional inspection today!