
Why Metal Roof Repairs Matter Before Small Leaks Become Big Problems
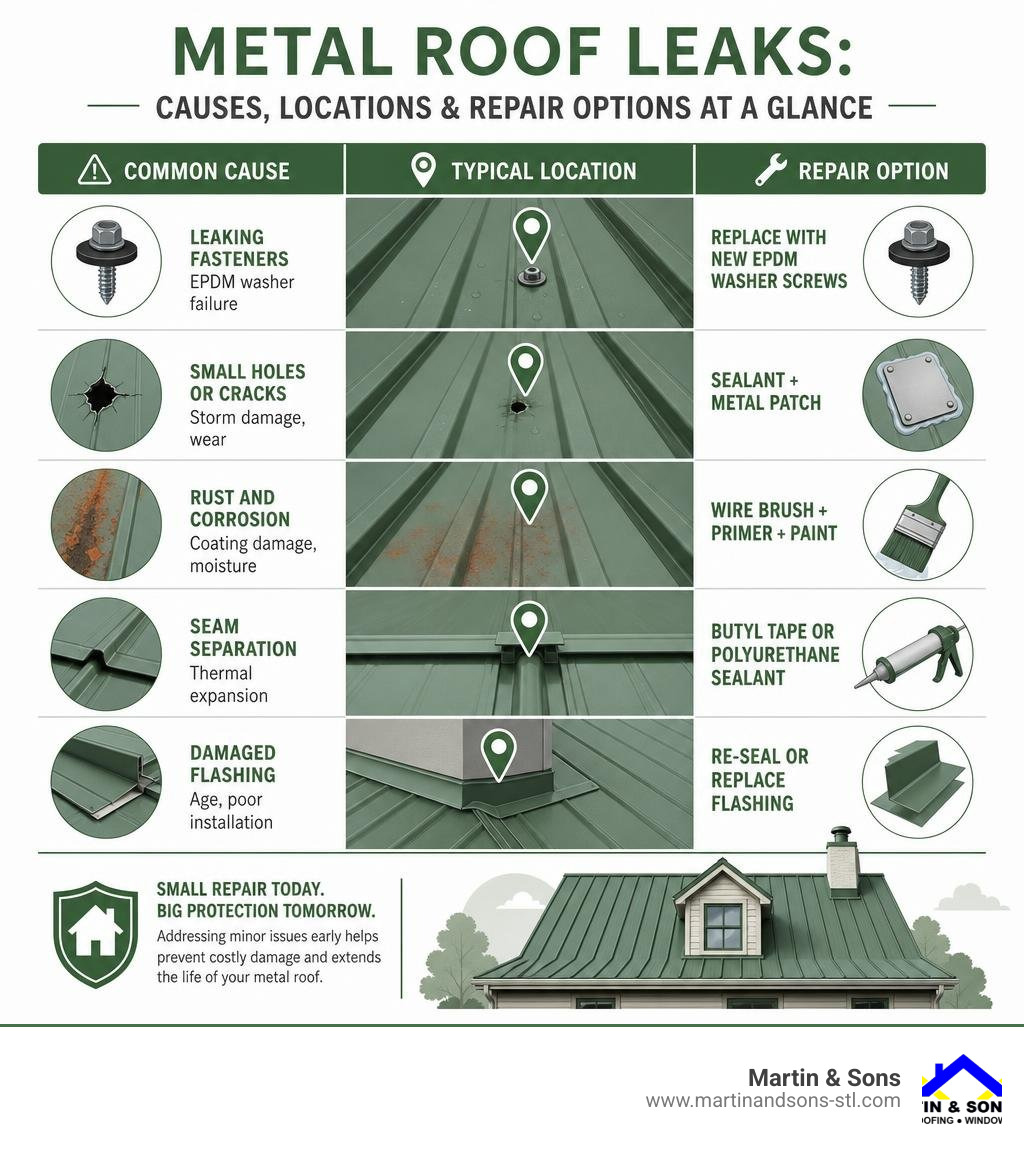
Metal roof repairs are needed when leaks, rust, loose fasteners, or damaged flashing compromise your roof’s ability to protect your home. Here’s a quick overview of the most common issues and how they’re fixed:
| Problem | Common Cause | Basic Fix |
|---|---|---|
| Leaking fasteners | EPDM washer failure | Replace with new EPDM washer screws |
| Small holes or cracks | Storm damage, wear | Sealant + metal patch |
| Rust and corrosion | Coating damage, moisture | Wire brush + primer + paint |
| Seam separation | Thermal expansion | Butyl tape or polyurethane sealant |
| Damaged flashing | Age, poor installation | Re-seal or replace flashing |
Metal roofs are built to last 40 to 70 years — far longer than standard asphalt shingles. But even the toughest roof isn’t immune to leaks. Harsh weather, UV exposure, and the constant push-and-pull of temperature swings can quietly wear down fasteners, seams, and coatings over time.
The real danger isn’t the initial damage. It’s what happens when you ignore it. A small drip can snowball into rotting decking, soaked insulation, and mold — turning a $375 repair into a five-figure problem.
The good news? Most metal roof leaks are caused by a handful of well-known, fixable issues. And many repairs are manageable before they escalate.
I’m John Martin, and my family has been handling metal roof repairs and roofing projects across the St. Louis area since 1953 — that’s over 35 years of hands-on experience for me personally. In this guide, I’ll walk you through exactly how to find, fix, and prevent the most common metal roof problems, and I’ll be straight with you about when it’s time to call in a pro.
Metal roof repairs terms to know:
Common Causes of Metal Roof Leaks
To stop a leak, you first have to understand why it happened. Metal roofs are highly durable, but they are dynamic systems. Unlike asphalt shingles that lie flat and mostly stay put, metal panels expand, contract, and shift. Understanding these dynamics helps you spot the signs of roof damage you should never ignore before water ruins your ceilings.
Loose Fasteners and Thermal Expansion
Did you know that roughly 60% of all metal roof leaks are caused by loose or failed fasteners? It’s a staggering statistic, but it makes perfect sense when you look at the physics of a roof.
Metal roofing panels are held down by thousands of screws. Each of these screws is equipped with a rubber EPDM (ethylene propylene diene monomer) or neoprene washer designed to create a watertight seal. However, these little rubber gaskets live a hard life. They are constantly exposed to intense UV rays and extreme temperature swings.
In the St. Louis area, summer roof temperatures can easily soar to 160°F, while winter drops below freezing. This dramatic thermal cycling causes the metal panels to expand and contract repeatedly—sometimes moving up to 1 inch per 100 feet. This constant movement places immense stress on the screws, causing “fastener fatigue.” Over time, the screws can back out of the wood decking or metal purlins. As they loosen, the rubber washers degrade, dry out, crack, and eventually break, leaving an open pathway for water to enter.
Seam Separation and Capillary Action
Another major vulnerability point on any metal roof is the seams where two panels overlap. This is especially true for exposed fastener systems (like corrugated or R-panel roofs) compared to standing seam systems.
When strong winds buffet your home, they can create significant wind uplift. If you want to learn more about how winds affect your roof, check out the ultimate guide to identifying and repairing wind damage. This lifting force can loosen the seams between panels. Once a seam separates even slightly, it becomes highly vulnerable to water intrusion.
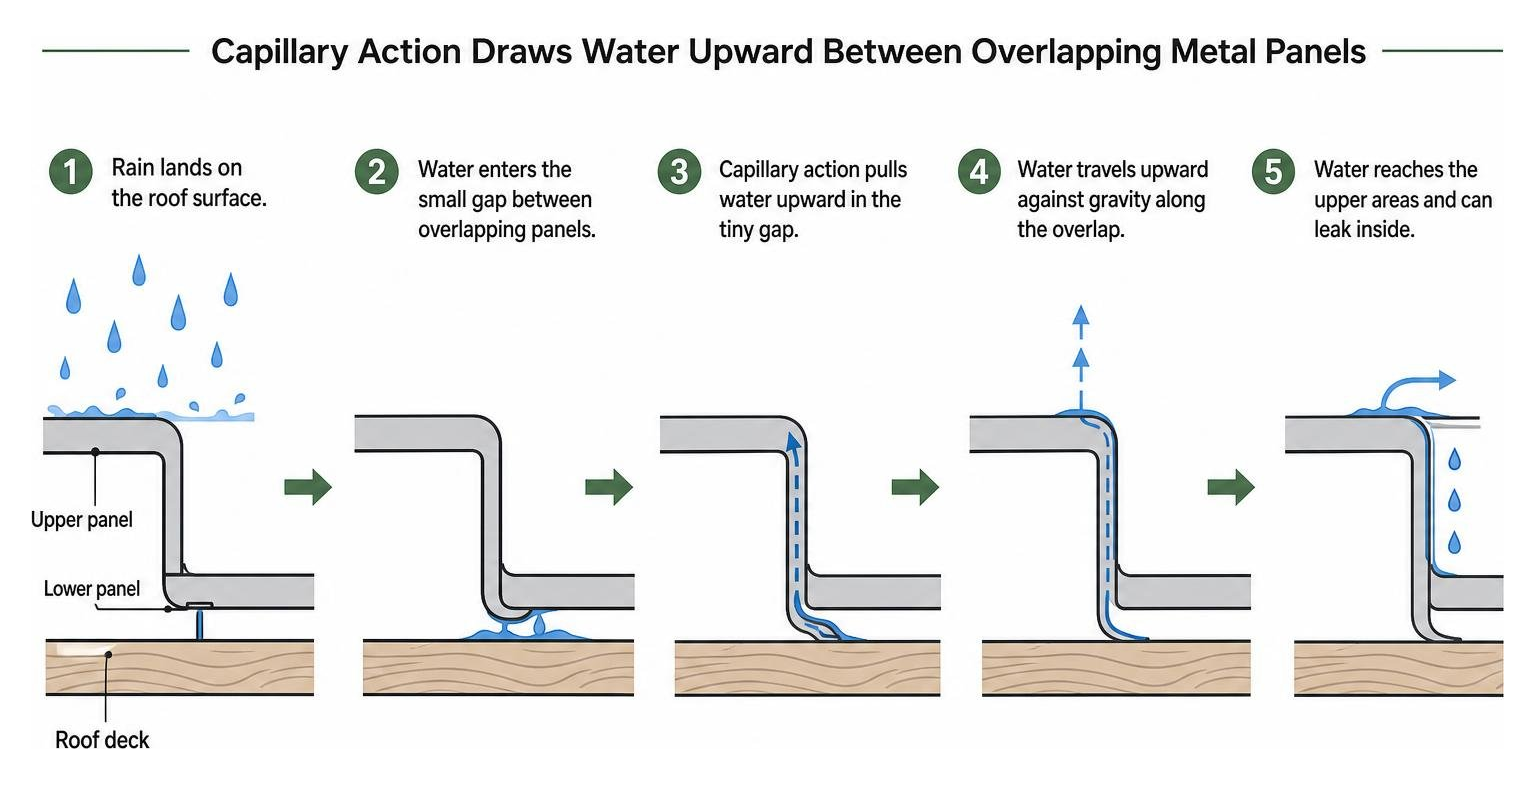
Furthermore, water doesn’t always behave the way you expect. Through a physical phenomenon known as capillary action, water can actually travel upward against gravity through the tiny gap between overlapping metal panels. If the original installer didn’t apply butyl tape or sealant between those overlaps, standing water or wind-driven rain will find its way inside, bypassing your outer moisture barrier entirely.
How to Safely Locate and Diagnose a Metal Roof Leak
Finding the exact source of a leak on a metal roof can feel like chasing a ghost. Because metal panels are smooth and flat, water that enters at one point can easily travel down the underside of a panel or along a rafter for 10 or 15 feet before finally dripping onto your drywall.

Before you even think about stepping onto your roof, safety must be your absolute top priority. Metal roofs are notoriously slippery, especially if there is a light morning dew, algae growth, or a steep pitch. Always wear slip-resistant, soft-soled shoes. If you are climbing onto a roof with a significant slope, you must use a properly anchored safety harness. Never work on a wet, icy, or extremely hot roof.
Tracing Water Damage from the Attic
The safest and most effective way to start your search is from the inside out. Grab a bright flashlight and head up into your attic during or immediately after a heavy rainstorm.
Look for the following indicators:
- Water staining or dampness on the wood rafters, trusses, or roof decking.
- Wet or packed-down insulation.
- Active drips that you can trace upward.
- Mold or mildew growth concentrated in one area.
If you are inspecting during a dry spell, look closely for dark water stains or white, powdery mineral deposits left behind on the wood. Once you find the damp area, use a moisture meter (aim for a threshold reading below 0.5% to ensure wood dryness during eventual repairs) to map out the wettest zone. Trace the path of the water upward to the roof deck.
That the water entry point on the exterior roof deck is almost always higher up the slope than where you see the stain on your ceiling. Check out our guide on roofing underlayment replacement and decking essentials to understand how water damages these underlying structures.
Conducting a Safe Exterior Water Test
If looking in the attic doesn’t reveal the leak, you can perform a systematic water test on the exterior. This is a two-person job: one person stays in the attic with a flashlight and a phone, while the other is on the roof with a garden hose.
Start at the lowest point of the roof and work your way up slowly. Use low pressure on the hose—never blast the roof with a high-pressure nozzle, as this can force water under perfectly good seams and create artificial leaks. Focus the water spray on one specific area at a time:
- Begin with the lower seams and fasteners.
- Wait 5 to 10 minutes while the person in the attic watches for water intrusion.
- Move up to the next row of fasteners.
- Test around penetrations like chimneys, vent pipes, and skylights.
- Finally, test the ridge cap at the very top.
Communicate constantly. The moment the person in the attic spots a drip, stop spraying and mark that exact spot on the roof with a piece of chalk or painter’s tape.
Step-by-Step Guide to DIY Metal Roof Repairs
Once you have safely located the leak and marked the problem areas, you can prepare to make the necessary repairs. For minor issues like small punctures, loose screws, or hairline cracks, a DIY approach can be highly effective and save you hundreds of dollars.
Before you begin, gather the essential tools and materials:
- Wire brush and 400-grit sandpaper
- Putty knife or plastic scraper
- Tin snips (for cutting metal patches)
- Drill/driver with hex head bits
- High-quality polyurethane or polyether sealant
- Butyl tape
- Self-tapping roofing screws with integrated EPDM washers
- A piece of matching metal panel (for patches)
- Isopropyl alcohol or a fast-evaporating solvent for cleaning
Fixing Small Holes and Punctures
Small holes (under 3 inches in diameter) caused by fallen branches, hail punctures, or removed equipment can be repaired using a metal patch. It is critical to use a patch made of the exact same metal type and gauge as your existing roof to prevent galvanic corrosion (which occurs when dissimilar metals touch and rapidly rust).
If you are interested in how panels are structured, you might find our guide on how to install metal roof panels helpful.
Here is how to patch a hole successfully:
- Prepare the Surface: Use a wire brush and sandpaper to scrub away all rust, dirt, and old sealant around the hole. Wipe the area clean with a solvent-soaked rag and let it dry completely.
- Cut the Patch: Use your tin snips to cut a patch from your matching metal panel. The patch should be at least three times the diameter of the hole, ensuring at least a 2-inch overlap on all sides. Round off the sharp corners of the patch to prevent snow, ice, or debris from catching on the edges.
- Apply Sealant: Apply a thick bead of high-solids polyurethane sealant or butyl tape to the underside of the patch, about 1 inch inward from the edges.
- Secure the Patch: Press the patch firmly over the hole. Use your drill to secure it with self-tapping roofing screws spaced 1 to 1.5 inches apart around the perimeter. Drive the screws straight down, ensuring they pull the patch tight against the roof panel so the sealant squeezes out slightly.
- Seal the Edges: Run a neat bead of sealant along the entire outer edge of the patch, smoothing it down with a gloved finger to create a smooth transition that allows water to flow over it effortlessly.
Replacing Loose or Failed Fasteners
If your leak is coming from a backed-out screw or a degraded washer, the fix is straightforward but requires precision:
- Remove the Old Screw: Back the failed screw out using your drill/driver.
- Clean the Hole: Clean any dirt or degraded rubber residue from around the screw hole.
- Select the Right Replacement: Do not use the same size screw. Because the original hole in the wood decking may be stripped or enlarged, you should use an “oversized” replacement roofing screw (often a #12 or #14 screw if the original was a #10) with a fresh, intact EPDM washer.
- Drive the Screw Properly: Drive the new screw in straight—never at an angle. Tighten it until the rubber washer compresses slightly and forms a flat, watertight ring around the metal screw head.
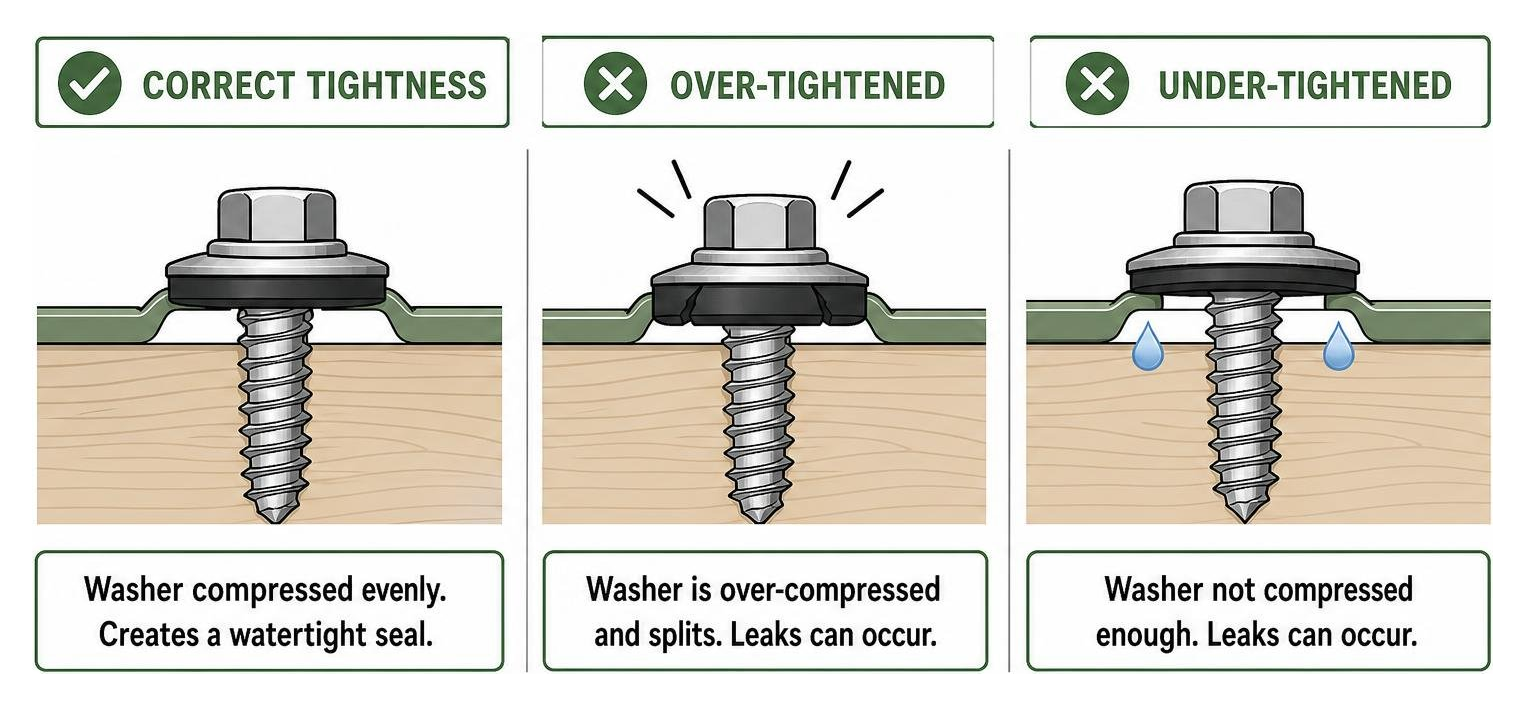
Avoid over-tightening, which crowns the washer and causes it to split, and avoid under-tightening, which leaves a gap for water to seep through.
Addressing Cracks with DIY Metal Roof Repairs
If you notice a crack or a split in a metal panel (often caused by stress from extreme freeze-thaw cycles), you can repair it using a reinforced mesh system. This is a highly reliable DIY method that accommodates the thermal expansion of the roof. For a detailed breakdown of this technique, you can read this guide on how to repair a crack in a metal roof.
Here is the basic process:
- Clean and sand the area around the crack thoroughly, removing all paint, rust, and debris.
- Cut a strip of reinforcing fabric mesh tape so that it extends at least 2 inches past the crack in all directions.
- Apply a thick base coat of urethane roofing cement or high-performance sealant over the crack.
- Embed the mesh tape directly into the wet base coat, smoothing out any wrinkles or air bubbles.
- Apply a generous top coat of sealant over the mesh, completely encapsulating it.
- Once cured, paint the repaired area with matching, UV-resistant metal roof paint to protect the patch from sun damage.
Treating Rust and Repairing Flashing Around Penetrations
Rust is the mortal enemy of metal. Left unchecked, a small spot of surface rust will slowly eat through the protective zinc or paint coating, eventually creating holes that compromise the structural integrity of your roof.
Removing and Preventing Rust Corrosion
If you catch rust early, you can easily stop it in its tracks. If you live in Florissant, you might want to read about the benefits of restoring your metal roof in Florissant MO to see how restoration can save an aging, rusted roof.
To treat localized rust:
- Scrape and Sand: Use a wire brush, wire wheel attachment on a drill, or 400-grit sandpaper to aggressively scrub the rusted area down to bare, shiny metal.
- Apply Rust Converter: Brush on a high-quality chemical rust converter. This converts any microscopic remaining iron oxide into a stable, paintable black barrier.
- Prime the Metal: Apply a rust-inhibiting metal primer. This is a critical step; skipping the primer will cause your topcoat of paint to peel off within a year.
- Paint or Coat: Apply two coats of a high-performance acrylic or silicone-based protective coating that matches your roof’s color.
Sealing Flashing Around Chimneys and Vents
Flashing is the metal trim installed around roof transitions and penetrations, such as chimneys, plumbing vents (pipe boots), skylights, and valleys. Because these areas interrupt the continuous run of your metal panels, they are prime candidates for leaks.
Plumbing vent pipe boots are especially prone to failure. While your metal roof might last 50 years, the flexible rubber collar on a standard pipe boot typically degrades and cracks after 10 to 15 years of intense UV exposure.
To repair or replace flashing:
- For Minor Pipe Boot Leaks: If the rubber collar is only slightly cracked, you can apply a temporary bead of high-performance polyurethane sealant around the pipe connection. However, the best long-term solution is to install a retro-fit pipe boot over the existing one, securing it with self-tapping screws and a heavy bead of butyl sealant.
- For Chimneys and Skylights: Remove any cracked or peeling caulking using a putty knife. Clean the metal surface thoroughly with isopropyl alcohol. Apply a premium, UV-stable butyl or polyurethane sealant along the seams of the counter flashing. If the flashing itself is rusted through or warped, it must be removed and replaced with new, custom-bent metal flashing.
Patching vs. Panel Replacement: Making the Cost-Effective Choice
As a homeowner, you have to decide whether a quick patch is enough or if you need to invest in replacing entire panels. While patching is highly economical, there comes a point where a band-aid won’t cure the underlying illness.
| Consideration | Targeted Metal Roof Patch | Full Panel Replacement |
|---|---|---|
| Average Cost | $200 – $600 (DIY: $15 – $50) | $1,000 – $3,000+ |
| Typical Lifespan | 10 to 20 years | 40 to 70 years |
| Best For | Isolated punctures, minor cracks, single screw leaks | Widespread rust, structural damage, major storm impact |
| DIY Friendly? | Yes, highly manageable | No, requires specialized professional skills |
| Structural Integrity | Cosmetic/waterproof fix only | Restores full structural strength |
When to Choose Targeted Metal Roof Repairs
Targeted repairs make the most sense when the damage is isolated and localized. If a single fallen branch poked a small hole in an otherwise pristine 10-year-old roof, patching is the smartest choice. It is fast, highly cost-effective, and can easily last another 15 to 20 years if done correctly.
Minor dents from small hail that haven’t cracked the paint or protective zinc coating are purely cosmetic and don’t require repair at all. If you want to learn more about the early stages of putting together a roof, check out tin roof installation 101: from underlayment to the final screw.
When Full Panel Replacement is Required
You should stop patching and opt for full panel replacement or professional restoration if you experience any of the following:
- Widespread Rust: If rust has eaten through multiple areas of the panels, the metal is structurally compromised. Patching one spot will only buy you a few months before another hole opens nearby.
- Severe Storm Damage: Heavy winds that have buckled panels or large hail that has caused dozens of punctures across the roof surface require professional replacement.
- Widespread Fastener Failure: If more than 20-30% of your roof’s screws have backed out or stripped the wooden decking underneath, the panels are no longer securely anchored to your home.
- Structural Sagging: If the underlying roof decking or rafters have rotted from long-term, hidden leaks, the entire section must be torn up to replace the wood before new metal can be installed.
When you need professional help, it is vital to choose a local contractor you can trust. At Martin & Sons, we serve communities across the Greater St. Louis area—including Chesterfield, Creve Coeur, Maryland Heights, O’Fallon, St. Charles, St. Peters, and Florissant. We stand out by offering no upfront deposits—you only pay when the job is 100% complete and you are completely satisfied. Plus, we back our work with lifetime labor warranties.
Frequently Asked Questions about Metal Roof Maintenance
What is the best sealant for metal roof repairs?
The best sealants for metal roofs are high-solids polyurethane or polyether-based sealants, as well as premium butyl rubber tape. These materials offer exceptional flexibility and high elongation percentages (often between 500% and 650%). This means they can stretch and compress as the metal panels expand and contract without losing their adhesion.
Avoid standard silicone caulk from the local hardware store. While silicone is great for bathrooms, standard formulas degrade quickly under harsh UV rays and will lose their grip on smooth metal within 1 to 3 years. Also, never use black asphalt tar or roof cement on a metal roof; the acids in asphalt will chemically react with the modern PVDF or Kynar paint coatings, causing them to fail and peel.
How long does a professional metal roof patch last?
A professionally installed metal patch that is properly prepped, secured with matching metal, and sealed with high-quality polyurethane can easily last 10 to 20 years. The ultimate lifespan depends heavily on the quality of the surface preparation (removing all rust and oil is critical) and your local weather exposure.
Can you repair a leaking metal roof from the inside?
No, you cannot make a permanent, watertight repair from inside your attic. Water enters from the outside of the panels and travels downward. Applying sealant to the underside of the panels inside your attic might temporarily redirect the water, but it will trap moisture against the metal and wood decking. This trapped moisture will rapidly accelerate rust, rot the wood rafters, and lead to mold growth. All permanent metal roof repairs must be performed on the exterior roof surface.
Conclusion
A metal roof is one of the best investments you can make for your home, offering unmatched durability and a lifespan that can easily exceed half a century. However, keeping it in peak condition requires vigilance. By checking your roof annually, replacing worn fasteners, treating rust early, and sealing joints, you can prevent minor issues from turning into major headaches.
If you are dealing with tricky leaks, widespread storm damage, or if you simply don’t feel comfortable climbing onto a high, steep roof, don’t take unnecessary risks.
Our team at Martin & Sons is here to help. We believe in doing business the right way: we demand no upfront deposits, we only ask for payment when you are 100% satisfied with our completed work, and we provide lifetime labor warranties to give you total peace of mind. Whether you are in Florissant, St. Peters, St. Charles, or anywhere else in the St. Louis metro area, we are ready to serve you.
Schedule a professional metal roof inspection and maintenance service with us today, and let our family protect yours!