
What You Need to Know Before Starting a Tin Roof Installation
Tin roof installation is one of the most rewarding home improvement projects you can tackle — but it’s also one of the most technical. Here’s a quick overview of what the process involves:
How to install a tin roof (overview):
- Inspect and prep the roof deck — repair any rot or damage before anything goes on top
- Install underlayment — synthetic underlayment is the current best practice
- Install drip edge and closure strips — keeps water and pests out at the edges
- Lay the metal panels — start from one eave, work toward the ridge, overlap correctly
- Fasten panels properly — screws go into the panel flats, not valleys, with rubber washers
- Flash all penetrations and valleys — chimneys, vents, and low points need extra sealing
- Install the ridge cap — seal the peak with closure strips and butyl tape
Modern “tin” roofs aren’t actually tin. They’re steel or aluminum panels with protective coatings — and they can last 40 to 70 years with proper installation. That’s two to three times longer than asphalt shingles.
Metal roofing also reflects heat, which can cut cooling costs by 7–15% annually in warm climates. For St. Louis homeowners dealing with hot summers and severe storm seasons, that’s a meaningful advantage.
That said, the installation process has real complexity. Mistakes with fasteners, sealants, or thermal expansion are responsible for the majority of metal roof leaks and premature failures. This guide walks you through every step — clearly and completely.
I’m John Martin of Martin & Sons, a family roofing business with over 35 years of hands-on experience in tin roof installation and metal roofing systems across the St. Louis area. In that time, I’ve seen what separates a roof that lasts a lifetime from one that fails in five years. Let’s make sure yours is built right.
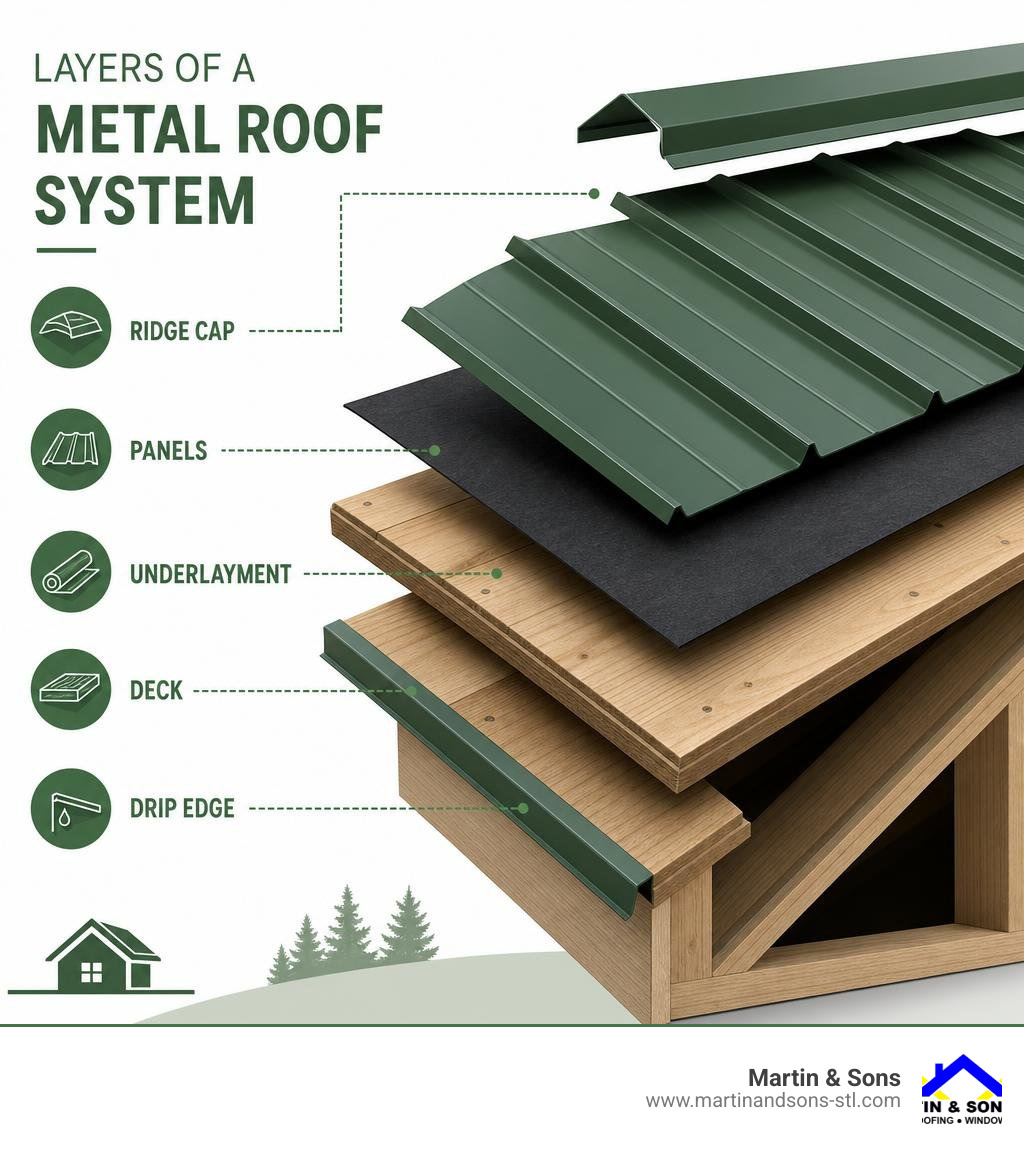
Tin roof installation terms you need:
Understanding Metal Roofing Materials: Tin, Steel, and Beyond
Before you climb up a ladder with a handful of screws, you need to understand the material you are putting on your home. Historically, a “tin roof” was actually made of iron or steel plated with tin to prevent rusting. While the nostalgic term has stuck around, modern residential metal roofing has evolved into a sophisticated collection of highly engineered alloys and high-performance coatings.
When planning your project, you will primarily choose from galvanized steel, Galvalume, aluminum, copper, and zinc. Each material brings its own set of structural benefits and aesthetic profiles to the table:
- Galvanized Steel: This is carbon steel coated with a protective layer of zinc. It is incredibly strong, highly impact-resistant, and relatively economical. However, in incredibly humid environments, the zinc layer can slowly sacrifice itself over time, eventually exposing the raw steel to rust if not maintained.
- Galvalume: This material features a steel core coated with an alloy of aluminum and zinc (typically 55% aluminum and 45% zinc). Galvalume offers superior corrosion resistance compared to standard galvanized steel, making it an exceptional choice for the variable weather we experience across St. Louis, Florissant, and O’Fallon.
- Aluminum: If you live near a body of water or in an area with high moisture, aluminum is a stellar candidate. It is naturally rust-proof because it doesn’t contain iron. The trade-off is that aluminum is softer than steel, meaning it can dent more easily during severe hail storms.
- Copper: The undisputed king of longevity. Copper can last up to 200 years, slowly developing a beautiful green patina. It requires no painting and is naturally corrosion-resistant, but its premium upfront cost makes it a rare choice for entire residential roofs.
- Zinc: Similar to copper, zinc is a self-healing metal that forms a protective patina over time. It can easily last 80 to 100 years. It is highly moldable and naturally weather-resistant, though it requires specialized professional installation to handle thermal expansion correctly.
Selecting the right panels and matching trim is crucial for long-term performance. If you are sourcing materials locally, visiting a regional distributor like Metal Central St. Peters, MO can help you physically compare different panel profiles and paint finishes. Additionally, if you already have a metal roof that has lost its luster but is structurally sound, you might not need a full replacement. Reading up on The Benefits of Restoring Your Metal Roof in Florissant MO can show you how professional restoration coatings can extend your roof’s life by decades at a fraction of the cost.
Comparing Durability, Cost, and Climate Suitability
Choosing the right metal depends heavily on your budget, aesthetic goals, and regional climate. For example, our hot, humid Missouri summers and freezing winters demand a material that can handle extreme thermal expansion and contraction without warping or pulling its fasteners loose.
To help you visualize how these materials stack up against one another in terms of durability, cost, and climate performance, we have put together this comparison table:
| Material Type | Average Lifespan | Relative Material Cost | Best-Use Climates & Conditions |
|---|---|---|---|
| Galvanized Steel | 30 to 50 Years | Budget-Friendly to Mid-Range | Continental climates, high-wind zones, areas prone to heavy snow loads |
| Galvalume | 40 to 60 Years | Moderate | Humid climates, areas with variable seasonal weather (like St. Louis) |
| Aluminum | 30 to 50 Years | Mid-Range to Premium | High-moisture areas, coastal environments; less ideal for severe hail zones |
| Zinc | 80 to 100 Years | High Premium | Temperate zones, modern architectural designs, low-maintenance properties |
| Copper | Up to 200 Years | Ultra-Premium | Historic restorations, luxury accents, virtually any climate |
Planning Your Tin Roof Installation: Measurements and Materials
Proper planning is the secret weapon of any successful tin roof installation. A common rookie mistake is assuming you can simply buy metal panels and screw them down like wood siding. Metal behaves differently than other materials; it expands when heated by the summer sun and shrinks when the winter chill sets in.
First, let’s talk about roof pitch. The pitch of your roof determines which type of metal roofing panel you can safely use.
- Through-Fastened Corrugated Panels: These traditional exposed-fastener panels require a minimum slope of 3:12 (three inches of vertical rise for every twelve inches of horizontal run) to ensure proper water drainage.
- Standing Seam Panels: These premium panels, which feature interlocking ribs that hide the screws, can often be installed on shallower slopes down to 1:12 because they lack exposed penetrations where water could pool and seep in.
Understanding your roof’s geometry is also key to estimating your overall budget. To understand how roof shape, pitch, and material choices interact financially, take a look at our guide on Roof Installation Costs: Key Factors That Affect Pricing.
DIY vs. Professional Tin Roof Installation
Can you install a metal roof yourself? Yes, absolutely — especially if you are working on a straightforward, low-slope structure like a detached garage, shed, or simple ranch home. However, it is vital to weigh the pros and cons honestly before you start ripping off your old shingles.
The Pros of DIY Installation:
- Cost Savings: You can save roughly 30% to 50% on the total project cost by eliminating professional labor fees.
- Personal Satisfaction: There is nothing quite like pointing to a beautiful, gleaming metal roof and saying, “I built that.”
The Cons of DIY Installation:
- Safety Hazards: Roofing is inherently dangerous. In fact, roofing accidents account for over 30% of all construction-related injuries. Working with large, slippery metal sheets on an elevated slope requires extreme caution and proper fall-arrest gear.
- Complexity around Transitions: While laying straight panels is simple, flashing around chimneys, venting systems, valleys, and dormers is highly technical. A single misplaced screw or poorly bent flashing can trigger a slow, hidden leak that rots your decking over time.
- Warranty Voiding: Many premium metal manufacturers only honor their 30-to-40-year paint and structural warranties if the system is installed by a certified professional.
How to Measure Your Roof and Order Materials
To calculate how much metal you need to order, you must break your roof down into simple geometric shapes (usually rectangles and triangles).
- Calculate Square Footage: Measure the length and width of each roof plane from the ground or safely from a ladder. Multiply length by width to get the square footage of each section, then add them together.
- Determine Panel Length: Measure from the ridge (the peak) down to the eave (the edge). Your panels should run in continuous sheets from the eave to the ridge to avoid horizontal seams, which are notorious leak points. Add an extra 1 to 2 inches to this length to allow for a clean overhang at the eave.
- Account for the Waste Factor: Always add a 10% waste factor to your final calculations (or 15% for complex roofs with lots of valleys and hips) to account for cutting errors and overlapping ribs.
- Calculate Fasteners: For exposed-fastener corrugated roofs, you will typically need about 80 to 100 screws per “square” (a 100-square-foot area).
Essential Tools, Materials, and Safety Gear
You cannot install a high-quality metal roof with just a standard hammer and a hand saw. Having the correct specialty tools on hand prevents panel damage and speeds up the installation process significantly.

Here is your checklist of essential tools and materials:
- Aviation Snips (Left, Right, and Straight Cut): Essential for making precise, clean cuts in metal trim and flashing.
- Carbide-Tipped Metal Cutting Circular Saw Blade: If you must cut panels lengthwise, use a dedicated metal-cutting blade running at a low RPM. Never use an abrasive grinding wheel!
- Hand Seamer: Used to bend clean, professional edges on the ends of your panels and trim.
- Cordless Impact Driver and Drill: For driving self-tapping roofing screws quickly and straight.
- Chalk Line: To snap perfectly square reference lines across your deck.
- High-Temperature Synthetic Underlayment: Far superior to old-school felt paper.
- Butyl Flashing Tape: For sealing overlapping trim joints and metal-to-metal connections.
- Profile-Specific Foam Closure Strips: Inside closures for the eaves, outside closures for the ridge.
Safety Equipment and Site Preparation
Safety must be your absolute number one priority. Metal panels are incredibly slippery, especially if there is a light morning dew or a thin coat of manufacturing oil on them.
- Fall Protection: Always wear a properly anchored safety harness when working on roofs with a 4:12 pitch or steeper.
- Personal Protective Equipment (PPE): Wear cut-resistant gloves at all times when handling metal sheets. Freshly cut metal edges are razor-sharp. Additionally, wear safety glasses to protect your eyes from flying metal shavings.
- Ladder Safety: Secure your ladder to the structure at both the base and the roof contact point. Ensure it extends at least 3 feet above the roof edge.
- Deck Inspection: Before laying down your underlayment, strip away all old roofing materials and inspect the wood decking underneath. Replace any soft, rotting, or water-damaged OSB or plywood sheets. If you want to dive deeper into preparing your roof deck properly, read our comprehensive guide on Roofing Underlayment Replacement and Decking Essentials.
The Step-by-Step Tin Roof Installation Process
Now that your roof deck is clean, dry, and structurally sound, it’s time to begin the actual tin roof installation. Building a roof is all about layering. You must think like water: every layer must overlap the one below it so that gravity naturally sheds moisture down and off the house.
For a detailed visual guide on panel placement, you can also reference our step-by-step tutorial on How to Install Metal Roof Panels: An Easy and Affordable Guide or consult the industry-standard Tin Roof Installation Guide for additional technical diagrams.
Step-by-Step Guide to Tin Roof Installation
Step 1: Install the Underlayment
Roll out your high-temperature synthetic underlayment horizontally, starting at the eaves and working your way up to the ridge. Overlap each horizontal row by at least 4 inches, and overlap vertical end joints by 6 inches. Secure the underlayment using plastic cap nails.
Step 2: Install the Eave Drip Edge
Install your metal drip edge flashing along the eaves. Fasten it over the underlayment every 12 to 16 inches using galvanized roofing nails. If you need to splice two pieces of drip edge together, overlap them by at least 2 inches and apply a bead of polyurethane sealant between them.
Step 3: Lay Down Inside Foam Closure Strips
Apply a strip of butyl sealant tape along the top of the drip edge, then press your profile-specific inside foam closure strips into the tape. These foam strips match the wavy pattern of your corrugated panels, blocking wind-driven rain, insects, and small pests from nesting under your roof.
Step 4: Snap a Square Reference Line
Do not assume your roof is perfectly square — it rarely is! Use the 3-4-5 triangle method to snap a perfectly square chalk line from the eave to the ridge. This line will serve as your guide for aligning your very first panel. If the first panel is crooked, every subsequent panel will drift further out of alignment.
Step 5: Install the First Metal Panel
Place your first panel on the roof, aligned precisely with your chalk line. The panel should overhang the eave by 1 to 2 inches to ensure water drains cleanly into your gutters.
Step 6: Fasten the Panels Properly
Using your cordless impact driver and self-tapping metal roofing screws (which feature integrated EPDM rubber washers), begin securing the panel.
- Where to screw: For exposed-fastener corrugated panels, drive the screws into the flat “valleys” of the panel, directly adjacent to the ribs. This ensures a tight, secure hold against the wood deck.
- Fastener Spacing: Space your screws every 12 to 24 inches vertically along the ribs.
Step 7: Overlap and Continue
Lay the second panel down, overlapping the first by at least one full corrugation (or rib). Ensure the overlapping rib is facing away from the prevailing local winds to prevent water from being driven under the seam. Apply a thin bead of polyurethane sealant or butyl tape along the overlap seam before fastening.
Step 8: Install the Rake/Gable Trim
Once all your field panels are installed, cover the exposed edge of the roof along the gables using rake trim. Secure the trim with screws spaced every 12 inches.
Step 9: Install Outside Closure Strips and the Ridge Cap
At the peak of the roof, apply butyl tape and install your outside foam closure strips over the top of the metal panels. Place your ridge cap trim over the peak and secure it by driving longer 2-inch screws through the ridge cap, through the closure strips, and directly into the roof structure below. Overlap ridge cap sections by at least 6 inches.
Handling Penetrations, Valleys, and Transitions
Valleys and roof penetrations (like pipes and chimneys) are where 90% of roof leaks occur.
- Valleys: Install a continuous W-profile valley flashing before laying down your panels. Cut your metal panels at an angle to match the valley slope, leaving a clean 6-inch open channel down the center of the valley so leaves and debris can wash away easily.
- Pipe Boots: For round plumbing vents, use a flexible EPDM rubber pipe boot. Cut the boot to fit your pipe diameter, apply a generous ring of metal-roofing-approved polyurethane sealant to the underside of the boot’s flexible aluminum base, slide it down the pipe, and screw the base to the metal panels every 2 inches.
- Chimneys and Dormers: These require custom-fabricated metal step flashing and counter-flashing. If you have a wide chimney or a transition that faces upslope, you must install a roof cricket. A cricket is a small, pointed structure built behind the chimney to divert water around it. To learn how to build one correctly, check out our Best Practices for Installing a Roof Cricket: Essential Guide.
For a complete breakdown of handling these tricky areas, you can also read the step-by-step flashing guide at How to Install a Tin Roof.
Integrating Roof Ventilation Systems
A metal roof needs to breathe. Without proper attic ventilation, heat and moisture will get trapped in your attic, causing condensation to form on the underside of your roof deck. This can eventually lead to wood rot, mold growth, and ruined insulation.
A balanced ventilation system consists of:
- Intake Vents (Soffit Vents): Located under the eaves to draw cool, fresh air into the attic.
- Exhaust Vents (Ridge Vents): Located at the very peak of the roof to let hot, humid air escape naturally.
When installing a ridge cap on a metal roof, you can use a ventilated ridge cap system. This replaces the solid foam closure strips with a breathable, matrix-style mesh material that allows hot air to escape while blocking rain, snow, and bugs.
To design the perfect airflow system for your home, take a look at these helpful guides:
- The Ultimate Guide to Soffit Vents, Ridge Vents and Attic Breathing
- Roof Vent Installation Guide: Static vs Turbine vs Ridge
Common Mistakes to Avoid for a Watertight Roof
Even minor errors during tin roof installation can lead to major structural damage down the road. Keep these common pitfalls in mind to ensure your roof remains completely watertight:
- Using Abrasive Cutoff Wheels: Never cut metal panels with a high-speed angle grinder or abrasive blade. The extreme heat generated will burn away the protective zinc coating along the cut edge, leading to rapid rust. Additionally, hot metal sparks will fly across the panel, embedding iron particles in the paint finish and leaving unsightly rust spots all over your new roof. Use metal snips or a cold-cutting circular saw blade instead.
- Overdriving or Underdriving Screws: Driving screws correctly is a balancing act. If you overdrive the screw, you will crush and split the EPDM rubber washer, destroying its seal. If you underdrive it, the washer won’t compress enough to seal the hole, allowing water to seep in. Drive the screw until the rubber washer bulges slightly but remains flat.
- Fastening in the Bottom of Valleys: Never drive fasteners through the flat center of a valley flashing. Valleys carry the highest volume of water on your roof; putting screws there is an open invitation for leaks.
- Using the Wrong Sealant: Never use standard, cheap silicone caulk on a metal roof. Standard silicone does not adhere well to painted metal over time and will crack under extreme UV exposure. Always use a high-performance, 100% polyurethane sealant specifically formulated for metal roofing.
- Omitting Foam Closure Strips: Skipping the closure strips at your eaves and ridges allows wind-driven rain to blow straight up under your panels, soaking your underlayment and decking.
Frequently Asked Questions about Tin Roofs
If you are still on the fence about whether a metal roof is right for your home, here are answers to some of the most common questions we hear from homeowners in the St. Louis area.
(Note: While metal roofing is fantastic for sloped homes, if you happen to have a low-slope or flat addition on your house, you will want to look into different specialized materials. For those sections, refer to our guide on Everything You Need to Know About Fixing Flat Roofs.)
Can you install a tin roof over existing shingles?
In many cases, yes! Because steel and aluminum are incredibly lightweight (weighing only about 65 pounds per square compared to 150 to 200 pounds for asphalt shingles), you can safely install a metal roof directly over a single layer of existing shingles without overloading your home’s structural framing.
However, you must install a high-temperature synthetic underlayment or a grid of wood purlins (1×3 furring strips) over the old shingles first. This acts as a buffer, preventing the rough shingles from wearing away the protective coating on the underside of your new metal panels as they expand and contract. Always check your local building codes in St. Louis, St. Charles, or Florissant first, as some municipalities limit the number of total roofing layers allowed on a home.
How long does a properly installed tin roof last?
A professionally installed metal roof can easily last 40 to 70 years. To maximize this lifespan, we recommend a simple annual maintenance routine:
- Clear Debris: Clean leaves, twigs, and pine needles out of your valleys and gutters so moisture doesn’t get trapped against the metal.
- Inspect Fasteners: Check your exposed screws every few years. Over time, extreme thermal expansion can occasionally back a screw out slightly. Tighten any loose screws and replace any cracked rubber washers.
- Wash the Surface: Every few years, wash the panels down with mild soapy water to remove accumulated dirt, pollen, and mildew, keeping your roof’s protective finish looking bright and performing at its best.
Does a tin roof make a house hotter or noisier?
This is perhaps the most common myth we encounter!
- Heat: A metal roof actually makes your home cooler, not hotter. Unlike dark asphalt shingles that absorb and hold thermal energy, metal reflects solar radiation back into the atmosphere. This solar reflectance can lower your attic temperatures and reduce your summer cooling bills by up to 15%.
- Noise: A modern metal roof installed over solid wood decking with high-quality underlayment and standard attic insulation is no noisier during a rainstorm than a traditional asphalt shingle roof. The solid layers beneath the metal deaden the sound of rain completely.
Conclusion
A high-quality tin roof installation is a fantastic investment that adds lasting beauty, durability, and energy efficiency to your home. While a straightforward DIY install is possible for skilled homeowners working on simple structures, managing complex valleys, chimney flashings, and steep pitches on a main residential home is often a task best left to the professionals.
If you want the peace of mind that comes with a flawless, watertight installation, we are here to help. At Martin & Sons, we have been serving homeowners throughout the St. Louis area — including St. Peters, St. Charles, Florissant, Chesterfield, Creve Coeur, Maryland Heights, and O’Fallon — for over 35 years.
We do things differently than most roofing companies. We offer:
- No Upfront Deposits: You don’t pay a single dime until the job is 100% complete and you are entirely satisfied with our work.
- Lifetime Labor Warranties: We stand behind our craftsmanship for the lifetime of your roof.
- Best Prices Upfront: No high-pressure sales tactics or hidden fees — just honest, competitive pricing from day one.
Ready to upgrade your home with a roof built to last a lifetime? Schedule a Professional Roof Installation with Martin & Sons today for a free, no-obligation estimate!