
What You Need to Know About Built Up Roof Repair
If your flat or low-slope roof is leaking, blistering, or losing gravel, built up roof repair is likely what stands between you and serious water damage inside your building. Here’s a quick breakdown of the most common issues and fixes:
Common BUR problems and how they’re addressed:
| Problem | What It Looks Like | Typical Fix |
|---|---|---|
| Blisters | Bubbles raised under surface | Cut, dry, patch, reseal |
| Alligatoring | Deep cracking like reptile skin | Patch with new ply and asphalt |
| Gravel loss | Bare, dark spots on surface | Recoat and re-embed aggregate |
| Leaks at flashings | Water near edges or penetrations | Replace flashing and reseal |
| Ponding water | Standing water 48+ hours | Improve drainage, patch low spots |
| Membrane splits | Visible tears or separations | T-cut repair with fiberglass fabric |
Built-up roofing — also called tar and gravel roofing — has protected commercial and residential flat roofs for over 150 years. These systems use alternating layers of asphalt and reinforcing felt to create a tough, waterproof membrane. That multi-layer design is both a strength and a challenge: it provides excellent redundancy, but damage can hide beneath the surface where it’s hard to spot until it’s already causing problems inside.
I’m John Martin, and with over 35 years in the roofing industry at Martin & Sons, I’ve handled every type of built up roof repair you can imagine — from patching a handful of blisters to full membrane restoration on aging flat roofs across St. Louis. We’ll walk you through exactly how these systems fail and how to fix them right.
Quick look at built up roof repair:
Understanding Built-Up Roofing (BUR) Systems
To master built up roof repair, you first have to understand how these heavy-duty roofing systems are put together. Unlike single-ply membranes (such as TPO or EPDM) which rely on a single sheet of synthetic rubber or plastic, a built-up roof (BUR) is a custom-fabricated “roofing sandwich” built directly on top of your building.
The core philosophy of a BUR system is multi-layer redundancy. If a single sheet of single-ply membrane gets punctured by a fallen branch or a dropped tool, you have an immediate leak. With a 3-ply or 4-ply built-up roof, a puncture in the top layer is backed up by several more layers of waterproof bitumen and reinforcing felt. This incredible durability is why BUR systems have been in continual use on American commercial and residential buildings since the 1840s.
Traditionally, installing a BUR system involved heating solid blocks of asphalt (bitumen) in a giant kettle to temperatures between 400°F and 500°F, then mopping that liquid hot asphalt over layers of heavy-duty roofing felt. Today, while hot-mopped asphalt remains a gold standard for durability, we also utilize cold-applied adhesives. These synthetic, solvent-based asphalt adhesives don’t require heating kettles, making them much safer, odor-free, and highly convenient for occupied buildings in residential areas like Florissant, MO or Chesterfield, MO.
Anatomy of a BUR Membrane
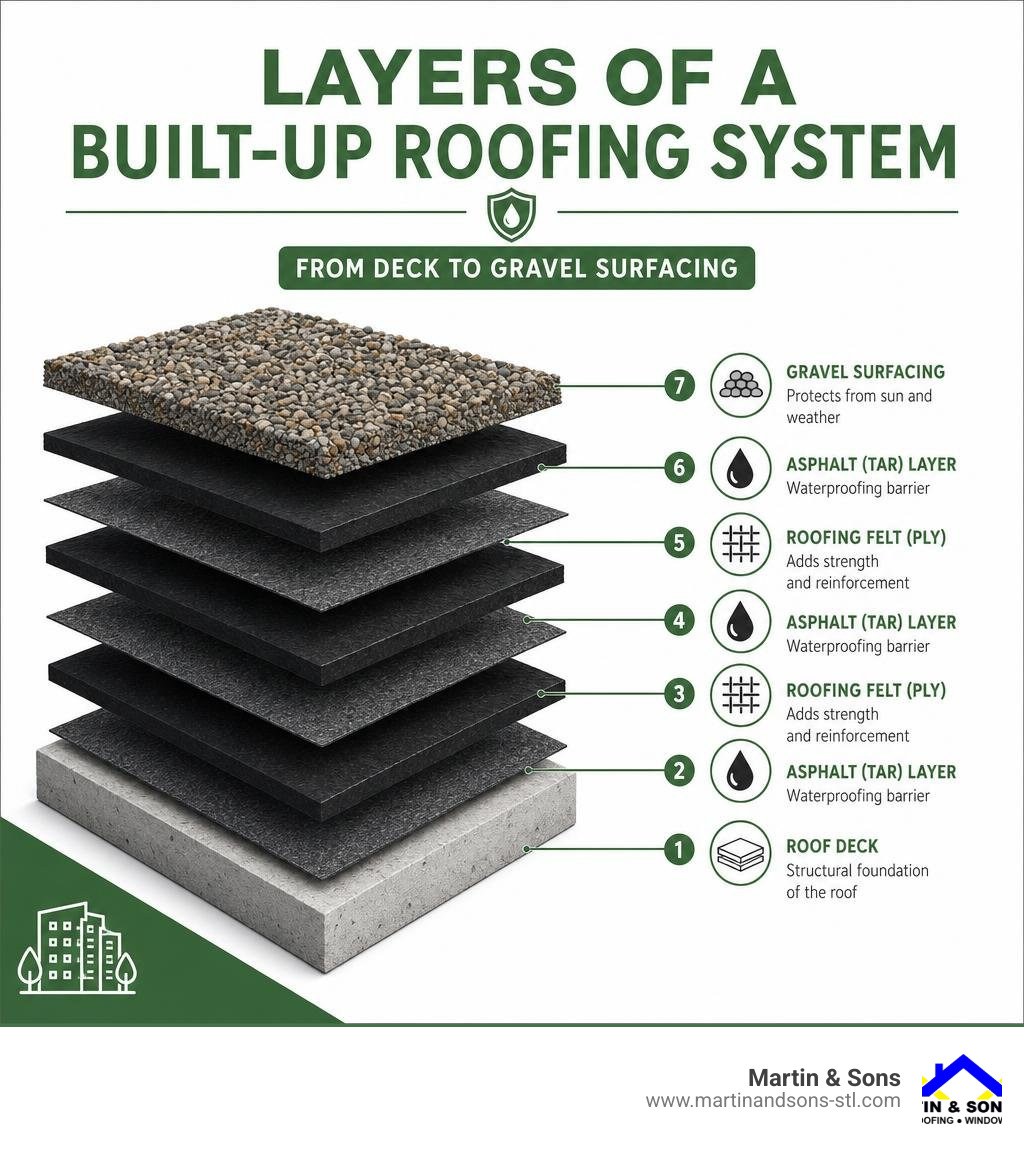
A standard built-up roof is composed of four primary components, each playing a vital role in keeping your building dry:
- The Base Sheet: This is the initial layer of heavy asphalt-saturated felt that is mechanically fastened or adhered directly to the roof deck or the rigid insulation boards. It provides a stable, flat foundation for the rest of the system.
- The Interply Sheets (Ply Felts): These are layers of reinforcing fiberglass felt or organic mats. In a typical 4-ply system, we lay down four overlapping sheets of felt, with each layer saturated and bonded to the next using hot bitumen or cold-process adhesive. This creates a dense, monolithic, waterproof membrane.
- The Flood Coat: Once the ply felts are in place, a thick final layer of liquid bitumen is poured or sprayed over the entire surface. This serves as the primary waterproofing shield.
- The Surfacing Layer: To protect the underlying bitumen from damaging ultraviolet (UV) rays, foot traffic, and thermal expansion, a protective surface is applied. This is typically either a thick layer of embedded gravel ballast, a mineral-surfaced cap sheet, or a liquid-applied reflective elastomeric coating.
For a deep dive into the construction and history of these systems, you can check out the comprehensive Built-Up Roofing (BUR) Guide (2026) | Commercial Roof Guide.
Smooth vs. Gravel BUR: Pros and Cons
When it comes to built up roof repair, the type of surfacing layer on your roof dictates the entire repair process. Built-up roofs generally fall into two categories: Smooth BUR (which uses a mineral cap sheet or reflective coating) and Gravel BUR (the classic “tar and gravel” roof).
| Feature | Smooth BUR (Cap Sheet / Coated) | Gravel BUR (Tar & Gravel) |
|---|---|---|
| Weight | Lightweight (approx. 150-200 lbs/sq) | Very heavy (300 to 650 lbs per 100 sq ft) |
| UV Protection | Dependent on reflective coatings or granules | Exceptional; thick gravel blocks all UV rays |
| Leak Detection | Relatively easy; cracks and splits are highly visible | Difficult; leaks hide under inches of rock |
| Foot Traffic Resistance | Moderate; susceptible to punctures | High; gravel acts as armor against traffic |
| Thermal Performance | Excellent if coated with white reflective elastomeric | Good, but gravel absorbs and holds heat |
| Maintenance Needs | Requires recoating every 5-10 years | Requires gravel redistribution and debris clearing |
Smooth BUR systems are popular because they are significantly lighter, making them ideal for buildings that cannot support the massive structural load of a gravel ballast. They are also much easier to inspect and patch. However, they require regular maintenance, such as reapplying a reflective coating every five to ten years to prevent the sun from drying out and cracking the asphalt.
Gravel BUR systems, on the other hand, are incredibly tough. The thick layer of river rock or slag protects the roof from wind uplift, hail, and heavy foot traffic. The major downside is weight, along with the fact that finding a leak under a bed of rocks can feel like searching for a needle in a haystack.
To learn more about how these different flat roof options perform in our unpredictable St. Louis weather, see our guide on Flat Roof Repair St Louis Mo Keeping Your Modern Home Water Tight.
Common BUR Failures: Smooth vs. Gravel Surfaces
Whether your roof is smooth or rock-surfaced, time and weather will eventually take their toll. In the St. Louis area, our roofs endure extreme temperature swings — from freezing, snowy winters in O’Fallon, MO to scorching, humid summers in Creve Coeur, MO. This constant expansion and contraction (known as thermal cycling) puts immense stress on flat roofing systems, eventually leading to structural failures.
Identifying Blisters, Cracks, and Alligatoring
As built-up roofs age, they exhibit specific symptoms that signal the need for immediate built up roof repair:
- Blisters: These look like raised bubbles or domes on the roof surface. Blisters occur when moisture or air gets trapped between the ply layers during installation or through a tiny pinhole leak. When the hot summer sun beats down on the roof, that trapped moisture expands into water vapor, ballooning the membrane upward. If walked on, these blisters can pop, creating an open gateway for water.
- Alligatoring: This is a classic sign of advanced UV damage on smooth BUR roofs. Over years of sun exposure, the volatile oils in the asphalt evaporate, causing the bitumen to harden and shrink. The surface begins to crack in a pattern that looks exactly like alligator skin. If left untreated, these shallow cracks will deepen, eventually splitting the reinforcing felts beneath and causing widespread rot.
- Membrane Splits: Unlike localized cracks, splits are long, deep tears that go completely through all plies of the membrane. They are usually caused by structural movement of the building or severe thermal shock when temperatures drop rapidly.
- Flashing Failures: The vast majority of roof leaks do not occur in the middle of the flat roof; they happen at the edges, parapet walls, and penetrations (like HVAC units, pipes, and chimneys). The metal flashing seals can pull away, rust, or crack, allowing water to slide right behind the waterproof membrane.
For precise, professional-grade guidelines on diagnosing these membrane failures, you can consult the 13.2.1 Built-up Roofs (BUR) Membranes – Canadian Roofing Contractors Association.
Locating Hidden Leaks Under Gravel Ballast
Locating a leak on a smooth-surfaced built-up roof is relatively straightforward: you look for the cracks, splits, or worn coatings. On a gravel BUR, however, it is a completely different story. Water can enter through a split in the membrane under the gravel, travel twenty feet sideways along a structural joist, and finally drip into your building.
To locate these hidden leaks without tearing up the entire roof, we use advanced diagnostic tools:
- Infrared Thermography (Thermal Imaging): This is the most effective method for flat roofs. Water has a high thermal mass, meaning it holds onto heat much longer than dry roofing materials. After the sun goes down, we scan the roof with an infrared camera. The wet insulation beneath the membrane will show up as glowing “hot spots” on our screen, showing us exactly where the water is trapped.
- Moisture Mapping: By taking core samples or using electronic moisture meters in a grid pattern, we can map out the exact boundaries of the water intrusion. This ensures we only repair the damaged sections rather than replacing dry, perfectly functional roof areas.
For a comprehensive breakdown of flat roof leak detection, take a look at Everything You Need To Know About Fixing Flat Roofs.
Step-by-Step Methods for Built Up Roof Repair
While major commercial repairs should always be handled by experienced professionals, understanding the repair process helps you make informed decisions. Here is how we perform durable, watertight repairs on both smooth and gravel built-up roofs.
Repairing Blisters and Splits
If a blister is small, intact, and not leaking, it is often best to leave it alone and monitor it. However, if a blister has cracked, is located in a high-traffic area, or is actively leaking, it must be cut out and patched.
Step 1: Preparation and Cleaning
We begin by sweeping away all loose gravel, dirt, and debris from the repair area. The surface must be completely clean and dry. If we are working on a gravel roof, we must carefully scrape away the embedded aggregate using a roof scraper or spade until we reach the bare, smooth membrane underneath. The prepared area must extend at least 18 inches beyond the perimeter of the damage.
Step 2: Slicing the Blister (The T-Cut)
Using a sharp utility knife, we make a clean, straight slice directly through the center of the blister. If the blister is large, we make a “T-cut” or an “X-cut.” This allows us to fold back the flaps of the membrane like a book.
Step 3: Drying the Interior
We inspect the inside of the blister. Any trapped water must be completely dried out using a rag or a heat gun. If the underlying wood deck or insulation is rotten or saturated, that section must be cut out and replaced before proceeding.
Step 4: Applying Mastic and Plies
We apply a generous layer of high-quality asphalt plastic cement (roofing mastic) inside the cavity and press the flaps back down firmly. Next, we apply a heavy coat of mastic over the entire top of the cut area. We then embed a layer of fiberglass mesh or roofing felt (the bottom ply) into the mastic, ensuring it extends at least 6 inches beyond the cut in all directions.
Step 5: The Second Ply
We apply another layer of mastic over the first patch, and embed a second, larger ply of fiberglass felt that extends at least 3 inches beyond the edge of the first patch. This step-down layering ensures a smooth, feathered edge that sheds water and won’t catch on foot traffic. Finally, we seal the entire patch with a top coat of mastic.
Addressing Gravel Loss and Bare Spots
On a gravel BUR, bare spots are highly dangerous. When wind or water washes away the gravel, the underlying asphalt flood coat is exposed directly to UV rays. Within a couple of years, this exposed asphalt will oxidize, dry out, and crack, leading to major leaks.
To repair bare spots:
- Clear the Area: Sweep away any loose, dirty rocks and dirt from the bare spot.
- Apply Adhesive: Apply a thick coat of cold-applied asphalt adhesive or hot bitumen over the bare asphalt.
- Re-embed Gravel: While the adhesive is still wet and sticky, shovel clean, dry gravel (matching the existing size) over the area. Press the gravel firmly into the adhesive so it is fully embedded. This restores the roof’s vital armor against the sun and physical impacts.
When to Choose Professional Built Up Roof Repair
While a handy building owner can patch a minor hole with a tub of roofing cement, major built up roof repair is not a DIY project.
First, there are massive safety concerns. Working with hot asphalt requires specialized kettles that heat material up to 500°F. A single spill can cause life-threatening third-degree burns. Even cold-applied adhesives contain powerful solvents that require professional-grade ventilation and safety gear.
Second, material compatibility is critical. If you use a modern, rubberized sealant that is incompatible with coal tar pitch or asphalt, the chemical reaction can literally melt your roof, turning a minor repair into a massive, sticky disaster.
If you are dealing with an active, stressful leak, read our Dont Panic Your Emergency Guide For A Fast Roof Leak Fix or contact us immediately for Emergency Roof Repair We Can Help You.
Frequently Asked Questions About Built-Up Roofs
How do I know if my roof needs repair or replacement?
This is the most common question we get from building owners in St. Louis. The answer comes down to three factors: the age of the roof, the extent of the moisture damage, and the overall structural integrity of the roof deck.
A well-maintained built-up roof typically has a lifespan of 20 to 35 years. If your roof is only 15 years old and has a localized leak around an HVAC unit, a simple, targeted built up roof repair is absolutely the way to go.
However, if your roof is 30 years old, has multiple active leaks, and an infrared scan reveals that more than 25% of the insulation beneath the membrane is saturated, a full replacement is much more cost-effective in the long run. Continually patching an expired roof is like throwing money into a leaky bucket.
For a detailed breakdown of how to make this decision, read our guide: Repair Vs Replace How Do I Know Which Route To Take For My Roof.
How often should a built-up roof be inspected?
We recommend scheduling a professional roof inspection at least twice a year — once in the spring and once in the fall — as well as after any major St. Louis storm.
Spring inspections are critical to check for any damage caused by winter freeze-thaw cycles and heavy snow loads. Fall inspections ensure your drains are clear of fallen leaves and debris before the winter weather sets in. Keeping your flat roof drains and scuppers clear is the single most important thing you can do to prevent ponding water, which rapidly deteriorates asphalt membranes.
To understand why regular checkups are so vital for your roof’s health, see How Often Should I Schedule A Roof Inspection Why Is It Important and Why Every St Louis Homeowner Needs A Roof Inspection.
Cost Factors in Built Up Roof Repair
The cost of repairing a built-up roof varies widely based on several key factors:
- Size and Accessibility: A wide-open, easily accessible flat roof on a single-story commercial building in St. Peters, MO will cost less to repair than a high-rise roof with difficult access in downtown St. Louis.
- Type of Surfacing: Repairing a gravel BUR is generally more labor-intensive (and therefore more expensive) than repairing a smooth BUR because of the extra labor required to scrape away, store, and re-embed the gravel ballast.
- Extent of Water Damage: If the water has penetrated the membrane and rotted the underlying wood deck or insulation, those structural materials must be replaced, which increases material and labor costs.
- Asbestos Risk: If your building was constructed before 1985, there is a chance the existing BUR system contains asbestos in the felts or adhesives. If so, specialized environmental testing and abatement are required by law before any tear-off or major repair work can begin.
To get a realistic idea of budgeting for your project, read our article on The Real Price Of Fixing Your Roof.
Conclusion
A built-up roofing system is one of the toughest, most reliable investments you can make for a low-slope or flat roof building. However, even the most durable “tar and gravel” roof requires routine maintenance and timely, professional repairs to reach its full 30+ year potential. Ignoring a small blister today can lead to thousands of dollars in structural rot, mold, and ruined inventory tomorrow. In commercial and flat roofing, prevention always beats the cure.
At Martin & Sons, we’ve built our reputation across the Greater St. Louis area — including St. Louis, St. Peters, St. Charles, Florissant, Chesterfield, Creve Coeur, Maryland Heights, and O’Fallon — by delivering honest, expert craftsmanship with unbeatable customer benefits.
When you choose us for your flat roofing needs, you get:
- No upfront deposits — you pay only when the job is 100% complete and you are completely satisfied.
- Lifetime labor warranties on our work.
- The best prices upfront without high-pressure sales tactics.
Whether you need a minor patch on a smooth cap sheet, advanced infrared leak detection under a gravel ballast, or a complete flat roof restoration, our family-owned team is here to help.
Don’t wait for the next big storm to test your flat roof. Schedule a professional inspection and maintenance plan with Martin & Sons today, or visit us at our main office at 8460 N. Lindbergh Blvd. Suite 11, Florissant, MO 63031. We’ll make sure your roof stays watertight for decades to come!