
A Quick Guide to UPVC Window Seal Replacement
A upvc window seal replacement is usually a simple repair when the rubber gasket around the window frame is cracked, flattened, loose, or letting in cold air. Replacing the correct push-fit seal can help stop draughts, water leaks, outside noise, and heat loss without replacing the whole window.
| Quick answer | What to know |
|---|---|
| Can you replace it yourself? | Yes, most perimeter rubber seals can be pulled out and replaced with a matching push-fit gasket. |
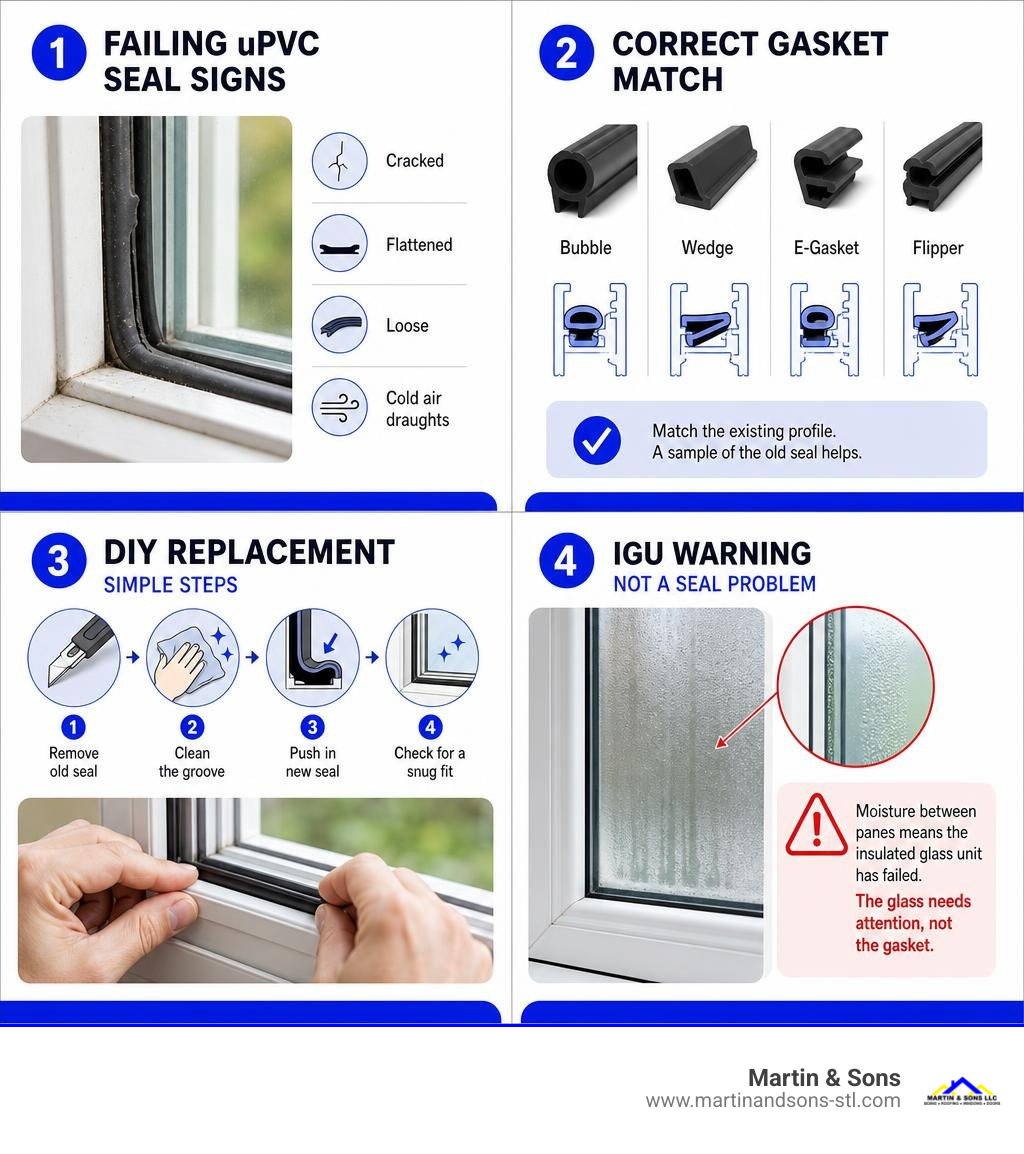
| What seal do you need? | Match the existing profile, such as a bubble, wedge, E-gasket, or flipper seal. A small sample of the old seal helps. |
| When is it not a gasket problem? | Moisture between double-glazed panes usually means the sealed glass unit has failed, not the outer rubber gasket. |
| Do you need a new window? | Usually no. If the frame, glass, locks, and hinges are sound, replacing the gasket is often enough. |
Window seals commonly last 10 to 20 years, though strong sun, freeze-thaw weather, dirt, repeated opening, and age can make them fail sooner. The key is to identify whether the issue is the perimeter weatherstrip or a failed insulated glass unit before buying materials or starting work.
I’m John Martin of Martin & Sons, a family-owned business founded in 1953 with more than 35 years of industry experience. We understand how a properly completed upvc window seal replacement fits into a practical plan for maintaining efficient, weather-ready windows.
Upvc window seal replacement terms to know:
Signs You Need a UPVC Window Seal Replacement

Knowing when to perform a upvc window seal replacement comes down to spot-checking a few obvious physical symptoms around your window sash and frame. Because weather seals act as the frontline barrier against air and water infiltration, even minor rubber degradation leads to noticeable indoor discomfort.
Here are the primary indicators that your uPVC window rubber weatherstripping has outlived its usefulness:
- Unwanted Draughts and Cold Spots: If you stand near a closed window and feel a distinct chill or moving breeze, the perimeter seal has likely flattened, lost elasticity, or pulled out of its channel.
- Increased Outside Noise: Rubber gaskets block sound waves as effectively as they block breeze. If street noise or passing traffic suddenly sounds much louder inside your living room, hardened or missing gasket sections are often the culprit.
- Water Stains and Mould Growth: Dampness pooling along the bottom interior sill, or small patches of black mould creeping up the corners, points directly to a compromised weather barrier allowing rainwater ingress during heavy downpours.
- Higher Energy Bills: When perimeter gaskets degrade, your HVAC heating and cooling system works overtime to keep room temperatures stable. Unexplained jumps in utility costs frequently trace back to failing window seal channels.
- Visible Cracks, Shrinkage, or Flattening: Over time, physical rubber degrades. Inspect the black or white rubber strip around the opening sash. If it feels brittle, looks cracked, or has pulled away from the frame corners leaving exposed gaps, replacement is overdue.
- Difficulty Closing or Latching the Sash: When seals age unevenly, they can bunch up or unclip from their track, interfering with smooth sash operation and preventing latches from drawing flush.
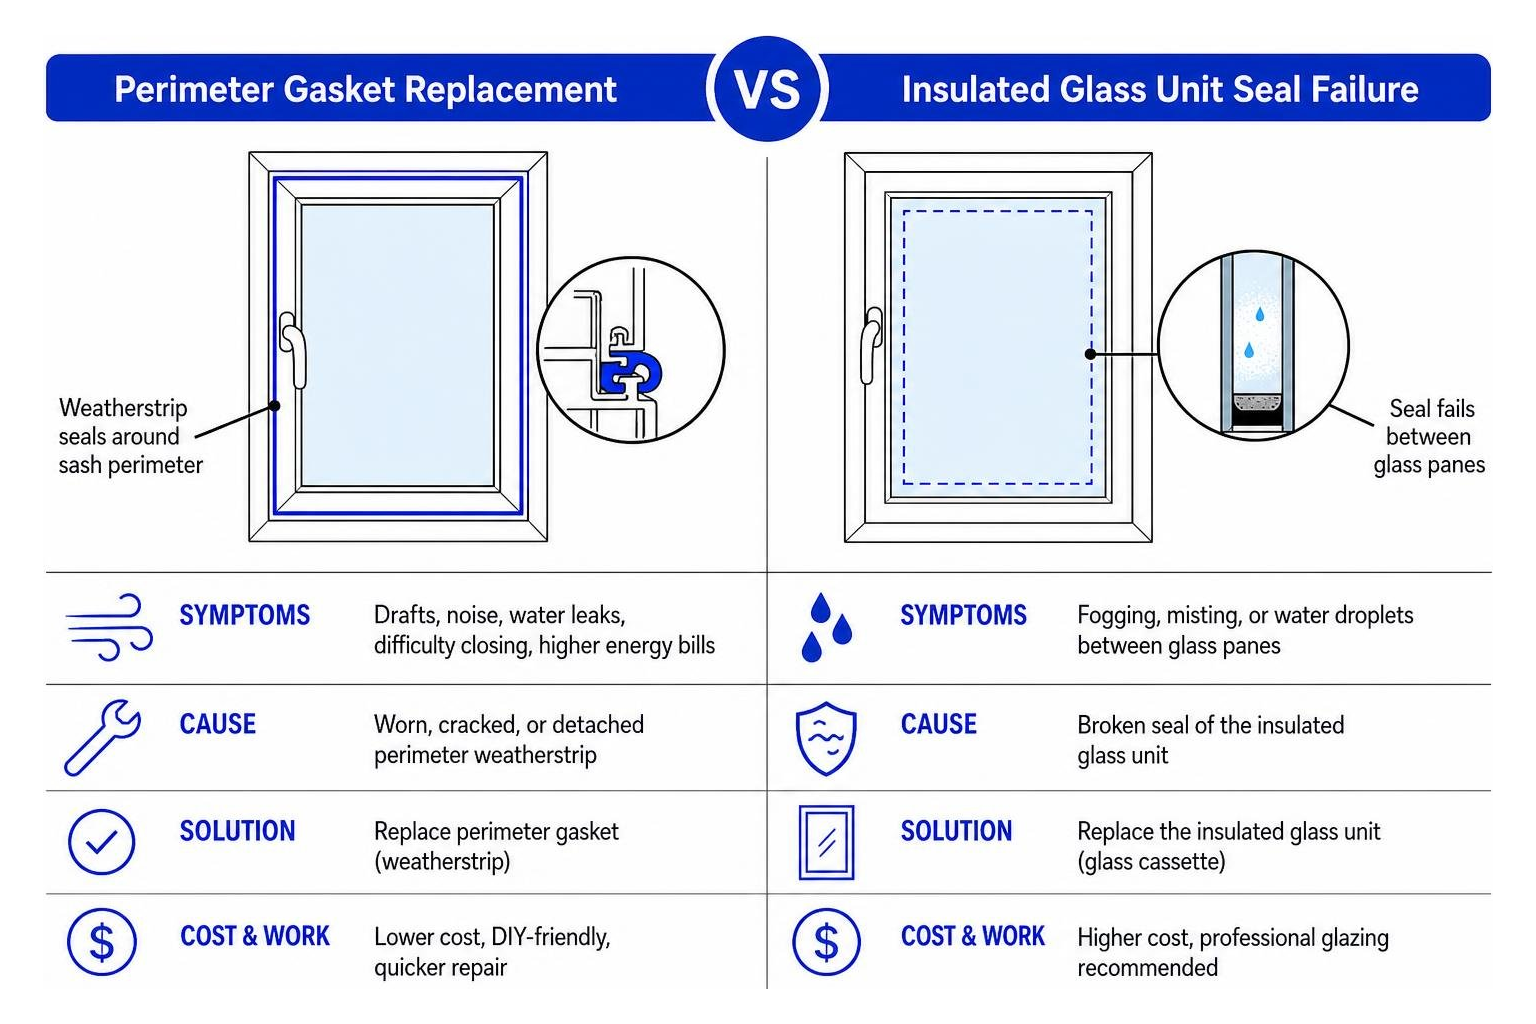
It is crucial to distinguish between a broken perimeter gasket and an internal Insulated Glass Unit (IGU) seal failure. A perimeter weatherstrip seals the movable sash against the fixed window frame. On the other hand, if you notice fogging, misting, or droplets sandwiched between the double-glazed glass panes themselves, the airtight seal of the glass cassette has failed.
When double-glazed unit seals fail, inert insulating gases escape, and ambient moisture penetrates between the glass. While replacing the peripheral rubber gasket stops drafts, fixing internal glass misting requires learning how to replace a double-glazed sealed unit or installing a replacement glass cassette. For complete diagnostic advice on handling air leaks around older frames, review our helpful guide to broken window seals.
Common Types of uPVC Window Seals and Materials
Finding the right gasket profile is the most important step in a successful upvc window seal replacement. Because uPVC window frames feature specific channel profiles (rebates), installing an incorrect rubber shape will either fail to seal properly or create too much bulk, preventing the window sash from closing and locking correctly.
Here is an overview of the standard uPVC window gasket shapes:
- Bubble Gasket: Features a hollow, rounded top loop attached to a T-shaped mounting foot. When the window sash closes, the bubble compresses flat to form a tight, springy weather seal. This is one of the most common profiles on opening sashes.
- Flipper Gasket: Combines a flexible rubber fin or “flipper” with a mounting foot. As the window closes, the fin folds slightly over the frame edge, creating a smooth barrier against wind and rain.
- Bubble-Flip (Hybrid) Seal: Features both a flexible fin and a hollow compression bulb. It offers double-layer protection and is popular in regions subject to intense wind-driven rain and extreme atmospheric pressure shifts.
- Wedge Gasket: Shaped like a wedge or chevron, this profile pushes directly into the gap between the glass pane and the uPVC frame. It holds glass units firmly in place without requiring adhesive.
- E-Gasket (Fir Tree Seal): Named after its “E” cross-section or multi-barbed fir-tree mounting stalk. The ribbed stalk clips securely into pre-formed frame channels to prevent the seal from popping out during sash movement.
- Brush Pile Seal: Consists of woven synthetic bristles mounted on a rigid polypropylene backing strip. These are primarily found in sliding uPVC sash windows where smooth low-friction gliding is required alongside draught proofing.
When selecting gasket materials, understanding material performance helps ensure long-term durability:
| Material Type | Primary Characteristics | Key Advantages | Typical Lifespan |
|---|---|---|---|
| EPDM (Ethylene Propylene Diene Monomer) | Synthetic rubber compound | Superior UV stability, high elasticity, excellent compression recovery in extreme cold | 10 to 20 years |
| TPR (Thermoplastic Rubber) | Polymer blend combining rubber and plastic traits | Outstanding flex fatigue resistance, high resistance to oils and chemical weathering | 7 to 10 years |
| Q-Lon / Polyurethane Foam | Clad foam construction | Exceptional acoustic dampening, low compression set, smooth operation | 10 to 15 years |
For homeowners evaluating general window performance, learning about material properties in our guide to vinyl windows highlights how frame expansion and contraction affect gasket longevity.
To identify your exact replacement seal profile, snip a small 1/2-inch sample of your old rubber gasket out of an easily accessible corner. Measure the width of the mounting foot (typically 4mm to 7mm) and the height of the seal head. If the manufacturer profile code is unknown, ordering an inexpensive gasket sample pack containing short lengths of popular profiles allows you to test-fit multiple options before purchasing full rolls.
Step-by-Step Guide to Replacing Your Window Seals
Performing a DIY upvc window seal replacement is a simple, cost-effective project that requires no specialized power tools. Most standard opening uPVC sashes require between 3 to 4 metres (approximately 10 to 13 feet) of continuous gasket material.
Tools and Materials Required for UPVC Window Seal Replacement
Before beginning, gather these basic tools and supplies:
- Replacement gasket coil (such as a Stormguard replacement seal or matching profile)
- Utility knife or sharp utility shears
- Heavy-duty household scissors
- Tape measure
- Small flathead screwdriver or glazing shovel (to help lift old seal ends)
- Mild dish soap, warm water, and a lint-free microfibre cleaning cloth
- Small gasket roller tool (optional, but speeds up insertion)
- High-grade neutral-cure silicone sealant (for sealing corner joins if required)
Step-by-Step Process for Gasket Installation
Follow this step-by-step process to achieve a professional draught-free finish:

- Remove the Old Seal: Open the window sash fully. Locate the joint end of the existing rubber gasket, usually found along the top or bottom frame edge. Pinch the rubber firm and gently pull it straight out of its frame groove. If the old rubber is brittle and tears away in pieces, use a small flathead screwdriver or utility blade to carefully hook the remaining feet out of the channel without scratching the uPVC frame.
- Clean the Frame Channel Thoroughly: Accumulated dirt, grit, and moss inside the seal groove will prevent new gaskets from seating correctly. Wash the entire channel with warm, soapy water and a cloth. Pay special attention to the four frame corners.
- Inspect and Clear Frame Obstructs: Check the internal corners of the uPVC profile. During factory manufacturing, welded frame joints often leave behind small beads of melted uPVC plastic inside the gasket track. Carefully chisel away these plastic nibs using a utility knife so the new seal can slide smoothly around corners.
- Begin Installation at Top-Center: Never start installing your new seal at a bottom corner where water collects. Begin pushing the new seal into the channel at the top-center edge of the window frame. This ensures that the only joint seam is located at the top, completely protected from running rainwater.
- Push-Fit the Gasket Around the Frame: Gently press the foot of the rubber gasket directly into the frame channel using your thumbs or a small roller tool. Crucial rule: Do not stretch the rubber seal as you push it in. Stretching causes tension, which will cause the rubber to shrink back over time, pulling away from corners and creating giant gaps. Gently push extra material forward into the channel as you work.
- Execute Corner V-Cuts for Clean Bends: When you reach a 90-degree frame corner, you can either wrap the seal continuously or make a small notch. To wrap continuously without bulging, turn the gasket over and cut a small V-shape wedge out of the mounting foot only (leaving the outer weather face intact). This allows the seal to make a crisp, flat 90-degree turn without pulling out of the groove.
- Trim Flush and Finish Joint: Work all the way back around to your starting point at top-center. Cut the gasket slightly long (leaving an extra 2mm to 3mm of length) and push the two ends firmly together so they compress snugly against one another. For ultimate weather protection, apply a microscopic dab of clear silicone sealant at the seam join.
- Test Window Latch Operation: Close the window sash and pull the handle shut. The latch should engage smoothly with a firm, snug feel. If the window is extremely difficult to force shut, the replacement seal profile may be slightly too thick.
Cost, Savings, and Benefits of Resealing Windows
Investing time in a upvc window seal replacement yields immediate home improvement benefits. Beyond eliminating cold drafts, fresh perimeter gaskets restore sound insulation, lower energy consumption, prevent water leaks, and block dust.
When air leaks around compressed gaskets are sealed, interior home temperatures remain stable at lower thermostat settings. Draught proofing windows can significantly reduce monthly utility expenses during both summer cooling and winter heating seasons.
Here is a financial comparison between DIY gasket replacement and hiring a professional installer:
| Service Option | Material Cost | Labour / Call-Out Cost | Total Estimated Cost (Per Window) |
|---|---|---|---|
| DIY Seal Replacement | £5 – £15 ($7 – $20) | £0 (Self-installed) | £5 – £15 ($7 – $20) |
| Professional Resealing | Included in service | £20 – £50 ($25 – $65) labour + £100 ($130) call-out | £50 – £180 ($65 – $230) |
While tackling perimeter rubber seals yourself is affordable, older frames suffering from warped sashes, rotted subframes, or widespread glass failure require a broader home inspection. For comparison on full-frame upgrades, consult our comprehensive window replacement cost guide.
DIY vs. Professional UPVC Window Seal Replacement Costs
Choosing whether to complete a DIY gasket swap or hire a specialist comes down to access, confidence, and scope.
For ground-floor, standard opening casement windows, DIY installation is simple, fast, and highly cost-effective. However, if your windows are located on upper levels requiring tall ladders, or if the frames are severely misaligned, hiring a qualified tradesperson ensures proper safety protocols and professional latch adjustment.
That professional tradespeople typically charge a minimum call-out fee to cover travel time, making it much more economical to have all window frames in your home serviced during a single visit rather than booking repairs piecemeal.
Frequently Asked Questions About UPVC Window Seals
How long do uPVC window seals typically last?
High-quality EPDM or TPR synthetic rubber window seals typically last between 10 and 20 years. However, high exposure to direct ultraviolet (UV) radiation, severe freeze-thaw cycles, industrial pollution, or lack of routine cleaning can reduce effective lifespan to 5 to 7 years. Inspecting perimeter weatherstripping every 5 years helps catch hardening, cracking, or shrinkage early before air leaks cause structural moisture damage.
Do I need to replace the entire window if the seal is broken?
No! You do not need to replace the whole window if only the rubber perimeter gasket has worn out. Replacing flexible push-fit rubber seals is an inexpensive routine maintenance task that restores window efficiency for a fraction of full replacement costs.
However, if your uPVC frame profiles are cracked, warped, visually sagging, or if glass panes mist up constantly due to internal double-glazing failure, it may be time to evaluate total replacement. Review our list of clear signs you need new window installation to determine if structural frame age warrants full unit upgrades.
What causes uPVC window rubber seals to deteriorate?
uPVC window seals fail primarily due to environmental aging and mechanical friction:
- UV Radiation: Constant exposure to sunlight breaks down rubber polymers, making synthetic gaskets brittle, faded, and prone to cracking.
- Freeze-Thaw Cycles: Temperature swings cause uPVC frames and rubber seals to expand and contract at different rates. Water trapped in frame grooves freezes in winter, stretching rubber and tearing it away from corner channels.
- Compression Set: Remaining squeezed shut under continuous sash latch pressure for decades eventually flattens round bubble seals, preventing them from bouncing back to springy shapes.
- Dirt and Chemical Degradation: Gritty dirt inside frame tracks acts like sandpaper against rubber when sashes move, while harsh chemical solvent glass cleaners strip rubber oils and accelerate hardening.
Conclusion
Completing a upvc window seal replacement is one of the most effective, accessible, and budget-friendly home maintenance tasks available to homeowners. By accurately identifying your gasket profile—whether a bubble, wedge, flipper, or E-gasket—and following smooth, tool-free installation practices, you can stop draughts, eliminate rain leaks, lower heating costs, and enjoy quiet indoor comfort once again.
When inspecting your home exterior, overall envelope maintenance goes beyond windows. Protecting your roof, siding, and drainage channels is equally important. That at Martin & Sons, we only provide gutter services when performing a complete roofing project, as we are not a standalone gutter company. This integrated roof-and-gutter approach guarantees your home maintains proper drainage alongside airtight wall and window protection.
If you suspect your home’s draft issues stem from aging frame structures rather than simple rubber gaskets, our team at Martin & Sons is ready to help. Serving St. Louis, St. Peters, St. Charles, Florissant, Creve Coeur, Maryland Heights, and O’Fallon, we offer straightforward expertise backed by lifetime labor warranties and our signature promise: no upfront deposits, with payment due only upon 100% completion and satisfaction. Contact us today or explore complete window services to keep your home warm, dry, and energy-efficient for decades to come!